Shooting stars. How to photograph the starry sky, the secrets of photographing stars
For photography stars we're going to dig a lot deeper. We will learn how to use manual camera control, which aperture, shutter speed, ISO, etc. to choose. By the way, for this purpose, be sure to choose mode night shooting. This will give more options when editing the final image. If you still have doubts, let's take a closer look.
Let's start with what we need:
Tripod- We're going to be dealing with exposures of tens of seconds, so this item is more than useful. We need to stabilize the camera.
Camera with manual settings- we will manually set the ISO value and shutter speed, which is of great importance for photographing stars.
Lens with wide diaphragm- we need a lot of light and f / 2.8 aperture will do. It seems to be a fuzzy zone for astrophotography. Combined with an ultra-wide-angle lens, depth of field won't be an issue.
With this set, you can already start. But of course there are still a lot of things that we have to discuss.
Location!
So, it’s not enough just to collect all the equipment, you need to find the right place to successfully photograph the night sky. A serious problem for astrophotography light pollution occurs. If you live within the boundaries of a major city, you will have to drive at least an hour to get away from the light.
As we can see in the image below, even a city of around 30,000 people a few dozen kilometers away can still result in some interfering light pollution.

Let's not forget that we are going to photograph the sky, so for good choice locations on earth, we also focus on the position of stars and constellations in the sky. This has a great effect on the visual perception of the photo. You can use an app called Starwalk from your iPhone to track the celestial bodies. For example, a photograph of the Milky Way can give an amazing visual effect.
basic settings
When photographing these tiny points of light, we need as much light as possible. Therefore, it is important to use a combination high ISO, wide apertures and long excerpts.
For the kayaking under the stars I used ISO 1250 at f/2.8 and a shutter speed of 30 seconds. As you can see, there is some light pollution on the lower right side of the photo from the city, which is about 30 minutes away.
To flatten to minimum light pollution, necessary to figure out, where it comes out. To do this, it is best to take several consecutive shots across the horizon, using the highest ISO setting. We simply reduce the time spent on each frame. We won't use these shots in the final step, but they play an important role in letting us know which parts of the horizon we have off limits.
Concerning time excerpts, then it is better to withstand as little as possible. As much as possible. Otherwise, given the rotation of the planet, the position of the stars will change. For example, if you look closely at a photograph taken with a 30 second exposure, you can see some movement in the stars.
Below we see a somewhat exaggerated photograph of stellar trails.

Photo processing
Processing images of the night sky can be a bit intimidating. Don't expect amazing results from the first try. As we have already noted, use the RAW format in the camera, if it is provided for it, when you are going to shoot the starry sky.

The image above is specially presented in two versions to clearly show the difference before and after processing. LR4 instrument settings used. The experiment continues until you are satisfied with the result.
Take your ff shot taken with a specific lens. From it, it is quite easy to take a picture from a crop in Photoshop by simply cutting out the central part with a coefficient. 1.5, which will correspond to the image on the cropped matrix. Compare both shots at 100% scale. The length of the tracks will be exactly the same. Because it's the same star, the same pixel size and the same focal length. But EFR will be different.
So no one argues. But I'm not talking about looking at 100% crops, but I'm talking about the actual use of real lenses by people. Take two shots taken with the same lens but with 2 different sensors (FF and 1.5 crop), print 20x30 and look at them. A shot that was taken on a cropped carcass will have a 1.5 times smaller viewing angle and 1.5 times more noticeable star tracks. Other things being equal, of course. That is why, when taking a picture on a cropped camera with the same focal length, it is necessary shorten shutter speed by 1.5 times. And that's what I'm talking about in my post. Once again, I'm talking about that, other things being equal, and with an increase in the crop factor, shutter speed should be increased.
In addition, you do not take into account the factor that, as you rightly noted, along with the crop factor, the resolution of the matrix does not decrease. For example, all modern cropped Nikons are produced with 24MP matrices (d5300-5300, d7100, and so on). And what of this?
We have:
2 cameras, crop 1.5 and 1
1 lens, 15mm
Let's take two shots:
iso 800, 30 seconds.
We open 100% increase in both frames, each one is 24mp.
What will we see?
And we will see that the tracks are more noticeable on the crop.
I'm not a sheep to cut something out of my 24MP frames and turn them into 10.5MP, almost no one does this in reality. Everyone squeezes out of their matrices what they are capable of. And your hypothetical example about the cut out fragment is all right, only it has nothing to do with reality. So you will get to the point where you don’t need to buy, say, 135mm at all, but you can shoot everything at 10mm, then crop it, and there will be no difference. Because once at 10 mm the tracks are almost invisible at 30 seconds, then at 135 they will not be visible. And I don't care that if you cut a piece corresponding to 135mm from a 10mm frame, you get as much as some 0.3 mp. Print them on the wall 100x60 and enjoy.
- The basis for the fact that you get longer tracks on crop with the same parameters as on ff is step 2. Manufacturers, as a rule, try to keep the same resolution in cropped cameras as on ff.
Yes, what are you saying? Is it true? Did you just prove yourself wrong? Or it seemed to me, and you just advise people who use cropped cameras to reduce the size of the finished image to avoid blurring? Or maybe print them in a smaller size?
Wouldn't it be better to follow my advice, shorten the shutter speed and get shorter tracks?
And in order to fit the same number of pixels into a smaller matrix, their size has to be reduced. A smaller pixel is more blur.
So who's arguing? I told him about Foma, he told me about Yeryoma! More lubrication - well, we shorten the shutter speed and shoot, what's the problem?
Probably, the problem is that I, as a person who makes a picture, and not measuring pixels, always focuses on appearance finished frame, and not for techno-fetishists who need some mythical numbers. Friend, my advice is for photographers. Those who receive a picture, ready-made, solid, 3x2 format, which will be printed on paper, and will not be looked at in special laboratories under a magnifying glass. And in my case, these tips are much more appropriate than the theory of a small pixel, which is relevant only when looking at a picture at 100% magnification.
In modern Russian-language magazines and books on photography, you can find thousands of articles on landscape, portrait, animalistic, reportage, genre and other types of photography.
It seems that everything has already been written about. It's hard to think of anything to add to all this. But if you take a closer look, we will see that all these countless volumes of advice and instructions for the most part relate to shooting only in the daytime and, in rare cases, in the evening.
Almost not a word is said about night photography, and after all, the dark time of the day occupies at least a third of the entire duration of the day. Some may object that nothing is visible at night, there is no light, and the art of photography is losing its power and relevance.
In this article, I will try to refute this stereotype and show that night photography can be no less interesting and productive than other genres of photography.
The first and main problem that a photographer faces when shooting at night is an insufficient amount of light. And if in painting the artist draws with paints, then in photography the basis for everything is light.
And, unlike conventional shooting, at night the photographer has to collect the light bit by bit, cherishing each photon like a treasure. In all this there is something mysterious, in some way even mystical.
It is important that in such conditions you very quickly learn to appreciate and feel the light, after which the work in daylight seems to be not so difficult and sometimes even not so interesting and exciting.
Choice of photographic equipment
Before proceeding directly to questions related to photography, let's decide what kind of equipment we should take with us to night photography.
Camera
Since at night you have to work almost on the verge of the capabilities of modern digital cameras, it is desirable to use the most modern technology, which will allow you to get photos of the highest possible quality.
When choosing a camera, you should give preference to full-length top models of the leading manufacturers of the photo market ( Canon EOS 1Ds Mark III, Canon EOS 5D Mark II, Nikon D3x/s, Nikon D700, etc.), which produce relatively quiet images at high ISO speeds and/or long exposures (shutter speeds).
Of course, this does not mean that other cameras are unsuitable for night photography. Not at all. It's just that more advanced and modern models give more opportunities for flexible and high-quality shooting, besides, they are well protected from a variety of adverse weather conditions with which night photography is often associated.
 Canon EOS 1Ds Mark III, Canon EOS 5D Mark II, Nikon D3x, Nikon D700
 Lenses
All of the above about the choice of camera can be attributed to lenses. It is advisable to use top lens models that can provide maximum resolution at open apertures.
The faster the lens you choose, the easier it will be for the camera to focus and the easier it will be for you to compose the desired frame, since the brightness of the picture that you see in the viewfinder of your camera directly depends on the aperture of the lens used. But a fast lens is also not a panacea.
Many budget models of relatively fast lenses at the edges of the frame are very soapy. This is another reason why you should give preference to more expensive models that allow you to get a sharp picture even at almost fully open apertures.
In addition, it is important to note that most often and best stories with starry sky, circular star tracks and the Milky Way are obtained using wide-angle lenses.
An excellent means of expressing yourself in astrophotography is also ultra-wide-angle optics with a field of view close to 180 degrees. These are the so-called fish-eye (fisheye) lenses, which in astronomy are usually called all-sky lenses (all-sky lenses).
With such a field of view, almost the entire starry sky can be captured in the frame without any problems. Just remember that such lenses have strong distortion (geometric distortion), so always keep an eye on the horizon line and vertical lines at the edges of the frame.
As for my personal experience, then I rarely use zoom lenses and lenses with a focal length of more than 50 mm, since with increasing focal length the density, and, accordingly, the number visible stars decreases in the frame, and star trails at long exposures are increasingly approaching boring straight lines.
Specifically, for the Canon system, I would recommend the following lens models: Canon EF 14mm f/2.8 L USM, Canon EF 15mm f/2.8 Fisheye, Canon EF 24mm f/1.4 L II USM, Canon EF 35mm f/1.4 L, Canon EF 50mm f/1.2L USM. Although, one must understand that absolutely any optics can be used. The main thing is to have a good imagination, stubbornness and a true desire to achieve the expected result.
 Canon EF 14mm f/2.8 L USM, Canon EF 15mm f/2.8 Fisheye, Canon EF 24mm f/1.4L II USM, Canon EF 50mm f/1.2 L USM
 Tripod
A tripod, it is also a tripod in Africa, so there are no special requirements for it. It just needs to be stable and support the weight of your photography equipment.
The use of tripods is only encouraged. composite materials, which, in addition, very well dampen the vibrations that come from the ground and are relatively light in weight, which is very critical during long journeys, especially in mountainous regions.
It will not be superfluous to have a hook on the central stem, on which you can pick up a photo backpack or some other load to make the tripod more stable.
Remember that vibrations that can ruin your shot can be caused by passing cars, people walking, or wind. Therefore, try to choose a location for shooting in a quiet, calm place, away from roads and trails. Well, yourself, if you want to stretch or jump / squat to keep warm - better move aside, away from the tripod.
It’s good if your tripod head has a level at which you can align your camera horizontally, since at night it’s often impossible to determine the position of the horizon “by eye” the first time. If your tripod head does not have a level, then you can buy a level that is placed in the flash shoe. Such a device will come in handy in the future, especially when shooting panoramas 😉
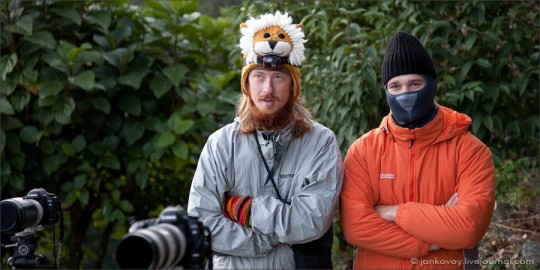
 PHOTO TRAVEL team after night shooting (Nepal, Himalayas, Everest region)
 Flash
Some photographers use off-camera flash(es) to illuminate the foreground. Sometimes this gives very interesting results. So you can experiment if you want.
I don’t practice this, because I really appreciate the natural night lighting, which seems to me more alive, plastic and in some ways even mystical.
Power elements
Photographing night scenes is always associated with long exposures, numerous takes and an insane number of shots when shooting in time lapse mode.
Often one night photo session, smoothly turning into sunrise photography, can reach 7-9 hours. Moreover, in the overwhelming majority of cases, in conditions that are by no means favorable for the camera (cold, snow, wind, etc.).
Therefore, I strongly advise you to stock up on a fair amount of fully charged batteries before going out on a night photo hunt. Sometimes it happens that during ultra-long exposure or time lapse shooting, at the most inopportune moment, the battery is discharged, and even its ultra-fast replacement will no longer save your shot.
To avoid such cases, you can resort to using a battery grip, which will at least double the operating time of your camera from one set of batteries.
Spare batteries should always be kept in a warm, dry place, somewhere in the bosom, closer to the body. For example, on mountain tracks, I always sleep in a sleeping bag along with all the batteries from 2 cameras, not to mention that I always carry them in the breast pocket of my down vest. As they say, I keep everything dear to my heart.
 Self-portrait against the backdrop of Machapuchre (6997 m), full moon (Nepal, Himalayas, Annapurna Base Camp)
 Programmable cable release (PST)
If not mandatory, then it is highly recommended for night shooting is the presence of such a specific photo accessory as a programmable cable release. It is very difficult to overestimate its importance in this genre of photography. So, let's see what it can be useful to us ...
- Allows you to take pictures without resorting to direct contact with the camera, which reduces the likelihood of movement in the frame (but this can also be avoided using such an in-camera function of the camera as a shutter timer or a simple cable / remote control);
- Allows you to shoot in bulb mode. You simply hold down the button on the cable at the start of the exposure and release it when you want to end the exposure. In this way, you can set an almost infinite shutter speed, which is limited only by the charge of your battery. The only downside of this method is that you have to constantly monitor the exposure time so as not to miss the moment when you need to close the shutter curtain. Of course, you can simply hold down the shutter button of your camera with your finger, but then you will surely be provided with movement in the frame;
- Allows you to set a programmable shutter speed, in which you set the desired frame exposure period in advance (up to 100 hours in 1 second increments);
- Allows you to make interval shooting with a specified number of shots in a series, with any interval from 1 second and with any exposure pair you programmed (both in full manual and semi-automatic modes). This is probably the most important function of this device, which allows you to take pictures of stellar tracks with absolutely any duration of exposures, while losing nothing in quality. In addition, using this PST function, you can shoot a series of time lapse shots, from which you can then mount a video with the rapid movement of the starry sky, the Milky Way, blooming flowers, mushroom growth, the movement of clouds, people, the construction of some objects, yes, anything at all;
- Allows you to set the shutter release timer from 1 second to 100 hours (in-camera capabilities are limited to 10-12 seconds). How it can be useful and how it can be used this function when shooting at night? Everything is very simple. For example, you want to take a picture of the Milky Way above the surrounding landscape, but you are very tired and do not have the desire to get up in the middle of the night to shoot this scene.
Then you put the camera on a tripod, tune in to the landscape you need, focus, set the necessary parameters for the exposure pair (again in manual or semi-automatic mode) and set the timer for the time at which, according to your preliminary calculations, the milky way will pass in the place you need , start the timer and go to bed. And in the morning you wake up, voila, and find that the camera has already caught a trace of a beautiful night shot on your card.
You can’t replace the last 3 PST functions with anything, except for a hired slave who will sit all night long with a stopwatch in his hands and work out hundreds of exposures with an interval of 1 second)) and will get up at midnight to take the picture you have planned 🙂
 Canon TC-80N3 and Nikon MC-36 programmable cable releases
 Useful little things
- Flashlight- helps to get to the intended shooting location in the dark; sometimes they can highlight a foreground object to help the camera focus on it;
- Compass- helps literally in a matter of seconds to determine the cardinal directions, find the poles of the world and, already leaving this, plan the future composition of the frame before dark;
- Mobile phone/PDA/iPad/laptop- useful as an entertaining device that will help while away long nights with a camera programmed for many hours of shooting (player, all kinds of games, electronic books, movies, etc.). In addition, you may need a calculator function to calculate the duration of exposures, number of frames, etc.;
- Illuminated clock- help not to get lost in time and calculate the shooting period;
- Food- be sure to bring some food with you, some nuts, dried fruits, seeds, perhaps chocolate bars, cookies. This will at least diversify your nights a little, help keep the body in an active state of wakefulness and warm up on cold nights, otherwise it becomes somehow even colder without food;
- The drinks Bring water/juice with you. It will also not be superfluous to take a thermos with hot tea / coffee. Hot drinks are especially helpful during winter shooting and shooting in the mountains, where it is simply unthinkable to sit out all night without them;
- Warm clothes- even in the lower reaches, in the warm season, the nights are always cooler than the day, so take some spare jacket or windbreaker with you. If you are going to shoot in the high mountains and / or in the cold season, then the choice of clothing should be taken more seriously. In such cases, you need not to take off, but to put on! More warm clothes. Do not forget about warm woolen socks and two pairs of gloves - one is thin, in which you can work with the camera, the other is thick, put on over thin ones. Fingers freeze instantly;
 I am with Slava Dusaleev in the morning after the night shooting.
 - Optics cleaning kit. It is clear that before shooting, all optics must be thoroughly cleaned and “rubbed” to a crystal shine. But besides this, abundant moisture (condensation, dew) may settle on the camera at night due to temperature differences. In this case, the front lens of the lens is first covered with barely noticeable droplets, and then completely loses its transparency. Well, if you manage to notice this phenomenon in time, wipe the camera and lens. As a rule, shutter speeds are so long that it is impossible to be sure that there is no condensation on the front lens until the end of the exposure, when it becomes possible to view it under the light of a flashlight. In this case, you can regularly check the presence of moisture on the camera and, if necessary, gently wipe the surface of the lens (or filter);
- Protective (insulated) all-weather case for the camera- used to protect the camera from all sorts of vagaries of nature, such as rain, snow, frost, condensation;
- Gradient filters- sometimes (especially on moonless nights) they help to even out the difference in brightness between the bright starry sky and the dark surrounding landscape;
- Atlas of the starry sky is a wonderful companion and guide in our visible universe. With the help of him, I discovered a new insanely interesting and fascinating world of astronomy;
- Schedule times and places of sunrises / sunsets of the Moon and Sun for the entire period of your trip
Shooting conditions
When shooting stars, the most important criterion is the transparency of the sky, which depends on several factors:
- Height above sea level- the higher you climb into the mountains, the thinner and more transparent the layer of the atmosphere above you will be and the clearer the starry sky will be;
- Shooting location relative to the earth's equator - the closer to the equator, the more transparent the sky;
- The presence of haze in the air- it is best to shoot immediately after heavy rainfall, when all the dust and haze that had previously hovered in the air settle for a while;
- Availability of air light sources- choose places away from settlements, roads and any other places where light sources may appear. Otherwise, instead of the stars, you will photograph the air illuminated by the city. Moreover, you should not assume that if there are no light sources in the frame, then you are saved. The light of air from the same city is visible for tens of kilometers, from places where, it would seem, there is no longer any hint of cars and street lamps;
- The presence of clouds- even thin, barely visible clouds in the picture turn into large opaque monsters that cover the stars. Therefore, try to choose clear nights for filming;
- Another factor the presence/absence and intensity of the moon's light strongly affect the visibility of stars, depending on its position in the 29.5 day cycle of waxing and waning. The moon is a powerful light source that illuminates the air (even when it is not in the frame!). Therefore, if you want to capture the beauty of the starry sky, it is advisable to shoot on a new moon or when the moon is not in the sky at all. But do not be afraid and avoid the Moon, it is also a very picturesque subject in itself, but this will be written a little later.
Focusing
In order to “win” more light when shooting at night, relatively open apertures are most often used, at which the depth of field (depth of field) drops sharply.
Therefore, it is best to choose scenes in which all shots are at a sufficiently remote distance from the camera and correspond to infinity on the focus scale of your lens.
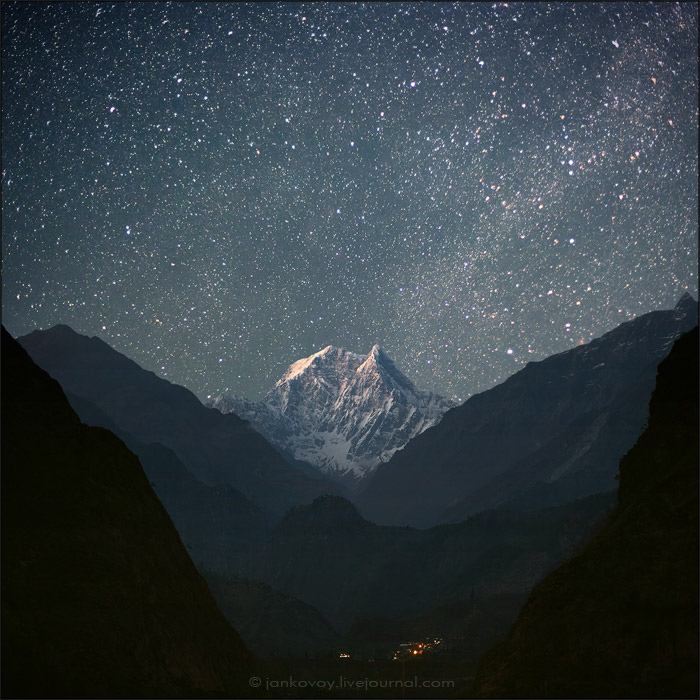 Nepal, Annapurna National Park, view of the Kali Gandaki river valley with the South Nilgiri (6839 m) in the background, 2011 | 20 sec, f/1.6, ISO 2000, FR 50mm, Moonrise (Canon EOS 5D Mark II + Canon EF 50mm f/1.2 L USM)
 To autofocus "on the stars" can help a bright object that can be seen in the distance.
It could be the moon, a light in the window of some distant house, bright Star, snowy peaks illuminated by moonlight, a street lamp, etc.. As a last resort, you can ask a friend to run back a few tens of meters with the phone on and focus on it.
If you need to focus on the foreground, then in this case a flash or flashlight can help you out. But, unfortunately, not all lenses are perfectly aligned and at open apertures in autofocus mode they can give a perfectly sharp picture. Therefore, I strongly advise you to immediately get used to manual focusing.
It is desirable to have a focus scale on the lens and focus manually on it. But since it is very difficult to hit the target "by eye" at night, it is better to take a few test shots until you achieve the perfect result. Also, manual focusing on the screen in LiveView mode turned out to be very effective and accurate, where the desired area of the image can be enlarged 10 times! So I recommend
Composition
It is worth getting into the habit of finding scenes and shooting points suitable for night shooting in advance, in the afternoon. At night, this will be much more difficult. Next, you wait for a night with a clear moonless sky, and go to the previously found place.
Stars should not be the main object, they just need to harmoniously complement the composition.
To make the image less abstract, you can include some easily recognizable silhouette in the frame - a single tree, a building, nearby mountain peaks, etc.
 India, Goa | 30 sec, f/2.8, ISO640, 15mm FR (Canon EOS 5D Mark II + Canon EF 15mm f/2.8 Fisheye)
 The Milky Way is the largest and most colorful object in the night sky.
It perfectly conveys all the Greatness and Infinity of our Universe. In order to emphasize this even more, for comparison, you can include in the composition a person or something related to him and his activities (a house, a tent, a fire with people sitting around, etc. Show all your imagination here). Dark, moonless nights are best for photographing the Milky Way.
"One fifth of humanity no longer sees the Milky Way" — a phrase from National Geographic
 Nepal, Annapurna National Park, Mardi Gorge, 2011 | 30 sec, f/1.6, ISO 2500, 24mm FR, moonless night (Canon EOS 5D Mark II + Canon EF 24mm f/1.4 II L USM)
 At night, there is also a "Sun" - this is the Moon. It may sound strange, but lunar sunrises and sunsets can be no less spectacular and colorful than those of her daytime counterpart.
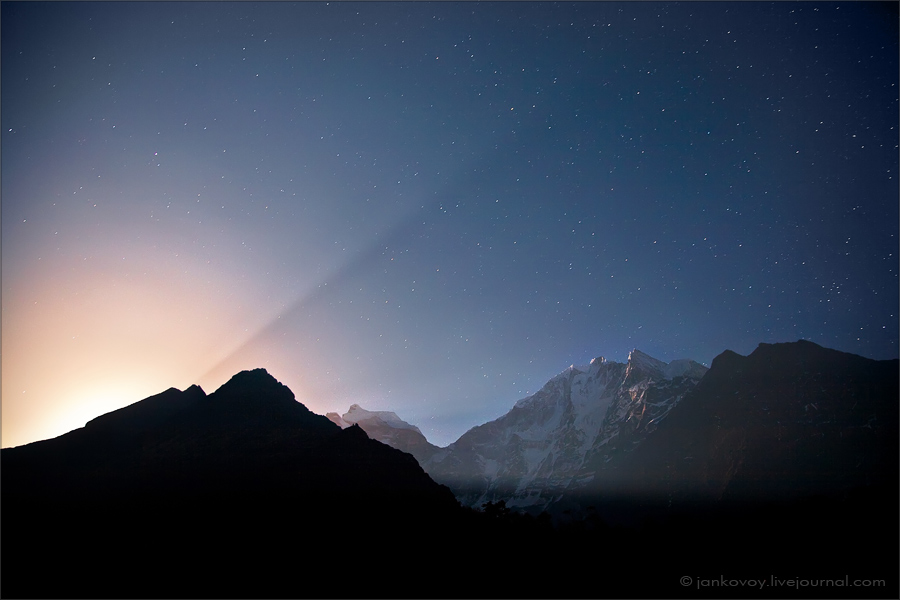 Nepal, Sagarmatha National Park (Everest), full moon rising over the Himalayas | 30 sec, f/4, ISO 400, 24mm FR, full moon (Canon EOS 5D + Canon EF 24-105mm f/4 L IS USM)
 If we talk about moonlight, then all the same laws and rules apply here as in daylight hours.
Post-dawn and pre-sunset moonlight are perfect for photography. The light at this time is very soft, voluminous, colors the surrounding landscapes in warm (sometimes even reddish) tones.
 Nepal, Annapurna National Park, Dhaulagiri (8167 m) in the golden light of the rising full moon, 2010 | 30 sec, f/2.8, ISO 400, 145mm FR, full moon (Canon EOS 5D Mark II + Canon EF 70-200mm f/2.8 L USM)
 The time when the Moon (especially the full one) is high above the horizon at its so-called zenith is of little use for photography, since the light under such conditions is very hard, flat, without color (as from fluorescent lamps, brr) + glare The air at this time is maximum, which is why the stars are practically invisible.
It is also worth noting that plots with the reflection of the starry sky (star tracks) on the surface of some reservoir are very interesting. In such cases, it is often better to choose a very low vantage point and shoot from near water level. Thus, even a small puddle or a small pond can be "turned" into a boundless ocean.
Nepal, Annapurna Base Camp (4150 m) and Machapuchre (6997 m), 2011 | 44 min (86 frames x 30 sec), f/4, ISO 1250, 15mm FR, full moon (Canon EOS 5D Mark II + Canon EF 15mm f/2.8 Fisheye)
Also, night shots with raging rivers / waterfalls look very interesting, which turn into milky streams with a slow shutter speed and in this form blend very well with the starry sky.
 Nepal, Langtang National Park, Gosaikunda Lake (4380 m), 2011 | 27 min (32 frames x 30 sec), f/2.8, ISO2000, 15mm FR, moonless night (Canon EOS 5D Mark II + Canon EF 15mm f/2.8 Fisheye)
 In some cases, the images reveal incomprehensible traces and stripes, the trajectory of which differs from the trajectory of the stars. Some photographers tend to give such phenomena a mystical character. However, such phenomena are explained by aircraft, satellites and / or bright meteors that burn up in the earth's atmosphere. Such trails of meteors can perfectly decorate your frame.
If you want to capture such a phenomenon, then first of all find out when the meteor showers are active. Having determined the maximum period, choose a place where there is no illumination from street lamps, windows and other light sources (preferably away from settlements).
The Perseid shower, which peaks on August 11-12, is ideal for a start. Firstly, it is rich in bright meteors - fireballs, and secondly, in August, dark and warm nights are convenient for work. Pay attention to what phase and where the moon is located. It is important that its light does not interfere with photography.
In addition to all of the above, you can build your image based on the constellations as the center of your composition. To find and determine the constellations, the atlas of the starry sky will help you 😉
 Nepal, Sagarmatha National Park (Everest), Orion constellation over Namche Bazaar (3500 m) | 30 sec, f/4, ISO 400, 24mm FR, full moon (Canon EOS 5D + Canon EF 24-105mm f/4 L IS USM
 Before composing a shot through your camera's viewfinder, give your eyes a few minutes' rest in total darkness to get used to the ambient light.
If even after such a “ritual” you cannot see anything in the viewfinder, then try pointing the camera “at the eye”. After that, take a test shot at extreme settings (open the aperture, ISO to the maximum) and, based on it, adjust the camera position. Repeat the last step until you achieve what you think is the perfect composition.
That's it, now you are ready to proceed directly to shooting the stars! 😉
In this article we will tell and show how to photograph the starry sky, the article will be useful for beginners - travelers or pros who are not used to photographing only themselves and sights on vacation different countries peace. We start to make a variety in photography and start with the question of how to take a photo of the starry sky.
Now let's decide on the option for displaying the stars, you can make the stars barely visible, or you can make the stars visible as a lot of spotlights clearly visible on a dark background, another option for photographing the starry sky is shooting the movement of stars, with this option you will get whole tracks of stars. All of the above options require a certain holding time. The first option is suitable if you set the shutter speed from 10 to 30 seconds in the camera settings. The second option will require setting the exposure time from 30 seconds to 1 minute and the third option from 5 minutes exposure to several hours.
Another separate option for photographing the starry sky is a professional option, which among photographers is called Timelapse, this direction becoming more and more popular among photography. The secret of this option is that you photograph one landscape for a very long time, sometimes even for several days. The photo is taken with a break of about 1 second, then it's all glued together in a special video processing program, the number of photos for a video clip in 1 minute is from 1000 pieces.

Let's give a little advice, if you buy a SLR camera from your hands, be sure to ask if timelapse was shot on your future camera, the thing is that after this shooting option, many cameras fail the shutter mechanism, which will additionally cost you a round sum to repair.
What do you need for photography
Let's return to the question - how to photograph the starry abyss. The next attribute for photographing the starry sky, we need a camera, we have already told you how to choose a camera, then you need a fast lens, if you don’t know how to choose a lens, then read ours, and the last attribute is a tripod. At the expense of a tripod, you should immediately warn if you are shooting in the winter, set the tripod on the frozen ground for about five minutes. This technique allows the tripod to cool down and the legs of the tripod are finally fixed in the ground, thus the photograph at slow shutter speeds is not blurry.
So, to open the question, we need: a camera, a lens, a tripod, a night, a battery, and preferably a remote control for the shutter release. For those who do not know what a remote control is - a regular remote control for professional shooting at slow shutter speeds, many photographers call such a remote control - a cable.

We will give advice about the battery, since shooting at long exposures consumes the battery very quickly, then for shooting we need either a fully charged battery or another spare. According to the technical data, the power consumption at long exposures is 10 times more than during normal shooting, draw conclusions if you need a spare battery.
So, after waiting for the nightfall, we begin to photograph the night landscape. Let's start by setting the right settings, follow our advice and write it down in your cheat sheet. Be sure to open the aperture to the maximum allowable value. In our case, the Sigma AF 15mm f/2.8 EX lens was used, the maximum aperture value for this lens is 2.8, you can take a lens with an even higher aperture.
Now make sure that you are in complete darkness, there should not be any light from city lights and nearby houses, that is, additional light sources should be completely excluded, only at night, without a single light source. The second point, the shooting of the starry sky should be carried out only before the moon leaves the horizon, otherwise additional source the light will not let you see the stars and just shine them.
From the camera settings, we have already talked about the maximum open aperture, which will allow you to see the stars in the photo as accurately as possible. In the camera, we set the shutter speed to at least 5 seconds and ISO at least 640, depending on the lens, we do all this on a tripod that is thoroughly installed on the ground in advance. If there is no tripod, which happened more than once in our case, then the usual hard fixed surface saves, on which you can put the camera with the lens up, the main thing is not to scratch the camera display.

In order for the shooting to be done with high quality, you need to eliminate the blurring of the photo when shooting with a long exposure, you need to install a cable with a control panel that has a shutter button that you press when you are ready to take pictures. But we manage with a simpler option, set a shooting delay of 10 seconds in the camera settings and move away, in 10 seconds the camera will stop shaking and stand still. We hope you understand what kind of delay we are talking about, with such a delay they like to take pictures with the whole family, they set a delay in order to have time to gather everyone in front of the camera lens.
Excerptwhen photographing the starry sky
If you set a huge shutter speed, then the stars begin to look like stripes and the earth rotates correctly, if you set a short shutter speed, then the stars will be hard to see. How to capture that moment? Two ways: the trial and error method and the second method is the 600 rule. The first method of photographing the starry sky is clear to everyone, until you try all the options with the camera settings, you will not understand exactly what you need.

Let's talk about the second method in more detail, the 600 rule tells us about dividing the number 600 by the focal length of the lens. In our case, we used the Sigma AF 15mm f / 2.8 EX lens, which means that we divide 600 by 15mm, we get a shutter speed of 40 seconds. For cameras with a crop matrix, the final result must be divided by another 1.6 to get a shutter speed of 25 seconds.
What aperture to set when shooting
Most best option photographing the starry sky is the most open “hole” for your lens, the faster your lens, the better. In our case, we used the Sigma AF 15mm f / 2.8 EX lens, aperture of this lens is 2.8, aperture 1.8 - 2.8 is considered the ideal lens for shooting the starry sky.
What should be the focus?
Automatic focusing at night is unlikely to work at 100 percent, so without racking our brains on how to take a picture and without suffering, we switch to mechanical focusing, or otherwise called manual focus. We advise you to put the focus in the most extreme position in the infinity of focus. Tip on focal length, using the 15mm focal length as an example, we have already calculated a shutter speed of 40 seconds for full frame and 25 seconds for crop.
So this rule is valid up to a distance of 50mm, then the longer the focal length, the much shorter the shutter speed should be, plain language you can say this - the longer the focal length (from 50 mm ...), the closer the stars are to us, which means we don’t need a long shutter speed.
Options when shooting the night sky
- it is best to use lenses 14 or 16 mm.,
- set the ISO parameters to 200, then, if nothing is visible, then we will increase the value to ISO 400,
- open the aperture from f4 to f5.6,
- I recommend selecting the shutter speed in manual mode, the brightness should correspond to the author's idea. If the shutter speed is short (in most devices it is no more than 30 seconds), then we increase the ISO to 400 or more,
- as for focusing, this is a problem at night, so we turn to manual mode focus.
How to shoot timelapsee
First, let's talk about the gluing program. huge amount footage, in fact, there are a very large number of such programs and almost all of them are free. But for a beginner in this business, we advise a simple and convenient program Startrails Version 1.1. You can download it everywhere and for free, so we will not post the link.
Shooting a time-lapse is a very painstaking and long work that requires a huge amount of nerves and free time, it took us 2 nights to photograph the starry sky, during this time we were very exhausted, but you simply have to try this type of shooting, this is a very big step to professional photography, and a very exciting event awaits you.
For about 10 seconds of a video clip in timelapse mode, you will need to shoot 100 photos. Approximate camera settings that we used, while you are shooting in complete darkness without a single light source interfering with you, are as follows: ISO 1000, focal length 15mm, maximum open aperture 2.8, shutter speed 30 seconds. Duration night work for a 10 second video about 50 minutes.
Now for some math, it takes a lot of time to shoot a 10 minute timelapse video. 1 second of video contains 24 frames, 60 seconds in a minute, 60 * 24 = 1440 frames, 10 minute video contains 14440 frames (1440 frames * 600 seconds). Taking each photo with a shutter speed of 30 seconds and pauses of 1 second, we get 31 seconds * 14440 frames = 447640 seconds or 124 hours of working time.
That is how much time it takes to shoot a high-quality video clip, but even more effort and money is spent on restoring equipment after such work. In conclusion, a few tips for photography. There must be no moon, shoot before it appears, otherwise you will get light and the stars will not be visible. Shoot away from city lights, the lights also illuminate everything and nothing will be visible.
Take a cloth with you to wipe the lens of the lens, it is very often humid at night and fogging is guaranteed to you. Further, when photographing for a long time, the matrix of any camera starts to heat up, as a result of which noise or light grainy dots appear in the photo, but some cameras have a noise reduction function that will save you. If there is no such function, give the camera a short break in work, otherwise the whole thing will go downhill.
Do not forget to experiment with the camera settings, choose a mountain or forest area and you will get a photo with an unforgettable starry sky, which will take first place among the photos taken on an exciting journey together with the website team
AT Last year periodically you could see photos of stars in my articles. Some asked me questions, they say, what aperture, what shutter speed, and so on. Therefore, I have already published the photos themselves in a separate post with their parameters, but here I want to post detailed description how to photograph the starry sky. I have long wanted to write a similar article, but there was very little experience. After reading this manual, you will at least be able to take the same photos as mine.
I immediately warn you that I am not a pro in this matter, and you will not discover something radically new for yourself, especially if you yourself are engaged in similar shootings. However, it will be useful for beginners to learn some of the nuances that I did not know at one time.
I have written a number of articles related to photography and aimed at amateurs like me. Here is a list of them, you can take a look.
What you need to shoot the starry sky
- First of all, a tripod. Excerpts are long and without a tripod anywhere. It is important that it can withstand the weight of the camera along with the lens and does not stagger, but at the same time it is not too heavy, otherwise you will not want to take it on a trip, well, unless you are by car of course.
- A camera with manual settings and preferably shooting in Raw, because this format gives great opportunities for photo processing. It would also be nice if the ISO could be set to 800-1600 without much damage to the picture.
- Wide-angle fast lens for capturing static stars and wide coverage of the starry sky.
- Remote control for setting long exposures, in the common people - a cable.
- Spare battery, as it is consumed quickly enough.
My starry sky kit
In general, I already wrote about my set of photographic equipment with my wife in the article. But there was the whole list, namely pictures of the night sky on this moment i do:
- Canon 7d camera
- Tokina 11-16 F2.8 wide-angle and fast lens
- Programmable Remote
- Tripod Slik Sprint Pro II 3W CG
I think you can take pictures of the starry sky with a soap dish if it allows you to do some things, such as: set a shutter speed of 30 seconds or connect a remote control to it, screw on a tripod, set a higher ISO without brutal noises, open wider aperture. Otherwise, you will be severely limited in opportunities, and it is unlikely that anything will work out.
My typical mistakes
I recently started trying to shoot the starry sky. But my first photos did not turn out at all, since I was sure that just a long exposure of 30 seconds would be enough. As a rule, all DSLRs make it possible to shoot without a remote control with a shutter speed of 30 seconds.
So, for such shutter speeds, you can’t clamp the aperture, although you want to make everything sharp. In this case, the light from the stars is not enough at all so that they can normally appear in the sky. On the contrary, you need to open it to the maximum! In my lens it is F2.8, some people buy lenses even faster. But not only the aperture needs to be opened, it is also desirable to set the ISO to at least 800-1600.
Options for shooting the starry sky
1. Shooting static stars. Exposure 10-40 sec. They look like dots, that is, the way we see them with the normal eye.
2. Shooting the rotation of the starry sky (stars in the form of stripes) or otherwise, tracks. Long exposure from several minutes to several hours. Absolutely unrealistic photos, but they look funny.
3. Shooting tracks, but in a different way. A large number of photographs of the same area of the sky are taken using the technology of shooting static stars with an interval of 1 second, and then they are glued together in a special program into one photograph. Visually, it is similar to option 2, but more colorful and with less noise. When shooting tracks according to option 3, we get both a glued final photo and the ability to rivet a timelapse video.
4. Timelapse. More photos of static stars are taken and then mixed into video. It turns out very beautiful videos of how the stars move across the sky.
How to photograph the starry sky - static stars

Static stars. ISO1600, 11mm, f2.8, 30sec
Excerpt
Well, let's move on to the photos and shooting directly. As you already understood, due to the fact that the stars are moving, they remain in the form of fixed points only up to a certain shutter speed. And if she has greater value, then they turn into stripes. And in order to calculate that very critical shutter speed, there is a “600” rule.
We need to divide 600 by the focal length of your lens and we will get the maximum shutter speed at which the stars will still be dots. This formula is valid for full frame cameras, crop factor 1:
15 mm - 40 sec
24 mm - 25 sec
35 mm - 17 sec
50 mm - 12 sec
85 mm - 7 sec
135 mm - 4 sec
200 mm - 3 sec
300 mm - 2 sec
600 mm - 1 sec
Most often, everyone, including me, does not use full-frame cameras. So, we need an amendment - we also divide 600 by your crop factor. For Canon cameras this is 1.6:
10 mm - 38 sec
11 mm - 34 sec
12 mm - 32 sec
15 mm - 25 sec
16 mm - 24 sec
17 mm -22 sec
24 mm - 15 sec
35 mm - 10 sec
50 mm - 8 sec
Obviously, a full-frame sensor and wide-angle lenses have a longer exposure margin. That is, when shooting with a 50 mm lens on a cropped matrix, you have only 8 seconds, and this is very, very little, the stars will not be visible. In addition, such a lens may not have enough viewing angle.
According to my observations, the shutter speed can still be increased by a factor of one and a half. Yes, when zooming on a computer, the stars will already be dashes, but in small photographs (for a blog, for a 10x15 printout), this may not be very visible.

Diaphragm
The aperture is best opened as wide as possible. If the lens allows you to open at 1.6-1.8, then it will be possible not to increase the shutter speed above the critical one and not set the ISO above 800. The sharpness drops, but what can you do.
Manual focus
At night, you can forget about auto focus, so you only have to use manual focus. Usually it is advised to set it to the extreme position at infinity, because we shoot the stars. But I am faced with the fact that my lenses almost never twist the focus to infinity in automatic mode. I checked it by focusing on the moon, on distant lights (by the way, these are options for autofocusing at night). It remained quite a bit to the extreme position, and I used it in the future.
Focal length
Once again, the longer the focal length, the shorter the shutter speed should be, because the stars are getting closer, which means that in order to prevent tracks, you need to reduce the shooting time. In addition, you may not have enough viewing angle, you will not just shoot one sky without everything. And the density of stars decreases as you get closer.
How to photograph the starry sky - the rotation of the sky, tracks

The rotation of the sky. ISO400, 11mm, f5, 1793sec
I shot tracks so far quite a bit and only according to the second option (without using additional programs).
Excerpt
From 10 minutes to several hours. The longer it is, the longer the lines drawn by the stars. It takes a remote to set these values and a good tripod to keep it from being blown around by the wind for so long. Just keep in mind that at such shutter speeds it is very difficult to calculate the correct exposure.
Diaphragm
It is difficult to write specific values, since I do not know how to calculate the exposure, most likely only by experience. And there is always a risk that after half an hour of waiting, you will get an overexposed frame. I put it on the eye, for example, like this - an 11 mm lens, a shutter speed of 30 minutes, an aperture of 7.1, ISO 400.
Focal length
In this case, it is no longer possible to say that it is better when it is minimal, because the precious seconds of exposure are no longer so important, there will be enough light anyway, the count goes not for seconds, but for tens of minutes. Therefore, if the composition of the frame works well on normal, and not on wide angle lens(grabs the angle), then this is even better, since it will take much less time to wait until the frame is shot. But you need to understand that the stars will be closer and their tracks will become less round. You won't need a lens larger than 50mm.
Determination of the center of rotation of stars
Since the stars in the sky rotate, their tracks are circles, which, of course, have a center. And, if you build the composition of the frame in a certain way, then it will be useful to know where this very center is. Therefore, in the northern hemisphere we direct the lens to the North Star, and in the southern hemisphere to Sigma Octant. Rotating, in half an hour the star forms an arc of 7.5 degrees, and this arc is the longer, the farther the star is from the North Star or from Sigma Octanta.

At the center of rotation is the North Star. ISO400, 11mm, f7.1, 1793sec
Now about how to look for the stars we need. The easiest way to find the North Star is through Ursa Major. We find the constellation on the horizon, mentally connect two bucket stars that form one of its walls, located opposite the bucket handle, and get a line. Mentally set aside 5 distances along this line from the bucket (from its top and further) and rest against the North Star.
Sigma Octantu in the southern hemisphere, it seems to me, is almost impossible to find. It is easier to be guided by the constellation of the Southern Cross. We first find it in the sky, and then we extend the long crossbar of the cross down by 4.5 distances of this same crossbar. Approximately in this place there will be Sigma Octant.
How to photograph the starry sky - tracks in the program
All settings are set exactly the same as in the first paragraph when shooting static stars. I will not repeat. But in fact, you can use slower shutter speeds when you can see a slight shift in the stars. All the same, in the program all this will be glued together. But in this case, as separate photos, they will not be very beautiful, and then you can’t do timelapse.
Software for gluing tracks
Surely there are different programs, but I only know one - Startrails Version 1.1, it is very simple and it is not difficult to understand it. We upload files and make tracks. If they turned out to be too long, then you can remove some of the photos from processing.
How to shoot timelapse
I did Timelapse with the stars only once, as this is a rather long task. And then, having made 99 frames, I left the tent and realized that the sky was overcast, and nothing else shines for me, it's a shame. Up to this point, I've only shot timelapse during the day, like the sun is setting or people move, and it was a video filming on a soap box (it does it well for me), then sped up in Premier. And to shoot the sky, you need a camera, a video camera will not be able to shoot at such a slow shutter speed at night.
The video was used 99 frames (ISO1600, 11mm, f2.8, 27 sec) with a gap of 1 second. The total shooting time is 46 minutes. This was enough for 4-7 seconds of video. If you make it slower, then it will already be noticeable how the image is interrupted.
Here is a small calculation of how many photos you will need to have for a 1-minute video with the rotation of the starry sky. The video contains 25 frames in 1 second, and if it is a minute, then it will be 25 * 60 = 1500 frames. We shoot each photo, for example, with a shutter speed of 30 seconds and an interval between frames of 1 second, which means that to shoot 1500 frames we will have to spend 31 * 1500 = 46500 seconds, or 775 minutes, or ~ 13 hours.
Some nuances when shooting a starry sky
1. If the moon shines brightly in the sky, then the stars will be faded against the blue sky. Therefore, you need to shoot before moonrise, or at a time and place where the moon is not visible, as well as on a new moon. For example, in August in the Crimea for 5 days of the campaign, I never saw her, and the sky was black and black. But in fact, lunar landscapes can be quite beautiful, the night luminary illuminates everything around very well.

2. Lights big city in the same way, they light up the sky well, and inside the city it’s not realistic to shoot the starry sky at all, you need to move away for tens of kilometers. And only if the city is visible somewhere in the distance, then an interesting backlight can turn out.

- It should be borne in mind that at night there is a possibility of fogging of the front lens. Therefore, if it is humid, then ultra-long exposures and shooting tracks are not always possible.
3. With long exposures of ten minutes or more, the matrix heats up and terrible noises appear in the photo. I won’t say about all DSLRs, but in my Canon 7d it is very noticeable - a lot of multi-colored dots in the photo. But the function of noise reduction at slow shutter speeds saves, they are somehow subtracted from the image. There is only such a moment, the noise reduction works as long as the exposure lasted, which means that the duration of shooting one frame is doubled, for example, instead of 30 minutes, a whole hour. The option of shooting tracks by gluing photos in specialized software does not have this drawback, the matrix does not have time to heat up.

4. It is enough to shoot just the starry sky once. Next, you want to do more interesting photos, and they need objects in the foreground. Therefore, the problem arises of choosing a place for shooting, an ordinary field or forest looks so-so, you need to experiment and turn on your imagination. Personally, I like the mountains the most in this regard, but since I don’t go there often, I don’t have so many shots of the starry sky.


Popular
- Profitable business: how to open a marriage agency
- Paving slab production business plan from a to z How to open a paving slab manufacturing business
- Franchise cost and cost of ownership
- How to open a recruitment agency
- Typical mistakes when renting premises for a store
- How to get a license to trade in flowers
- Classification of business centers and shopping centers
- Potato growing business: sales features and profit
- New projects in Russia to be led by Dmitry Sokov New projects in Russia will make EuroChem a world leader
- Where Nordman tires are made