Metering selection. Exposure metering modes
In the lesson, we found out that the camera is equipped with a very accurate tool for measuring the brightness of the scene. To always get high-quality photos, you need to learn how to work with it.
The camera can measure exposure in different modes to suit different shooting situations.
Matrix metering


The most suitable metering mode for beginner photographers is matrix. It is also called evaluative or multi-segment. The brightness of the scene is measured over the entire area of the frame, the maximum number of sensors is used. The results from each sensor (recall that, depending on the model of the device, their number can reach tens of thousands) are analyzed, and the camera determines the optimal exposure value. Methods for analyzing this data are constantly being improved, becoming more intelligent. The number of metering sensors is also growing. All this makes matrix metering more accurate with each new generation of cameras.
Matrix metering today almost always manages to obtain the correct exposure. Slight difficulties can arise in situations that are not standard for automation. For example, shooting a person indoors with a window in the background. In this case, the automation cannot determine exactly what we are shooting: a landscape outside the window illuminated by the midday sun or a person dimly lit by room light. It can solve this problem in different ways, depending on the situation and the specific composition of the frame. Shooting on a white or black background can also cause difficulties: the automation will try to equate the shades prevailing in the frame with gray. Therefore, frames on a white background will turn out to be too dark, and on a black background - too bright. Taking test shots with subsequent exposure compensation or using other metering modes (for example, spot) will help to solve this problem.

When to use matrix metering? This mode is suitable for most shooting situations. It will be optimal when active reportage shooting, on photo walks, during amateur family photo sessions and on a trip.
Spot metering


Quite difficult to use, but at the same time the most accurate metering mode is spot. The measurement of the brightness of the scene being shot takes place over a small area, a point. V Nikon cameras this point will be located in the same place as the active AF area. Since the measurement takes place only in a very small fragment of the image, it is necessary to correctly approach the choice of the area for measurement. If you thoughtlessly poke this point into any place that comes across, the result, most likely, will not be the most successful. We will get an incorrectly exposed frame. Spot metering should be done relative to the brightness-average areas in the picture. After all, the camera thinks that we are "showing" an object with an average brightness and, based on this, measures the exposure.
For example, when photographing this house, you should not measure the exposure by its white wall (otherwise the picture will turn out to be too dark) and not by the dark forest (we will get an overexposed frame). It is better to use the fragments of the plot with average brightness. The ideal option would be the slate roof of the house.


Some people use spot metering in portrait photography. This is convenient if you are shooting with Nikon camera and the metering point is the same as the focusing point. Since people's faces are usually of medium brightness, face spot metering will generally work correctly. But if we are shooting a dark-skinned or black person, it is worth considering introducing a small negative exposure compensation.

Exposure lock. Often, after metering the exposure with spot metering, the frame needs to be recomposed. So that after recomposition the exposure does not go astray (after all, the device measures the exposure constantly until we take a picture), there is a special exposure lock button - AE-L (Automatic Exposure Lock). When you click on it, the camera fixes the current value of the exposure parameters. This function is useful not only when working with spot metering, but also when you need to take several shots with the same exposure, without switching to manual mode. This is often necessary for panoramic photography.


By the way, when you hold the shutter button in the half-press position, exposure metering is also locked. After you press the button all the way and the frame is taken, exposure metering will continue, which is not always convenient (for example, when shooting panoramic shots).
When to use spot metering? First of all, when you are sure that you can handle it. Indeed, for accurate measurements, you will have to carefully monitor which object in the frame is the exposure metering. Photographers often use this type of metering when shooting landscapes with difficult (sunset, sunrise) contrasting lighting. Also, this type of metering can be used in portrait photography, metering the exposure exactly according to the subject's face.
Center-weighted metering


Center-weighted metering is a classic type of exposure metering inherited from the very first film SLR cameras with a built-in exposure meter. Exposure metering in this mode is carried out over a large area in the center of the frame, in a circle with a large diameter. In this case, the area located directly in the very center of the frame has a higher priority (more "weight") when analyzing the data obtained. Today, this type of metering is a little outdated against the background, firstly, of intelligent and easy-to-use matrix metering and, secondly, accurate and flexible spot metering in setting.
In inexpensive "soap boxes, as a rule, built-in electronics analyzes the light and independently selects the exposure that best suits the shooting conditions, and the photographer cannot interfere with this process. But in advanced compacts, SLR and system cameras, the user is given the opportunity to use different exposure metering modes. Many photographers ignore this possibility and in vain. After all, knowledge about how different types of metering work, and in what cases to use one or another option, are very valuable. Proper use of metering capabilities allows you to accurately display the photographed scene.
Exposure metering
Exposure is known to be based on the amount of light reaching the sensitive sensor. Correct exposure allows you to get a high-quality frame without the presence of overexposed or, conversely, too dark areas, with maximum number details and the desired brightness. Modern cameras are necessarily equipped with a built-in exposure meter with sensors capable of determining the amount of light entering the camera in a given shooting situation. V SLR cameras exposure metering is carried out through the lens. In any case, the light flux falls on a special sensor, which provides data to the processor. The latter, in accordance with certain algorithms, selects the most suitable exposure pair. This is what the exposure determination process looks like when shooting in automatic mode.
In most shooting situations, this is sufficient. However, the built-in electronics of the camera often make mistakes with the choice of exposure parameters. This can happen for a variety of reasons. In particular, the meter can measure reflected light from an object, so it is not difficult to mislead it if you are photographing a highly reflective subject. For example, a snowy landscape in winter. Due to the good reflectivity of the snow, the meter can err in metering the exposure, which ultimately results in underexposed photographs.
And such situations are not uncommon. Therefore, manufacturers of modern photographic equipment offer users to achieve the best shooting results themselves to choose which metering mode to use in a particular situation. If you can understand how the different metering modes work when shooting certain scenes, you can improve the quality of your photos.
Exposure metering modes
So, in modern digital cameras, there are several basic exposure metering modes that are available to the user. Everything, of course, depends on the manufacturer of a particular model of the device, but, in general, the following modes can be distinguished:
- Matrix
This mode is the default for most cameras. The essence of the matrix exposure metering is that the sensors measure the brightness of all areas in the frame, and then the processor of the device selects the appropriate exposure pair value for the scene being photographed. That is, in this case, the entire scene is divided into small zones, in each of which the illumination is assessed. All these measurements are then processed and averaged to compare against a database of correctly exposed images and find the most appropriate shutter speed and aperture combination. In advanced DSLRs, sensors measure not only the illumination of individual zones, but also the distribution of shades and colors, which improves the quality of the matrix exposure metering.
The scheme of work is not very difficult to understand. And in most standard shooting situations, the matrix system shows excellent results. At the same time, this versatility of matrix metering is also its weak side... In an attempt to "average" the illumination of the scene and to obtain one correctly exposed image, the camera automation often makes a mistake with the exposure of the main subject of shooting. The built-in electronics, although it tries to correctly expose the area of the active AF point, but due to the algorithms for averaging the illumination of the scene, this is not always the case. It should be noted here that the effectiveness of matrix metering depends on the camera processor, the number of focus points and the algorithms used to average the scene.
When should you not give up using matrix metering? Particularly when you need to get an evenly exposed image. The need for this often arises in landscape photography. Also, the matrix system works well when photographing any evenly lit scenes.
- Center-weighted

The next mode is center-weighted, which also tries to measure the illumination of the entire scene on average, but at the same time the areas located in the center of the viewfinder receive more weight. That is, in this case, priority is given to metering the exposure in the central area of the frame, which has a circular shape. The illumination of the areas outside the circle is also taken into account by the processor when determining the appropriate exposure, but to a lesser extent.
If the subject is closer to the center of the frame, then using center-weighted metering is quite logical. It's worth switching to this mode when you don't want the light coming from the back of the frame to somehow affect the exposure. The advantages of using this mode are especially true when photographing people outdoors on a sunny day, when you are dealing with strong contrast. After all, this mode allows you to correctly expose an object that is exactly in the middle of the frame. In addition to portrait, this mode can be useful for sequential shooting.
- Spot

The point mode is a kind of opposite of the matrix mode. Here, only a small area of the image is taken as the area for measurement, which is equal to one to five percent of the entire area of the frame. This small light metering area can be moved from the center to the edges of the frame. With spot metering, you can expose small details in a photo. It is this system that makes it possible to accurately measure the brightness and illumination of any part of the scene being filmed.
Spot metering comes to the rescue when you need to get a well-exposed subject, be it a portrait or shooting architectural details. It is well suited for backlit photography, in order, for example, to correctly expose a person's face, which in the default mode will appear in the photo as just a dark silhouette. This mode is also useful in situations where there is an evenly lit scene, but the subject itself is slightly brighter or darker than its surroundings. Spot mode can also come in handy when photographing objects at a great distance, in order to correctly expose objects or details that are far from the camera, and when shooting macro, when the subject does not occupy a significant part of the frame area.
- Partial

Partial metering works in the same way as spot metering. However, in this case, a slightly larger area is selected for metering the exposure - about eight to ten percent of the frame area. There is also an emphasis on the center of the viewfinder. The rest of the scene is not taken into account, which can be both an advantage and a disadvantage of this method. This is an advanced version of the point mode, which is used, for example, in cases where the background much brighter than the subject. Partial metering can also be considered a good substitute for spot metering if you need to correctly expose an area of the frame that is larger than the spot metering area.
Summing up, we can say that before deciding on the use of one or another metering mode, you need to carefully study the scene that you are going to shoot. If the scene is evenly flooded with light, then use matrix metering without changing anything. In most cases, this is landscape photography. If you are shooting any contrasting scene, for example, a person or object, which is located in the center of the frame and is illuminated from behind by some bright light source, then switch to center-weighted metering. Basically it is the best option for portrait photography. As for spot metering or partial metering, these modes should be used in situations where you want the subject or individual details that are an important part of the photographic image to be correctly exposed.
An opportunity such as choosing a metering mode is simply ignored by many novice photographers. but right choice exposure always plays a huge role in obtaining high-quality photographic images. By wisely using one or another metering mode, you can significantly increase the quality and detail of your photos.
Educational program: metering in digital cameras
What is exposure? This is the determination of the precisely dosed amount of light that should hit the photosensitive material (film or matrix) at the moment the frame is taken, that is, at the moment when the camera shutter is open. If there is not enough light on the sensor, the picture will turn out to be dark, underexposed. It will be very difficult to "stretch" it in a graphics editor - the colors will be distorted, color noise and graininess will appear. If too much light enters, the picture will be overexposed. There is nothing to save such a "whitewashed" shot, since the details are hopelessly lost.
If the optimal amount of light gets on the camera, then the picture will turn out to be well-developed.All details will be preserved in both light and dark areas. If the dynamic range of the camera is small, and the sensitivity is very high, then in deep shadows details may be lost, although the main object will turn out to be quite well worked out. Therefore, due to the not very wide dynamic range of the sensor in comparison with film, it is very important to set the exposure correctly, otherwise the probability of loss of details in bright and dark areas Images. Different cameras react differently to lighting in different conditions.
Since the days of film photography, there has been a special device that measures illumination - this is an exposure meter. It measures the light that hits the subject. There is also a spot meter, with its help, the amount of light that is reflected by the objects being shot is measured.
The amount of light falling on the matrix is determined by the brightness of the scene being shot and the aperture of the lens. By adjusting the iris, you can change the amount of light that enters the sensor. The aperture value is displayed in f-number. The exposure time is determined by the shutter speed. The sensor's light sensitivity also affects the exposure time - the higher the light sensitivity, the shorter the shutter speed, for example. The automation built into the camera must take this into account. The set values - aperture, shutter speed and sensitivity - are called exposure parameters. Competent setting of exposure pair, shutter speed and aperture will ensure correct exposure at the set light sensitivity.
Previously, in film photography, exposure was determined in two ways: using an exposure meter, the illumination of an object was determined, that is, the intensity of the light flux falling on the object; in addition, the intensity of the reflected light was measured. Today, when exposure metering devices built into a digital camera have appeared, only the second method is used.
For novice amateur photographers who have picked up a digital camera for the first time, almost every model has a fully automatic mode. You absolutely do not need to think about such "trifles" as shutter speed, aperture, photosensitivity, all this will be calculated for you by the "smart" electronics of the camera. You only focus on composition. Is this good or bad? It's good when you shoot in manual modes worse than your camera's automation can handle. But this is bad when it is still possible to manually achieve a better result than the average result in automatic mode. Why is this so? Let's try to figure it out.
In digital cameras, you can install different types exposure metering - everything is determined depending on the shooting scene.
Matrix metering, Pattern Evaluative, E
It is also called multi-zone, multi-zone, multi-segment, evaluative. In automatic mode, the camera sets the standard - matrix metering, which is used more often than others. This is the most intelligent metering, the exposure is measured by the camera in several areas of the matrix. Segment zones are distributed over the frame area, all cameras have different ways, and the priority of the zones is also different. The camera analyzes the data of each zone, the ratio of the brightness of individual zones, compares the information with its own database of standard, frequently encountered scenes. Matrix metering is the most versatile, but it has its limitations, since the lighting is not always the same and uniform across the entire field of the frame, and the objects can be different. Matrix metering is convenient when the illumination of the entire scene field is approximately the same. But it is not always predictable, although in most cases you will get the correct exposure. It is recommended for beginners who have not yet learned how to use manual settings.
Matrix metering will not do well in the following situations:
- In shutter priority or aperture priority mode (exposure compensation will help to some extent),
- Backlighting when the light source (sun, lamp, spotlight, etc.) is opposite the lens or from the side,
- If you need to focus on the main thing, select the object from the background,
- When you want to make a picture lighter or darker by changing the overall tone of the picture,
- Art photography
Matrix metering makes the exposure of the entire frame average. Bright areas become overexposed and shadow areas become dark.
There is also three-dimensional (3D) spatial segment matrix metering. With this variation of matrix metering, exposure is determined separately at different points in the frame, independently of each other. The brightness, contrast and distance to various objects in the scene are taken into account. Three-dimensional exposure metering is mainly used in DSLRs.
If you want to learn how to shoot not only in the automatic point-and-click mode, having received a mediocre memory photo, but you want to get more expressive and interesting pictures, it makes sense to become familiar with other metering methods.
Integral metering (Average metering, A)
Averaging metering. With this simple method, the illumination of the scene is averaged over the entire field of the frame. All areas of the frame have the same priority. Integral metering tends to dominate a mid-gray tone; the advantage of integral metering is that the average value is used regardless of the reflected light intensity. It is not suitable for shooting contrasting scenes, as well as black and white surfaces, clothing, animals - there is a risk of incorrect exposure. Also, it is not suitable in low light conditions: light objects will not be bright enough, and dark objects will be too dark. By shooting in the evening, you run the risk of getting a shot that is too bright. In this case, the exposure should be reduced by 1 or 2 stops. When shooting white objects, the opposite action will help - a large exposure by 1 or 2 stops.
There are also spot and center-weighted metering. They will come to your rescue when the lighting conditions are unusual, when you are shooting difficult scenes, when you are thinking of getting an original result.
Spot metering (S)
It is also sometimes called partial. This metering method provides the most accurate result, the exposure of the subject is optimal. In cameras with manual settings, spot metering is mandatory. In this case, the camera's exposure meter measures the brightness in a small area of the frame - usually 1-3% of the area (or up to 9%), depending on the camera model.
The measurement takes place at the center point of the frame. If the subject is not in the center of the frame, you can recompose the frame by aiming the center point over the subject and pressing the shutter button halfway (without releasing it) or locking the exposure. In more advanced cameras, such as professional DSLRs, the metering points aligned with the AF points can move around the frame. They are aligned with the AF points. The number of such points depends on a specific camera model, there can be from five or more.
The "advanced" cameras have a built-in exposure lock (save) function - AE. The “AE-L” button stands for Automatic Exposure Lock, exposure metering lock. If you need to recompose the shot, simply press the lock button and the camera will remember the settings.
Spot metering may cause the background to be overexposed or underexposed, but main object shooting, the one for which you measured will turn out well, as elaborated as possible with the maximum amount of detail. Spot metering can be used when shooting high-contrast scenes, backlit. That is, in those cases when it is important to correctly determine the exposure for the main part of the frame.
Center-weighted metering (CW)
It is also called averaged. With this method, the system estimates the overall brightness of the scene, but focuses on the center of the frame, which covers approximately 9 percent or slightly more. This method of exposure metering is advisable in the following cases:
- Portrait shooting,
- When the subject occupies most of the center of the frame,
- When the subject is against a contrasting background
Multi Spot metering (MS)
The exposure is measured at several points in the frame, and the camera averages the values obtained. Mainly, multi-point metering is used in professional SLR cameras.
Partial metering
Metering resembles spot metering, but the “point” is increased to a “spot” with an area of up to 6-10 percent of the frame surface. This method is often used in amateur SLR cameras.
Exposure compensation
Different surfaces reflect light from the same source in different ways. That is, each object has its own reflection coefficient. The average reflectance is 18-20%.
When shooting a medium-gray subject, matrix metering will correctly determine the exposure - aperture value and shutter speed. An object with a reflectivity of 20 percent will have a reflectance of 0.2, a black velvet fabric will have a reflectance of 0.02, and a snow will have 0.8. In order for these objects to turn out to be not gray in the picture, you need to make an exposure compensation - that is, to make an exposure compensation. The summer landscape reflects on average about 18% of the light, 8-10% - if there are greenery and foliage in the frame. If there is sand, dry surface is 30-40%. Human skin has a wide range of reflectivity, the specific coefficient depends on race and tan. For fair skin - 0.35, for very dark - 0.035-0.06.
In modern digital cameras there is a set of scene programs, and often quite rich. So, for example, if you set it to Snow / Beach mode, the camera will adjust the settings so that the snow appears in the picture believable, white. In this case, you do not need to enter exposure compensation.
The "+/-" button on the camera body controls the exposure compensation. A correction can be made by rotating the dial or pressing the corresponding buttons. Also, for simpler camera models, this function can be accessed through the menu.
Exposure compensation is indicated by EV values. EV (abbreviated from "exposure value" - translated from English. Value, exposure value.) Is a conditional value that includes all kinds of combinations of shutter speed and aperture number, which under constant shooting conditions provide the same exposure. A change in EV value by one unit (one stop to either side) corresponds to a change in exposure in half. If you enter +1 EV, the exposure will double. Exposure compensation is typically 1/3 EV steps. For example, to get rid of the "gray" in bad weather, adjust the exposure compensation by +1/3 or + 2/3.
Bracketing
Bracketing, or exposure bracketing, is a series of frames in which the exposure parameters change in each frame: the first frame is underexposed, the second is correctly exposed, and the third is overexposed. The cameras have the ability to set the bracketing step - the difference in exposure parameters from the norm. Bracketing is used when the illumination in the frame is difficult to determine and it is necessary to make a "test".
bar graph
The brightness histogram will help you to correctly estimate the exposure. This graph displays pixel counts and brightness levels. The horizontal axis corresponds to the value of the brightness: from black to white. The more pixels with the same value, the higher the level - amplitude.
If the histogram is shifted to the left, it means that the picture turned out with a predominance of dark tones, if to the right - with a predominance of light tones. It is desirable that the histogram is not "ragged", that is, does not have sharp drops, "bursts". It is good when it goes smoothly, forming a uniform curve, like a "hill" with smooth slopes.
In a number of digital cameras the histogram is part of the service (auxiliary) information recorded along with the image. This allows you to improve the balance when possible re-shooting the frame, or helps to choose a method of tonal correction of the image when editing it on a computer. In more advanced cameras, the histogram is superimposed over the image of the selected frame on the display. This allows you to pre-evaluate the quality of the future image and immediately either change the lighting conditions or composition, or introduce exposure compensation.
In order for the camera to determine the necessary settings for shooting, first of all, it needs to know how bright or dim the lighting of the area that needs to be photographed. The exposure meter in the camera is responsible for this determination. Necessary for a picture is one of the key tasks of any camera automation.
All Nikon digital control centers use reflected light metering, the so-called TTL mode... TTL means 'Through The Lens‘- through the lens (lens), that is, the metering is calculated using the light that was reflected from the object being shot, passed through the lens (lens) and hit the exposure meter sensor.

- The metering point is the same as the focus point when using single-point focusing. By moving the focusing point in this mode, you can see how the exposure meter readings change.
- The metering point for spot metering is always in the center of the frame if (rectangle icon) or any method other than single-point focusing is used.
- In point mode, the function does not work TTL + BL with Nikon flashes SB.

Exposure metering is center weighted.
In Live View mode, exposure metering works in the same way, only information about brightness and color distribution is taken directly from the camera matrix.

Changing exposure when choosing different metering methods. Spot metering made the watch correctly exposed, but the overall exposure fell into the '+'
Personal experience:
Roughly speaking, precise metering algorithms different in each cell, since each camera uses its own metering module and its own matrix, which has different values for DD and ISO and a range additional settings type . The exposure meter of each individual camera has to get used to... If an on-camera exposure meter does not suit the reflected light, you can always buy an exposure meter based on illumination. Personally, I just know roughly how the camera behaves in different conditions.

I take almost all pictures in matrix mode with, when the conditions are very difficult, I use spot metering, and when the automation does not suit me, I just use the manual camera control mode, in which I set the exposure parameters by eye or by the histogram. In automatic modes it is very useful to apply. Even if I didn't keep track of the desired exposure on the camera's display, I can always correct the levels when processing the RAW file. Particular difficulties with metering arise when shooting with multiple flashes in i-TTL mode, in which case I still use matrix exposure metering, but manual flash control using.
In general, the same can be said not only about Nikon, but also about other systems.

Auto exposure metering does quite well
conclusions
Understanding metering is the foundation for properly exposed photography. If learn to manage with different metering modes, you can easily shoot in any situation with difficult lighting. I advise you to conduct your own experiments on your CZK.
Helping the project. Thank you for your attention. Arkady Shapoval.
Exposure metering produced manually or with the help of automation built into the camera (TTL technology - English Through The Lens). The main goal is to achieve correct reproduction of the most important (defining) tone and to obtain the required brightness range.
The exposure is measured with a special device - an exposure meter (Fig. 1).
Rice. 1 - Exposure meters
Manual exposure meter
There are three types of such devices:
- exposure meters that meter exposure in constant light, that is, they select the necessary (and aperture) in natural daylight or artificial constant light;
- flash meters- devices that measure a short, sharp pulse of light emanating from a flash. Select the required aperture value;
- combined exposure meters- devices that are capable of determining exposure under constant and pulsed light conditions.
By measured luminous flux distinguish between:
- exposure metering by object illumination - measuring the incident light (Fig. 2). In this case, the exposure meter or flash meter is placed in close proximity to the subject;
 Rice. 2 - Lighting exposure metering
 - metering the exposure by the brightness of the object - measuring the reflected light (Fig. 3). It is carried out with an exposure meter located near the recording equipment or, most often, built into the camera (TTL). There can be two types: bright meters with a large measurement angle (about 45 °), and narrow-beam - spot meters (English spot - a spot) with an angle of about 1 ° (considered the most professional). Usually spotmeters are combined in one device with an illumination exposure meter.
 Rice. 3 - Exposure metering according to the brightness of the object
 Built-in exposure meter
Metering the exposure in the incident light gives the most accurate values of the illumination of the object, but, unfortunately, it is not always possible to place the exposure meter near the subject. Therefore, in most cases, measurements are made according to the brightness of the object with a device built into the camera. However, in this case, a number of difficulties arise. All exposure meters are set so that the most important tone is a medium-gray object that reflects 18% of the light, under which the exposure is set (Fig. 4). With the wrong exposure, in this case, we got overexposures on the neck and pedal.
For accurate metering of the exposure based on the brightness of the object, you can use special gray maps or objects (Fig. 5), on which 18% gray is applied. To do this, you need to point the camera lens at the map and adjust the exposure for it. There are also special targets (color checker) for fine-tuning the white balance and corporate colors during processing (Fig. 6).
 Rice. 5 - Map of gray
  Rice. 6 - Color targets
 Exposure metering modes
In the case when it is not possible to adjust the exposure to 18% gray, it is necessary to tie to the most important tone of the scene. To accurately determine the mid-gray tone in bounced light, the camera provides 4 metering modes:
- evaluative exposure metering (matrix, multi-zone);
- spot exposure metering;
- partial exposure metering;
- center-weighted metering;
Evaluative metering (matrix, multi-zone)
Full metering mode over the entire area of the frame (Fig. 7, a). This divides the viewfinder into zones to which any AF point can be associated. After determining the size of the main object, its position, brightness, background, front and back lighting, etc. the camera sets the required exposure.
Suitable for scenes with even illumination, dynamic scenes. The most versatile and popular.
Spot metering
A mode in which metering is performed in the central area, which makes up 2.4% of the viewfinder area (Fig. 7, b). This mode is effective when the background is much brighter than the subject (due to backlighting, etc.). Meters exposure to a specific part of an object or scene.
Partial exposure metering
An extended version of spot metering, in which the size of the metering area is increased from 2.4% to 8.5% (Fig. 7, c).
These metering modes provide the most accurate metering results. It is used in professional shooting of static and contrasting scenes, for example, in a theater, against a light background, night photography.
Center-weightedintegral exposure metering
It is produced by weighting the values relative to the center of the viewfinder with subsequent averaging for the entire scene (Fig. 7, d).
It is used for photographing portraits, since only the brightness of the central object is taken into account, not paying attention to the background.
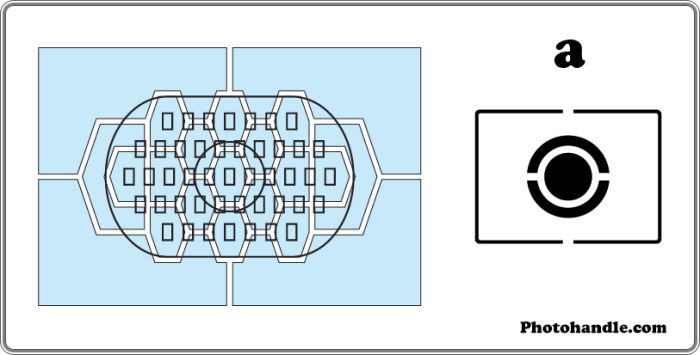 Rice. 7 - Exposure metering modes Rice. 7 - Exposure metering modes |
|||
|
Evaluative |
Point |
Partial |
Center-weighted |
Shooting modes. Automatic, semi-automatic metering
The functions of the above-described metering modes can be applied in different ways, depending on the participation of the photographer in the exposure metering procedure, in which the exposure level can be determined automatically, set manually, or partially set and partially determined manually.
Table 1 - Participation of the photographer in the exposure measurement procedure
|
Setting type |
Setting name |
Manual parameters |
Automatic parameters |
| M (Manual) | Completely manual configuration | ||
| Bulb or B | Manual camera setting, shutter remains open while shutter button is pressed | ||
| Tv (Time value) or S | Shutter Priority | Automatic selection of aperture value at a given shutter speed and ISO | |
| Av (Aperture value) or A | Aperture priority | Automatic selection of shutter speed at a given aperture and ISO | |
| Sv (Sensitive value) | ISO sensitivity priority | Automatic selection of shutter speed and aperture value | |
| Tav (Time & Aperture value) | Priority for shutter speed and aperture | Automatic selection of the ISO value at the specified shutter speed and aperture | |
| P (Program) | Auto exposure at specified ISO | ||
| DEP | Automatic exposure with depth of field control |
Exposure compensation (exposure compensation)
If most of the frame is occupied by an object with a brightness much more (or less) 18% (for example, snow), then the automation makes a mistake, taking this value for the average gray (Fig. 8). The result is an underexposed (or overexposed) image.
 Rice. 8 - Exposure compensation
 In this case, an amendment is introduced - exposure compensation exposure compensation, which shifts the exposure from the value calculated by the camera.
Exposure compensation is set in steps. An exposure shift of 1 EV means a 2x change in the amount of light that hits the sensor. Exposure compensation steps 1/3 EV.
The principle of determining the exposure compensation value is that when shooting light objects or a dark object against a light background, the exposure compensation value is +1/2 .. + 1 EV, very light objects (for example, a snowy landscape) - +1 .. + 2 EV , shooting dark objects or a light object against a dark background - -1/2 ..- 1 EV.
-
 Do I need to annually approve the contingent for the medical examination?
-
 How to release office workers who work only at a personal computer and with office equipment from on-the-job briefings (primary and secondary)?
-
 On the organization of training and verification of knowledge of the labor protection requirements of the organization's personnel
-
 Features of the definition of similar jobs with a special price
Popular
- Named lists of persons subject to medical examinations
- What does the correct protocol for testing knowledge of labor protection requirements look like?
- With changes and additions from
- On approval of the procedure for the formation and work of commissions to test the knowledge of labor protection requirements of training organizations
- Labor protection instructions for administrative personnel and specialists (office workers) Name of labor protection instructions for employees
- Soviet Historical Encyclopedia
- "Roman newspaper": history of the country, history of the magazine
- Mikhail injections A session of public telepathy
- Buy sectional garage doors inexpensively in installments
- Oil production and refining companies