Figurines made of white clay. How to make clay craft
And a very promising topic Clay crafting. Which not only allows you to occupy your hands with something, but also has a positive effect on well-being, self-awareness, internal balance of a person. It can also help you make money.
Classes in applied arts in general always have a very positive effect on the development of a person, revealing his creative abilities, developing fine motor skills of the fingers (and hence thinking), an eye, a sense of color and shape - and these are exactly the qualities that are very necessary in life. In addition, it has long been known that the best gift is do-it-yourself crafts. Even if not quite a masterpiece, naive, sincere, and from this even more dear to relatives and friends.
As this kind of homemade, you can use any small object that is in the field of view of the baby: household "trifle" - nuts, wire, cloves, eggshell and, of course, natural materials - wood, pebbles, leaves. Separately, we can note the topic of our article - clay molding, as most fully providing a person with scope for the realization of his creative fantasies, in fact - perfect opportunity for do-it-yourself crafts.
Clay modeling means that you can give this natural material any shape you like: from clay you can create both figures of animals and cars, houses, up to entire toy cities. By the way, clay is the oldest construction material of mankind and, quite possibly, the building functions of clay were noticed by people just when watching the games of children, creating various home-made products on the banks of the rivers with their own hands.
Clay is a secondary product of the earth's crust, a sedimentary rock formed as a result of the destruction of rocks in the process of weathering. Clay is different - red, blue, white, yellow. Its color is influenced by the addition of other minerals. Clay can be bought ready-made or in powder form. If possible, you can find natural clay, but not all are suitable for work and require long and careful preparation.
Important - if you want your products to be IMMEDIATELY used without firing - use clay with polymer additives
Before sculpting, the clay must be thoroughly kneaded with your hands, and then beat off by tapping it in your palms. In this way, you can get rid of most of the air in order to prevent the product from breaking during firing (if you will fire your products).
Work should be done with two hands. This will allow you to simultaneously decorate the right and left sides of the product, help to more organically connect everything into a single whole. To help your hands for sculpting, you need to use special tools - stacks.
As a rule, work begins with the largest part of the product, gradually moving to smaller ones.

Before completing the work, the product is “smoothed” with a damp sponge, rag or brush.
What are the options for clay modeling?
You can create a shape from a single block of clay, extruding and shaping it as required. With the help of simple techniques of pressing, pinching and pulling, traditional clay figurines are created, for example, folk whistle toys.
- You can carve a figure out of clay using special tools (stacks). Then a piece of clay should be sufficiently dense and slightly hardened so that it does not fall apart in your hands.
- You can create a product using a plaster mold, into which clay is poured, dissolved in water until a homogeneous mass.
- If you want to create a clay craft in a shape (for example, make a vase from a cast of a vessel you have), use plastic wrap. She needs to wrap the vessel before sticking a clay base around it. After the clay dries, the film is easily peeled off, and you are left with the finished form.
- There is also relief molding, when a pattern of any complexity is stuck onto the clay rolled out in a layer.
A kind of relief modeling - cutting out a pattern on the surface.
How to sculpt from clay?
Always remember that clay is not plasticine. This material is much stronger, but you need to handle it with care. Remember a few simple rules:
- First, modeling clay should always be damp. Therefore, after completing the work, cover the mass with a damp cloth, preventing it from drying out.
- Secondly, in the process of sculpting, always smooth out the cracks that appear with water or a water-clay mass.
- When creating a clay craft, start by sculpting the larger parts, and then attach the smaller ones to them.
- Remember that foreign parts, such as pieces of wire, metal or wooden legs, etc., must not be rolled into wet clay. It is better to make recesses for them and put them on glue after the product has dried.

Using buttons, clothespins, magnets or pins, you can make a ceramic fridge magnet, brooch or creative earrings.
What to do with the figure after sculpting - if you do not use polymer clay?
Anything clay must be dried before proceeding with it further. It is better to dry clay crafts in plastic bag. Do not rush things and let it settle for at least a couple of days. To determine if the craft is ready, carefully examine it: a dry clay product is much lighter than a wet one and a little lighter.
After the craft has dried, you can additionally dry it in the oven or microwave.
To make a clay product more durable, it is fired. It is quite problematic to do this at home, but if you have a stove in your country house or village, you can burn the figurine in it. To do this, put the dried (!) Craft for some time in a not too hot oven away from burning coals.
Also, a clay product can be burned at the stake. To do this, either place it in a tin, or place it on the surface of a brick or stone, then cover it with burning logs on all sides and gradually burn it. Remember that firing must always be uniform, and Clay cracks from sudden changes in temperature!

Before painting a clay product, apply a layer of plain white enamel on it. It dries quickly and creates an even base for painting.
Upon completion of painting, apply ordinary PVA to the clay figurine in an even layer. When the glue dries, you will have a beautiful, shiny and durable clay product on your hands! It is done!
More: site about clay and working with it - http://glina.teploruk.ru/
Successful creativity!
In the modern world, there are a lot of different types of needlework: knitting, embroidery, sewing, carving (wood, stones, etc.), decoupage, weaving, and this is not the whole list of what you can do with your own hands. One of the types of needlework is also modeling. Basically, it comes from puff pastry and polymer clay. Just about the second type of volumetric modeling and will be discussed.
The use of plastics
Polymer clay (also called cold porcelain) is a material that, by its characteristics, resembles plasticine, which usually has a solidification temperature and is used to sculpt various figures and details.

In world wide web a lot of photos of figurines made of polymer clay, bewitching with their beauty. They are made by masters of the highest level, who were very attracted to this type of art.


Many of them hold workshops on clay figurines online or in person. At the moment, polymer clay modeling is very popular.

Modeling - as a type of needlework
If this type of needlework attracted you too and you want to learn how to make a clay figurine with your own hands, then this article will be useful to you.

First you need to decide which figure will be made. Prepare a sketch, drawing or photo of the product.

Then, from the whole variety of manufacturers, choose the most suitable one, because each product differs in the method of solidification (drying in an oven and self-hardening), purpose (some are more suitable for modeling large parts, others - for small ones), price, color schemes (matte, glossy, metallic, with fluorescence effect).

It is worth remembering that with the same properties, cheaper polymer clay will crumble after drying and fade.

Making a simple figurine
Step by step instructions for beginners:
Preparatory stage: prepare a clean work surface with good lighting, gloves (required!), modeling materials (clay, knife, acrylic varnish).


Working stage: mold a figure from clay as if from plasticine. Bring the work on the part to the end, because the top layer of clay will harden and will crumble during further modeling.

Final step: dry in the oven or leave to harden. Sand (if necessary) and varnish.

Making a complex figurine
Training. Prepare all the necessary tools (clay itself, wire, knife, toothpicks, foil, varnish, accessories);
- Step 1. Warm up the clay. If there is no required color, prepare (mix several colors).
- Step 2. Make a wire frame;
- Step 3. Increase the volume of the figurine to the required size using foil;
- Step 4. Wrap the figurine with clay, after kneading it (the softer the better, if the clay is not soft enough - you can add a little Vaseline). Be sure to smooth out all the bumps and roughness wet wipe or a cloth soaked in water;
- Step 5. Let the figure harden (put in the oven or leave for a while, it is strictly forbidden to use a microwave oven);
- Step 6. Finish the remaining parts with toothpicks, accessories;
- Step 7. To fix the result, varnish the finished figure.
- Step 8. Prepare a stand for the figure (glass is most often used): thickness - about 2 cm, area - 2 times the "legs" of the figure.


Workplace cleaning
Although polymer clay is not toxic, you should ventilate the room after finishing work.

The shelf life of polymer clay is quite short, and in an open package, it generally deteriorates very quickly. When buying clay, this fact should also be taken into account.

Now you know how to mold a polymer clay figurine and you can create your own masterpieces.

Polymer clay is also used to make beads, buttons, flowers. Not so long ago, plastic began to be used in manicure.


Modeling is a very exciting type of needlework: concentration, perseverance, fine motor skills of hands develop. Therefore, such creativity will be useful for children. It is recommended that children from the age of six be engaged in modeling (from three to six - only under the supervision of their parents) in order to avoid swallowing small parts.


There are so many beautiful clay figurines self made, so this activity will be interesting for the whole family.

Photo of figurines made of polymer clay


Embossing is called obtaining an image by deforming the material, as a result of which the shape and nature of the surface changes.
 blind embossing
The simplest type of embossing is blind (“blind”), which uses a stamp whose printing (embossing elements) elements rise above the blanks and lie in the same plane. The image is clearly visible under oblique lighting due to the shadow of the slightly inclined walls of the picture. Blind embossing allows you to create a single-level image and is used in inexpensive packaging to give it an original look.
To work with clay brings pleasure, you must follow some rules.

At home, crafts at the last stage of drying can be put in the oven, and burned on a gas stove, placed in a cast-iron pan and tightly closed with a lid. The pan is heated by gradually raising and then lowering the temperature. The lid must not be removed until the product has completely cooled down.


My 3 year old daughter loves to sculpt. Together we master new techniques, materials and molds for modeling. Today I will tell you about the features of clay modeling for beginners.
Modeling from plasticine, clay, salt dough and other plastic material well calms the nervous system of the most mobile baby, captivates the most restless fidget, calms and pacifies. Modeling is considered an important component of art therapy.
Modeling allows you to develop fine motor skills, expands spatial thinking. Inventing and embodying figures from plasticine, clay or dough with the baby, parents stimulate his cognitive activity, the child imagines, invents and beats what he has come up with.
Clay is a material for co-creation
Clay is the most plastic and profitable material for modeling. Finished goods do not break, keep their shape for a long time. And most importantly, fairy-tale locker handles molded from clay together with the baby, a dollhouse, counting material - mushrooms, the alphabet, etc. well complement the interior of the children's room and will be dear to the child.

In clay modeling, beginners should immediately decide on the type of material. Clay is different. It can vary in color, consistency, plasticity, and even the presence of water in it.
If cracks appear on the finished product during work, this indicates an incorrect technique for working with the material or a lack of moisture in the clay. There is blue clay, which is enough to get out of the package and knead. There are types of clay that require the addition of water when working with them.
I would like to highlight polymer clay . Very good molding material. Polymer clay is based on PVC and plastic binders; finished products from such clay need to be baked at a temperature of 110 degrees.
Another type of polymer clay is made from a combination of natural ingredients and organic polymers. This material is self-hardening, finished products do not need heat treatment.
Since we decided to master modeling together with children, polymer clay must also be chosen safe to work with kids. With my children, I use a self-hardening polymer Fimo clay Air, it contains more than 90% natural materials, is environmentally friendly and is well suited for children's modeling.

Workplace, modeling techniques
Clay modeling for beginners requires strict adherence to all the rules for organizing the workplace. On the table before sculpting, you should:
- spread oilcloth or other covering material;
- put a bowl half filled with water;
- prepare a dry towel and a damp sponge;
- put a wooden stack and a plastic brush in front of you.
Now you can start a trial clay modeling lesson for beginners. We take out the clay from the bag, box, plastic bucket. Roll into a tourniquet, or pinch off pieces. We knead the blanks.

If the clay is too dry and is about to crumble between your fingers, place it on a table, dip your brush in water, and run the wet brush over the clay. Moisten the clay until it reaches the desired plasticity.
Attention! In the process of sculpting, the clay may stick a little to the fingers, so that this does not interfere, periodically wipe your hands with a towel and a damp sponge.
If cracks appear on the clay figurine, gently rub them with a finger dipped in water. Finished products should be dried during the day. Then they can be colored and decorated.
The only “but” in natural clay modeling is the processing of the finished product. If you do not have a muffle furnace, the finished clay figurine must be dried for 5-6 days, for example, on the windowsill. To prevent the figurine from cracking, cover it with polyethylene for a day.
Sand the dried product and impregnate with PVA glue. Once the glue has dried, you can paint the figurine with gouache, tempera or acrylic paint. Instead of PVA, you can use an acrylic primer as a base for paint. The finished product can be varnished.

Clay toys from the Paraskeva workshop, Diveevo village

Clay figurines in the interior of a children's room
With the help of clay modeling, you can decorate any space. Especially the children's room. For example, decorate the handles of cabinets, doll furniture, a table or a chest of drawers with stucco molding. You can also make materials for role-playing and educational games together with your child: figures of vegetables and fruits in the game “Shop”, counting material (numbers, signs, figures), letters for the magnetic alphabet and much more.

Cabinet handles made of polymer clay. Master class on the link


Lamp “Tabby cat”


Looking at these artificial flowers, you never get tired of being amazed - they are just like living ones!
What is the secret? How can you create such beauty? It turns out that polymer clay is capable of such miracles. But the material is not everything in order to achieve such a result. If you want to sculpt beautiful flowers from polymer clay yourself, you need to consider the following points.


There are several types of polymer clay, and not all of them are suitable for creating flowers. That is, of course, you can fashion them from any clay, but the effect, the quality will be different. Not only flowers are made from polymer clay, but also dolls, decorative figurines, jewelry. Each case is best suited to its own clay.

Polymer clay flowers are indistinguishable from real ones!
To create naturalistic colors, light self-hardening clays are used (they do not need to be baked, they themselves harden in air). By their plastic properties, they resemble marshmallows: they stretch easily and roll thinly. The most famous self-hardening clay for creating flowers is ClayCraft Deco made in Japan. It is especially recommended for beginners in sculpting. It has cellulose in its composition - that's why the flowers from it are the lightest, matte and thin, like paper. You can not wash them - only clean with a dry brush.

Specially designed for flower making cold porcelain(one of the types of self-hardening polymer clay). With his appearance, such a direction of creativity as ceramic floristry was formed. Flowers from this material are so naturalistic that they can hardly be distinguished from the real ones in the photograph.

Ceramic floristry - separate direction creativity
You can buy ready-made cold porcelain - for example, Modena, Modern or Fluer brands. And you can prepare clay for sculpting flowers yourself: it's very simple. Here is one of the recipes.
We will need:
- corn or potato starch
- PVA glue
- baking soda
- petrolatum
Starch (two tablespoons) must be ground with a teaspoon of petroleum jelly (it is most convenient to do this in a ceramic plate or a shallow bowl).
Add a good pinch of soda to the resulting mixture, mix. Now we begin to gradually introduce glue until the “dough” becomes elastic enough, but not too thick or tight. When "brute force" dilute it with glue. We knead the lump, lubricating our hands with Vaseline. The porcelain is ready to use. After sculpting, none of it additional processing not required - just let it dry. Finished products are covered with acrylic paints.

Ready-made self-hardening clays are only available in white, gray or terracotta. But baked polymer clay (plastic) has a wide range of colors. In addition, it may include sequins, filler that imitates metal or stone, be translucent or fluorescent colors. The figures molded from it must be baked in the oven (but by no means in the microwave!) Or simply boiled like dumplings to give them hardness. Finished products are very strong, and thin parts are flexible, easily restoring their original shape after deformation. So, for example, a petal no thicker than a millimeter, bent almost in half, will not break, but will return to its original position. valuable quality for polymer clay jewelry. But such a result is obtained only with its proper firing.
Rules for baking plastics
If you chose baked polymer clay as your modeling material, you can only welcome your decision. Plastic products do not lose their shape, are not afraid of water and do not fade over time. They can be polished, varnished, covered with acrylic paints. The plastic itself is very easy to use. It is just as easy to sculpt from it as from plasticine, it can be rolled out, baked and cut out details and figures with scissors or a knife.

The only difficulty is the baking process. It is worth underexposing or overexposing - and all the work is in vain. But if you strictly follow the instructions, and this is not a problem.
Before being sent to the oven, the figurines are placed on ceramic tiles, old earthenware or a metal baking sheet covered with baking paper.
For better "baking" flowers (or other products) need to be planted on toothpicks or pins and stuck in a wad of foil.
Strict adherence to the temperature regime is the main condition for the successful "baking" of thermoplastics. It is necessary to adhere to exactly the level indicated by the manufacturer. In one case it can be 110 degrees, in the other - 130.
At a temperature lower than required, flowers and other polymer clay crafts are fragile and very fragile, and at a higher temperature they darken and become glossy. A significant excess of temperature leads to complete deformation of the product, it spreads and begins to release toxic gas.

It is important not only to blind beautifully, but also to bake correctly!
An oven thermometer will help you keep track of the correct temperature.
It’s okay if you keep the product in the oven a little longer than it is at the required temperature, but if you don’t finish it, it may begin to crumble over time. A timer will help you stick to the time frame accurately.

When firing clay, take precautions: take the children out of the kitchen and open the window for ventilation, put all food in the refrigerator or under plastic wrap, do not “bake” clay with food. After firing, thoroughly wash the oven, wash your hands with soap, wipe off the clay adhering to your palms with a sponge soaped with dishwashing detergent (after that, it must be thrown away). In its "raw" form, thermoplastic is not toxic, but when heated, everything changes.
How to sculpt flowers from polymer clay
In addition to the material, to make flowers from polymer clay, you also need to have:
- Latex gloves or fingertips. It is not always convenient to work in them, but fingerprints will not remain on the products, spoiling their appearance. Gloves should be your size - they fit snugly on the fingers and interfere less with work.

- Knives.
For cutting petals and other parts of the flower, it is better to use a sharp clerical knife, a blade is also suitable. They allow you to avoid deformation of the product when cutting.
- Stacks. To draw veins on the petals and leaves of a flower, you will need toothpicks, knitting needles or special metal stacks, which can be found in the Everything for Drawing stores.

- Rolling pin. Clay can be rolled out with a glass bottle or a special glass rolling pin.
To sculpt beautiful flowers and flower arrangements, you do not need to have special artistic abilities, but perseverance, patience and skill will come in very handy.
You can start with the simplest - sculpting clay roses for jewelry.
You will need: baked pink polymer clay and rubber gloves.

Roll a sausage out of clay and cut it into pieces - future petals. Form petals of different sizes from them.


We form flower petals of different sizes
Twist the middle of the flower from the smallest petal, the rest from the smallest to the largest - attach to it in a circle.


Make a hole in the finished flower with a pin or a toothpick, so that later you can attach accessories to it (a chain or a hook for an earring).

"Bake" the product in the oven, observing temperature regime and the firing time indicated by the manufacturer in the instructions on the clay packaging.

When the simplest technique mastered, you can try to make a more realistic flower using various special tools: forms for cutting petals, molds for petals and rose cups, wire for artificial flowers, green tape for stems, a stack with a round tip. With the help of a stack with a ball at the end, the edges of the petals are thinly rolled out, and with the help of a mold they are made similar to the texture of a real rose flower. In this case, the petals are glued with PVA glue to the drop-shaped base of the bud. A five-pointed green clay flower cup, the ends of which are cut with a knife for realism, completes the beautiful picture.


Polymer clay flowers: you can't tell from the real ones
Flowers from polymer clay: a master class for beginners. magazine "Rootvet"
Polymer clay flowers step by step wizard class with photo and video
Polymer clay flowers (master classes)

Polymer clay flowers (cold porcelain photo, video, how to make)


DIY plasticine at home: varieties and recipes
What could be more pleasant and useful than modeling for children? Perseverance, creativity, fine motor skills, coordination develop. Strengthen and become more dexterous fingers. And most importantly, modeling is easy to organize at home, almost at any time. Hence the great need to learn how to make plasticine at home with your own hands.

Why do we do it ourselves?
- Homemade plasticine has a number of significant advantages over purchased plasticine.
- Plasticine made at home is safe because the materials used are substances that will not harm the health of the child. Dyes are used natural. Parents are calm about the quality of the material.
- Homemade plasticine is usually softer, more delicate - it does not need to be kneaded for a long time.
- If the baby is still very small (1-2 years old), and actively tastes everything, plasticine made at home, with the addition of salt and citric acid, will quickly discourage the desire to eat it, and without unpleasant consequences.
- Plasticine created at home is different in that it does not dry for a long time, does not stick to hands and does not leave greasy stains, and is very easy to wash off with water.
And make it fast and fun!
- Finally, homemade plasticine is much cheaper, especially considering its consumption by children and the cost of materials.

What is required to make plasticine?
For the manufacture of children's plasticine, mainly used food products that can be found in every kitchen. These include: flour, starch, soda, salt, citric acid, vegetable oil and food coloring. To make plasticine with an unusual texture and properties, you may need: PVA glue, sodium tetraborate, sparkles, paints, foam balls, cream of tartar, glycerin, hand glue, etc. The composition of plasticine depends on its purpose and type. There are a lot of different recipes for making “dough”, and they differ in components, complexity and cooking time. There is cold-prepared plasticine, and there is one that needs to be boiled, fried, baked. But in fact, homemade plasticine is an elastic mass, like dough, so the first recipe that will be considered is plasticine, which is most likely known to you as “salt dough”.
A simple recipe for mass for modeling flour, salt and water
Yes, this is the easiest recipe to make salt dough. But, despite the widespread use of this material, salt dough has not lost its popularity and relevance today, and it can be safely classified as a type of homemade plasticine. Salt dough is soft, elastic, holds its shape very well and is suitable for the manufacture of "long-term" products - it dries well, turning into a durable and hard result. When dyes are added to the test base, a wonderful bright “plasticine” is obtained, which is no worse than the purchased one. The disadvantages of this test can only be attributed to a relatively short shelf life - in the refrigerator 3-maximum 7 days. After that, an ugly and hard gray crust forms on the dough, which is no longer suitable for use.

Materials for manufacturing and manufacturing process:
- 1 glass of flour;
- 1 glass of water;
- ½ cup salt of the finest grinding;
We mix the ingredients in the following sequence: dissolve the salt in water, and adding flour, knead the dough. If necessary, add flour with salt (observing the proportions). We knead the dough very well, wrap it in a bag and send it to the refrigerator for at least 6 hours. Of course, you can immediately sculpt from the dough, but after “setting up” in the refrigerator, it becomes more elastic and pliable, keeps its shape well. Figures from the test are durable, light. You can immediately sculpt from colored dough, or you can paint already dried products with gouache. To make the dough more like plasticine, add a spoon to the base vegetable oil(or a little hand cream) and a spoonful of citric acid.

Starch plasticine
If for some reason there is no flour, then plasticine can be made from starch and soda. This dough has a white color, a flexible texture and a longer shelf life.
To prepare it you need:
- 1.5 cups of water.
- Soda - 450g.
- Cornstarch - 1 cup.
- Dyes.
Combine all ingredients in a saucepan and stir until smooth. Then heat the mixture, stirring constantly. The resulting solution will increase in volume and boil.
Simmer for about 5 minutes, until the mixture is thick and smooth. The dishes must be removed from the heat, put the plasticine on a plate and wait for it to cool completely.
For children, you can come up with a variety of creative tasks: modeling aliens, sweets, plasticine landscapes. Teach students how to sculpt basic elements- cakes, sausages, balls, flagella. To begin with, show how to mold a tree, how to create a caterpillar from balls, how to mold dishes, fruits. By combining elements and using your own imagination, you will have fun and usefully spend time, and when the plasticine runs out, you can easily prepare a new one.
In these videos you can see the process of making 4 types of plasticine from different materials.
Most interesting articles:
The topic of modeling from polymer clay has now become very popular. This is understandable, clay is very pleasant to use, it cannot be dirty, like paints, the process of working with it calms, and most importantly, the products from it are very entertaining. Clay resembles plasticine, but its plasticity is much higher, which allows you to create crafts much better than plasticine. If you don't want to bother with baking homemade clay, then DIY self-hardening polymer clay is the way to go.

The only disadvantage of polymer clay is its price. High-quality clay is not cheap, and given how much beginners have to spoil it, you immediately start to think and look everywhere for a polymer clay recipe with your own hands.
How do you make your own homemade polymer clay? First, let's find out what components this clay consists of. So, its main part is polyvinyl chloride, or pvc, and different types plasticizers that give clay softness and elasticity. As well as pigments to give the clay different shades. And stabilizers that slow down its hardening. We will make home-made clay, of course, from other components, but the final product in terms of its plastic properties will be much closer to plastic.
To create 350 g of homemade clay, we need:
- a glass of PVA glue;
- a glass of corn starch;
- 1 st. l. vaseline;
- 1 st. l. non-greasy and silicone-free hand cream;
- 2 tbsp. l. lemon juice;
- enamelware;
- plastic spatula;
- plastic board;
- some cling film.
Cooking method:
Pour corn starch into an enameled bowl, add glue and petroleum jelly. Mix everything thoroughly so that there are no lumps. Then add lemon juice, and mix everything until smooth. The mixture should be plastic. Then put the resulting mixture in the microwave at maximum power for 30 seconds.
Take out and stir, then put back in for 30 seconds. The mass is slightly covered with a dry crust, it should be cut off. Lubricate a plastic board with hand cream and put the finished mass on it. Next, you need to knead the mass well like a dough. This process takes about 5 minutes. You should get a plastic and elastic mass.

We roll the resulting clay with a sausage and put it on a cloth so that the clay cools down and excess moisture leaves it, then we wrap the plastic in cling film. You can start working right away, or you can wrap it better with a film, put it in a box and leave it in the refrigerator. If you decide to use homemade clay right away, then you can make it colored right away or color it later.
To give the clay a shade, you need to divide it into several parts and add a little acrylic paint, then mix each piece. Wrap each colored lump of clay separately in a film and store it this way until use. It is important to remember that to make the clay softer, it is enough to heat it up a little, and then add a little Vaseline or cream to it. But the best way is to mix it with softer clay.

Clay is ready, now you can get to work. Let's try to make the first products from our plastic. From this clay you can create the most unusual crafts and jewelry.
Examples of work from home length can be seen in the photo:
You can start creating a product from one color of clay, you can do combined work, but in any case, the main thing is to decide and take the first step. You can make a simple flower, as shown in the photo:

In another way, it is called cold porcelain. One caveat, for its production you will need a plasticizer, it will significantly improve the plasticity of the product. Do not be afraid, it is sold in any car shop. Let's start.
We will need:
- 350 mm glue Moment and PVA 1:1;
- 150 mm cornstarch;
- 1 tsp citric acid;
- 1 tsp glycerin;
- 2 tbsp. l. plasticizer;
- any cream without silicone.
Cooking method:
Mix glycerin, glue, citric acid and starch. Mix and add glue. Mix again until smooth, pour in the plasticizer. The mass acquires ductility and viscosity. We put in the microwave for a minute at maximum power. Then take out and mix again. So we repeat 3 times, reducing the heating time first to 30 seconds, then to 15 seconds. With the last stirring, add the cream.
Lubricate the bag on the inside with petroleum jelly and put the resulting porcelain there. There it should be stored for a day. Then it can be used in the same way as clay, but it does not need to be baked, it hardens in air in a day. More information about the preparation of self-hardening clay can be found on the video:

Popular
- What is gypsum and where is it mined
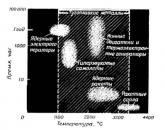
- How a nuclear power plant works
- The simplest clay dishes in survival conditions!
- Ao Kamov. Light helicopters of Russia. Production of light helicopters in Russia Where light helicopters are used
- Children's electronic presentations and clips Children's electronic presentations for preschoolers
- How to make a do-it-yourself collage of photos: ideas, methods and design examples Funny do-it-yourself photo collage
- How to make a collage of photos with your own hands on the wall: create home comfort Collage of family photos with your own hands
- Funny fairy tale scene about a turnip Fairy tale turnip for the new year for children
- Prom theme: how to choose and what ideas do you have?
- Batman comics: where to start reading?