Making ceramics with your own hands is a hobby for sophisticated natures. The simplest clay dishes in survival conditions! Modeling clay dishes
Experienced potters create such beauty in just ten minutes that you are amazed. But is it possible to make beautiful ceramics yourself?
What kind of clay is needed
To make ceramics, you need natural clay - this is the main ingredient. Glazes, varnishes, pigments and enamels will be required to cover the finished pottery and color it in the desired color.
Natural clay is:
- White - after firing, the product acquires the color of ivory, in the initial state of the clay it has a grayish tint;
- Red - the color is due to iron oxide. Clay is well molded, it is convenient and easy to work with, after firing it becomes red.
- Blue - used in medicine and cosmetology.
There are also porcelain and dark brown clay, but we will focus on the first two types.
Basic methods for making ceramics
There are different technologies for making clay products:

Clay crafting
The section will be of interest to parents who want to engage their children in a useful and developing activity. And clay modeling develops motor skills, imagination, and will be able to occupy the most restless child.
For adults, clay modeling will be an interesting and refreshing hobby. 
Helpful Hints:
- Cover your work area with plastic wrap.
- Nearby should be a container of water, a dry towel and a wet sponge.
- The main condition for successful work is plastic clay. If you see that cracks have appeared on your product, cover them with liquid clay. If the clay crumbles, smear it with a wet brush until the material becomes plastic.
Polymer clay is popular - it consists of PVC and plasticizers.
There are two types of polymer molding material:
the first requires firing at a temperature of 110C;
the second is self-hardening, products do not need heat treatment.
Pottery all the way
To make round pottery, you need a potter's wheel. There are circles with foot and electric control. Various modifications are manifested in the dimensions of the faceplate, rotation speed, power and type of engine.
Working on the potter's wheel requires basic skills and dexterity. For beginner potters, sculpting and pouring the slip mass is suitable. What we will talk about next.
slip casting
Clay of a liquid consistency is used, it is poured into plaster molds. In words, everything is simple, but in practice, ceramic products crack, resulting in uneven thickness. Let's consider the technological process in more detail using the example of pouring a simple mug. 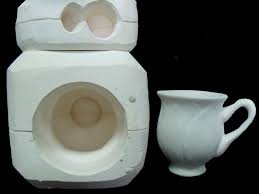
Why plaster molds?
Gypsum absorbs moisture, it will draw excess moisture from the clay slurry. It is convenient to work with plaster, you can make a home-made form, giving it the necessary pattern and size.
Whole or collapsible forms?
The configuration and type of mold does not affect the quality of ceramics, only the ease and convenience of removing the product from the mold. It is easier to remove the finished product from the collapsible form. 
Requirements for clay slip:
- A liquid solution without impurities, large particles and debris is used. Before cooking, sift dry clay, remove debris, etc.
- Strain the finished slip through an old nylon stocking.
- The thicker the solution, the thicker the walls of the mug will turn out.
Pour the solution into the mold
Attention! Problem! Air bubbles in the clay solution affect the strength of the product. You need to pour the slip along the wall of the mold, like beer.
Now we are waiting. You will see how the walls of the future mug appear along the contour of the plaster mold. The optimal wall thickness is 5-6 mm. If you see that the slip has become less, add more. When the walls are of the required thickness, you need to drain the remaining solution.
How to do it right?
Carefully pour the remaining slip from the mold. Cut the sides of the mug flush with the mold with a knife. You can’t just turn the mold over and put it upside down: a drop forms at the bottom. You need to leave the mug at an angle.
When the clay has set and become hard, remove the product from the mold. The fact that the mug is ready is evidenced by the fact that it began to peel off from the plaster mold. If this is a collapsible form, then remove the bottom and separate the parts of the form.
Not only mugs and cups are made by the shlinker casting method, but also souvenirs, gift ceramics. 
In hardware stores or on the Internet, you can buy ready-made molds for pouring.
Ceramic tableware
There are good reasons to do your own pottery making:
- Uniqueness - original dishes that you would like and suit you in all respects can be bought to order or made by yourself. Here are just homemade options will be many times cheaper.
- Quality and environmental friendliness. Not all purchased ceramics please with quality and durability: cracks, chips appear, and the pattern becomes not so bright and clear after a month. Some manufacturers use harmful substances such as lead and cadmium. Lead glaze looks beautiful, but you can’t call it environmentally friendly.
- Savings and even the possibility of additional earnings. A beautiful service costs money, but you can do it yourself.
There are different technologies, a simple way is to mold plates or bowls with bundles. As shown in the photo below, a lot of interesting things can be fashioned with bundles. 

The main thing is that the clay must be plastic, any cracks are smeared with slip. Securely glue the fragments of the future plate to each other.
- After that, remove the excess with your fingers or a stack, give the bowl the desired geometry.
- All cracks and irregularities are smeared with slip.
Finishing decoration
Decoration is done according to your imagination. The pattern can be cut with a toothpick or a needle. With the help of improvised means, you can make an interesting print on clay that has not yet set.
Basic requirements for such modeling
The bottom should not be too thick, otherwise it will crack during firing. The edges of the bowl should not be thin: chips and damage are inevitable.
All cracks and crevices are covered with a liquid solution.
Jewelry ceramics
Have you heard of ceramic jewelry? Can you make them yourself? Jewelry ceramics is a material consisting of crushed and compacted particles of non-metallic materials from inorganic chemistry.
In furnaces, the material is fired at a temperature of 1600 degrees, after which the material becomes durable, resistant to scratches and mechanical damage. Light weight and strength are the advantages of jewelry ceramics.
No matter how much you want to make a durable ceramic jewelry using technology, it will not work.
Outcome
Making ceramics with your own hands at home is a feasible task. The main thing is desire and a little patience.
How to make pottery from ceramics with your own hands, watch the video lesson - courses on ceramics
To make a clay cup with your own hands, you do not need any special skills. You can do everything at home, involve children in the project. Self-hardening clay is ideal for home crafting, however this material can be finicky. It has a texture close to putty, it is not so easy to smooth out, but this problem can be solved with wet hands.
Materials:
- self-hardening clay
- spatula for clay
- dye
Scheme of work

Using both hands, make an orange-sized ball.

Press the center of the ball in with your thumb and pinch it while rotating the clay around your finger with your other hand. Start sculpting the cup from the bottom, gradually moving up. At the top, the movement should be more pulling to increase the size of the cup.

Use a spatula to smooth the edges and inside of the bowl. You can also use it to remove excess clay in some parts if one side is thicker or taller.

Place the bowl on a flat surface to smooth the bottom. It's best to choose a surface that rotates easily, such as a cake stand, so you can rotate the bowl to perfection.

Continue smoothing the surface of the bowl with your fingers, making sure your hands and clay are damp. This will improve glide. After smoothing, allow the bowl to dry for at least 24 hours.

The most exciting part is the personalization of the thing made. You can color it however you like. To replicate the sloppy strokes used in this project, use the dry brush technique.

After dipping the brush into the paint, wipe off any excess with a paper towel.


Make a few horizontal strokes on the bowl. You don't have to worry about their accuracy. Such painting will give the product texture.


The article was prepared based on www.homeyohmy.com.
Polymer clay was invented relatively recently. Masters have known about this material for no more than half a century. Today, sculpting from it is a very popular hobby for amateurs and a professional activity for experienced designers.
Buying polymer clay a couple of years ago was very problematic. Residents of various Russian cities ordered it from the capital or from other countries. Now, almost all art salons or needlework stores offer such plasticity, where it lies next to knitting yarn, paints and floss that are familiar to us. Many interesting crafts can be made from this amazing material. These are not only souvenirs, but also a huge number of other things that will decorate our lives. You can also decorate the mug with polymer clay, the master class of which is described in this article.
Principle of operation
Today, polymer clay is one of the most common materials used for needlework. Masters are attracted by its elasticity and non-toxicity. In addition, crafts obtained from such material look simply fantastic.
You decide to decorate mugs. Then you should learn how to work with this material. Half the success of your event will depend on choosing the right polymer. It should be borne in mind that ordinary self-hardening clay can be used to decorate mugs and other dishes. However, this material hardens in air after a certain time, which is not enough for beginners, in order to give the product the necessary shape.

What is the best thing to buy in order to decorate a mug with polymer clay? The material can be of any kind. The main thing is to study the instructions and learn the rules for handling it.
polymer clay brands
Today, art salons and needlework stores offer their customers many varieties of material. Which one to buy to decorate the mug with polymer clay? Consider the brands of this material in more detail:
- The domestic manufacturer offers St. Petersburg plastic under the name "Tsvetik". This is the cheapest option, but working with it is somewhat difficult. Products of the brand "Tsvetik" are quite solid and easily soiled. However, a person who has patience and skill can make beautiful things out of them.
- In order to decorate the mug with polymer clay, you can buy the material of the German manufacturer Cernit. For some, it may seem, on the contrary, too soft in work. However, many craftsmen are attracted by the quality and color range of this sculpture.
- The Fimo brand is the most popular in our country. It is produced by the German company Eberhard Fabe. There are several varieties of this polymer. So, "Fimo Classic" is more solid. The Fimo Soft brand is soft and easy to knead. Both types of material are available in a wide range of colors. The manufacturer offers polymer clay with sparkles, transparent, and also luminous in ultraviolet. All these types are perfect for those who decide to decorate the mug with polymer clay.
- Some craftsmen use material brought from America. This is polymer clay of two brands - "Kato" and "Scalpi". It is not offered in Russian stores, but those who were able to purchase it need to be prepared for a fairly strong smell of the material, similar to the smell of Soviet gouache. In terms of its other qualities, this polymer is similar to other brands.
- The whole polymer line is offered by Poliform Products. But this material is chosen, as a rule, by sculptors.
In addition to solid, all of the above companies produce liquid plastic, which is a gel. This is a viscous transparent material that hardens after heat treatment. Decorating mugs and spoons with polymer clay can also be done using a gel, the possibilities of which are also endless.

Before you buy this amazing material, you should choose a product that will be decorated. Based on its color, you will need to decide on the tone of the plastic. Let's start with two or three. Among them should be a white bar, which can be diluted with more saturated colors.
varnish
If you are decorating a mug with polymer clay, how to make the finished item the most attractive? To do this, it should be varnished. This will give the mug a gloss and more expressiveness of the colors. In addition, varnish is necessary to enhance the strength of things. In addition, he fixes tinting paint on it.
What are plastic clay varnishes? The manufacturer offers matte, semi-gloss and glossy coating material. Such varnishes are sold in hardware stores. What can be done to make a polymer clay mug look the most attractive? Experienced craftsmen advise purchasing acrylic water-soluble varnishes with a polyurethane base. Such material is practically odorless, dries quickly and is easily washed off the brush. In a day, a mug with a polymer clay decor, covered with a similar varnish, will become resistant to mechanical damage and moisture.
Those who are engaged in such work for the first time should remember that before applying varnish, the surface should be washed with dishwashing detergent or degreased with alcohol, and the coating process itself is best done with a synthetic brush.
Working surface
How to prepare for sculpting with polymer clay? To work with this material, you need the smoothest possible surface. It can be glass or ceramic tiles, as well as a simple sheet of white paper. The main condition for such a surface is the absence of pores into which plastic can eat.
Knives
A block of polymer clay should be cut into pieces of the required size. For this, the master who decorates the mug with polymer clay (see photo below) will need knives.

They must be sharp enough. This will allow not to deform the product during cutting. To complete the decor of the mug, a regular or blade can be used.
Rolling pins and stacks
These tools do not have to be purchased in art salons. Stacks when working with plastic can be knitting needles or toothpicks.
In order to roll out plastic, many lovers take a glass bottle. Suitable for these purposes and other material at hand, which may be, for example, a bottle of hairspray or deodorant.
Gloves
After heat treatment of polymer clay, the master's fingerprints may remain on it. In order for the product to be neat and not to spend too much time polishing it, it is necessary to wear latex gloves. You can buy them at any pharmacy. Sometimes they are not very convenient when sculpting, but they greatly increase the quality of the work done.
Gloves should be selected according to the size of the hand. After all, the denser the latex adheres to the fingers, the more convenient it is for the master to decorate the mug.
Other
What other materials will be needed to complete the planned work? In general, in order to make a thermoplastic thing, you can use:
- special forms (boats), with the help of which figures are easily cut out;
- a special syringe (extruder) equipped with various nozzles;
- pasta machine;
- texture sheets;
- powders, etc.

However, all this can be bought after you understand that sculpting products from polymer clay is your calling.
What a Newbie Needs
As a rule, they decorate mugs with polymer clay of a girl. A master class on carrying out such work begins with an explanation of what beginners in this business should prepare:
- the mug itself;
- nail polish remover or glass cleaner;
- polymer baked clay;
- wooden skewer or toothpick;
- clean wet cloth;
- epoxy adhesive;
- stationery knife;
- varnish for plastic clay.
Preparatory stage
So, you have decided to decorate the mug with polymer clay. How to do this work with your own hands? To begin with, you should take some boring mug, which should become bright and original.

It should be laid on the surface in such a way that it is as convenient as possible to work. For this, for example, a baby blanket can be used.
Beginning of work
If your idea is to decorate a mug with polymer clay, how to make this work? To begin with, a piece of plastic of the desired size is cut off. Next, it should be well kneaded. Only in this case, the clay will become soft and plastic. To improve the working properties of the material, you can use a special tool. It's called a plasticizer. Experienced needlewomen are advised to purchase Moldmaker brand products. A few peas of this product are enough to soften a whole pack of clay. Vaseline or creams can serve as alternative materials. Suitable for softening and warming procedure.
It happens that clay, especially fresh clay, sticks very strongly to hands. In such cases, experienced craftsmen mix it with a harder brand or leave it on a piece of paper for several hours. However, it should be borne in mind that all the above manipulations will not help the material into which the paint has already got.
It is very important that no air bubbles remain in the clay. In the future, this will ruin your product. When heated, the air will expand, which will warp the plastic.
After that, you should take a cotton swab and, moistening it with nail polish remover or glass cleaner, wipe the surface of the mug. After that, we make an application on it.
baking
A mug with a polymer clay application should not be afraid of water, fade and lose its original appearance over time. To preserve all these qualities, the product must undergo heat treatment. What device is suitable for this? For baking polymer clay, use a gas or electric oven, as well as an electric mini-oven. Microwaves are not suitable for this purpose. The hardening process of polymer clay occurs only when exposed to high temperature. The principle of heating food in the microwave is to create waves. However, there are exceptions to the rule here as well. Some models of modern microwaves are equipped with a function that allows you to set the desired baking temperature. If there is such an opportunity, then clay can be placed in this household appliance.
What else should be considered when decorating a mug with polymer clay? MK (master class) involves accurate monitoring of the temperature indicated on the clay packaging. Exceeding it will cause the material to burn and release toxic substances. As a rule, this temperature is in the range from 110 to 130 degrees. That is why it will be very convenient for the master if the oven he uses has a built-in thermometer. Clay is baked for a short time. Duration of hardening applied to the mug application - ten minutes.
End of process
After heat treatment, the mug should be removed from the oven. From it you need to carefully separate the baked application. Next we need epoxy glue. It is made independently, adhering to all the requirements of the instructions. A thin layer of glue should be applied to the reverse side of the completed application, as well as to the mug, which we wipe again with nail polish remover or glass cleaner. After that, the appliqué is pressed tightly against the mug and subsequently adheres to it very well.

At the next stage of work, you will need a matte or glossy varnish. They cover the finished application. The varnish will protect the surface of the product from damage.
How does the application behave in operation? A cup made in this way can be safely washed. But do not put it in the dishwasher or use abrasive products on the decor.
Pottery is an invention of mankind, which has been proving its versatility and usefulness for many thousands of years. Along with the invention of a wheel or, for example, a spoon, it can be considered a find of genius in its simplicity. Love for ceramics has not faded over time. Ceramic pots, vases, plates, as well as tea sets, candlesticks, whistles and even musical instruments - all this can be done by yourself from a living natural material, clay. And how to do it, read here.
What is ceramics made of and where to get materials for work
Making pottery is such a visually appealing activity that many people without much artistic skill simply try pottery and find it hard to stop. But the path of a ceramist is not easy: the hobby is not the cheapest, requiring perseverance, concentration, willingness to try and try again.
Making ceramics is the work with clay. The material will be the basis of your activity if, for example, you have “played enough” with polymer clay and want to do real, natural. A ceramist cannot do without a potter's wheel and a kiln: both cost a lot of money. You will try to bake the first works in the oven, but when your hand gets stronger, you will think about professional equipment.
Where can I get all this? You rarely have to mine clay yourself, ready-made material can be bought in materials for creativity and handicraft. If the process is frequent, start ordering directly from the supplier. The potter's wheel is also easy to find - they are in specialized stores, of different prices and quality. Muffle kilns, in which dishes or jewelry are fired, are expensive. But if you value your interest in pottery highly, it brings you pleasure, and you decide to earn money with it, you will have to find funds.
A little tip: you can try it on a set for a beginner ceramist (children). The potter's wheel and clay are included, the oven or kiln will "help" with firing, and you will understand whether you should take more serious steps in relation to ceramics.
Clay technique by hand
The technique of work is the base, without mastering which no beginner will advance further. For some reason, many novice ceramists at the very first lesson want to sit down at the potter's wheel, although training begins with modeling.

modeling
For many centuries, masters who worked with clay tried to improve the techniques and methods they already had. Interestingly, most of the skills that a ceramist owns were invented a long time ago and have changed little.
Traditional sculpting methods involve:
- hand molding from a single piece of material;
- tape-harness equipment;
- plastic (textile machinery);
- otminka in the finished form;
- casting in the form of their plaster;
- drawing an object on a potter's wheel.
Hand sculpting does not conflict with stretching on a circle! Yes, it arose before its invention, but did not cease to develop with its use. And a huge number of craftsmen around the world continue to make clay products by hand. First, practice on plasticine: this will help you understand whether your hands like this kind of work, whether you are ready to do it for hours, patiently wait for the result.
Potter's wheel
It was not invented by chance, since, unlike modeling, it allowed the production of clay products to be flown - that is, it significantly accelerated the process of making ceramics. The potter's wheel requires the right approach: it is like a musical instrument that needs to be mastered. Correctly put hands, feel confident in them - these are important technical points.

warm-up
Beginning ceramists dwell on this technique in detail, as it is simple and understandable, while being illustrative. Soft clay is laid out in a plaster mold: it hardens, and the finished product is taken out of the mold. Why gypsum? He has one very attractive feature - he is able to absorb excess moisture, and the product hardens and dries out.
Casting
In casting, molds are also used, but already different. The diluted material is poured over them, the blanks are thoroughly dried, taken out and taken for painting. The craft will gain strength only after firing: it is impossible to obtain pottery with your own hands without temperature exposure.
Materials and tools
Start with simple and inexpensive, as the hobby develops, the requirements for them will increase.
Tools
Of course, the main tool is the hands of the ceramist, but despite the poetic nature of what has been said, one cannot do without quite prosaic tools.
At work you need:
- Potter's wheel,
- string,
- needles or awl
- pottery scallops and stacks.
There are a huge number of variations of the latter, do not “grow” with them until you feel confident in your hands and ready to engage in ceramics further.
Where and what kind of clay to get
It is easier to buy material in a specialized store, or you can make it yourself. But walking in search of raw materials along the slopes of ravines and quarries is not an occupation for everyone, therefore the option with a store is preferable. Buy pottery clay - plastic, different colors, which are suitable for hand modeling and for working on a circle. There are enough impurities in this clay, due to impurities it acquires characteristic colors and plasticity.
How to prepare for work
Dry clay is dissolved with clean water in a clean container: it is easier to do this in an enamel basin. If, in addition to the powder, you have dried lumps of clay, they can be soaked and reused. Clay is poured with a large amount of water, mixed, infused. After that, the composition must be crushed, and it is ready to work.
Foreign bodies are removed from the material by squeezing. The washed clay is wrinkled and interrupted several times: in this way, voids and unnoticed foreign bodies can be avoided. Clay dough is elastic and homogeneous.
Manual clay technology
Initially, the clay needs to be kneaded - you need to press on a piece of material with your hands and fingers. Then the ceramist learns to pinch off correctly: first, a piece is pinched, then it is torn off. In order for the clay to become flat, you need to learn how to flatten it with your fingers, large pieces are pressed with your palm to the surface.

Rolling clay allows you to form balls, rolling creates flagella, cutting is the division of a piece into a stack, sharpening is pulling a piece with your finger to give it sharpness. When making a clay product, the master works with two hands, he always uses tools (remove excess, make a small detail, attach, smooth, etc.). In the process of modeling, the product is constantly inspected for proportions and symmetry.
How to mold a clay plate with your own hands, step by step instructions
And now step by step about how to make pottery.
To make your own plate, you will need: kneaded clay, a rolling pin, a cup of water, a wooden spatula, a piece of paper, and a flat surface. Knead the clay until it does not stick to your hands: it should be elastic and pliable.

The plate is made like this:
1. Roll up a ball, the diameter of which is 8 cm. Make a recess in its center.
2. Gently press down on the indentation with your fingers: the ball turns clockwise. Each movement stretches and enlarges the ball. Place the workpiece on a sheet of paper: it is convenient to rotate it. You will get something like a bowl, which can be given the desired shape.
3. Form even edges with a wooden spatula (if there is no spatula, just moisten your fingers with water). Rotate the sheet in a circle, and a spatula or fingers applied perpendicularly will work to align.
4. Moisten your fingers with water and smooth the product inside.
The plate is stuck! The first test may be far from ideal, but only with experience will the plates become smoother and more pleasing to the eye.
How to mold a clay mug with your own hands in stages
Materials: clay, brush, water, spatula.
1. With both hands, form an orange-sized ball from the finished clay.
2. Press the center of the ball with your thumb, pinch it, rotate the material around your finger with your other hand.
3. Start sculpting the cup from the bottom up.
4. The spatula will smooth the edges and the inside of the product.
5. The cup needs to be rotated to smooth its bottom (it is convenient to do this on a sturdy cake stand). Smoothing is done with wet hands.
The following video shows how to make a clay mug with your own hands in stages:
Drying and firing of the product
Drying is needed to remove physical moisture. Dry the product should be a day, no less. Next, future dishes or decorations are fired in a kiln. And here are several options - a Russian stove, a special muffle furnace and even a fire. But the last method is dangerous, because the firing lasts 8 hours, and all these hours you will have to watch the fire.
Usually, beginners start with an oven, but it’s worth saying right away that utility bills will increase. For masters, muffle furnaces work for days, and the ceramist lays these expenses in the price of the product.
Product decoration
To decorate means to decorate, with color or relief, glaze or painting.

There are a lot of decoration options:
- relief;
- painting;
- glazing;
- inlay;
- embossing;
- seal;
- reservation;
- openwork;
- silkscreen, etc.
Ceramic paints can be applied to the product by hand painting. The drawing can be applied with a contour for decoration, or you can work impromptu, which is more difficult, of course.
Features and uses of earthenware
Earthenware is used for cooking in an oven (gas or electric), in a Russian stove. Individual instances are applicable for microwaves, but it's not worth the risk. Ceramics are afraid of sharp temperature fluctuations: if you put a cold pot in a hot oven, it can quickly crack.
Contact of pottery with an open fire is also undesirable - cracks will go through the product. Only Russian clay pan latka and Georgian ketsi can be safely used as frying utensils. Or rather, boldly, but skillfully - they are placed on a small fire, which gradually increases.

You can brew tea in earthenware, but first you need to thoroughly pour hot water over it from the inside. The most delicious green tea is brewed in red clay products, according to the Chinese. Remember that the porous structure of clay perfectly absorbs odors, fats and tastes. Therefore, make roasts in one pot, and serve salads in the other. Do not use the same dishes for polar dishes.
You need to wash pottery in warm, barely soapy water (you can take soda instead of soap). But it is better not to use detergent chemistry: you should not take risks and leave the chemical composition in the porous structure of the clay. After washing, the dishes are thoroughly wiped and dried in the air without covering with a lid.
Conclusion
Do-it-yourself ceramic dishes will be your favorite utensils in your kitchen. It keeps the warmth of your hands, it contains the efforts of the author, many hours of work. Finally, it is always an exclusive variant that does not have a copy of the item. Beautifully decorated ceramic tableware looks completely different on the table, and even the usual dishes in it look more appetizing, brighter, more refined.
Ceramics as an art does not look at age, education and artistic skills.Tryeveryone can owe!
In contact with
How to determine that you have found clay or not. This can be done in two ways. To get started, take a piece and try to roll it into a thin sausage, if it rolls out to a diameter of 3-5 mm, then you are already close to what you need. Now take a bite and chew.
If the teeth do not squeak and the substance in the mouth does not have a pronounced taste and smell, you have found a good clay. Take the sample home, dry it well in the air, and then ignite it in a fire. If after that it did not crumble and acquired a homogeneous, slightly rough structure at the break, this clay is suitable for making dishes.
First you need to prepare the clay. To do this, the raw lump is thoroughly kneaded, just as hard dough is kneaded. In this case, it is necessary to periodically knock on it with a fist. This is done so that the clay becomes homogeneous throughout the volume, all excess air is removed from it, which guarantees the quality of the resulting product.
If the clay is too hard, you can add a little water. You can knead clay not only with your hands, but also with your feet, which is even easier. The result should be clay that doesn't stick to your hands, but isn't too dry or brittle either. To work using the potter's wheel, it is necessary to prepare the clay softer. But people mastered this technique much later, and we will do the same, having first considered the elementary technology for making pottery, which was used long before the invention of the potter's wheel.
The actual manufacture of dishes can be carried out in two main ways - from rolled flat pieces and from bundles, or some combination of them.
The clay is rolled out like pie dough on something flat, covered with a pre-moist rag, to a thickness of 5-7 mm, after which the dishes of the desired shape are formed from the resulting pancake by hand. It is good to make flat dishes in this way, such as plates or shallow bowls, or something very small, like a fat (oil) lamp.
The manufacture of pots, cauldrons, jars, jugs must use a different technique.
Take a small piece of clay and roll out a tourniquet with a diameter of 0.5-0.7 mm from it, from which you will form the walls of the vessel, twisting the tourniquet into spirals. If the pan must have a flat bottom, proceed as described above, make a pancake and cut out a circle of the required size from it.
Laying it around the perimeter of the bottom with your right hand, with the thumb of your left hand, press on the surface of the tourniquet, achieving its strong adhesion to the bottom. Then the next tourniquet is rolled out. Since the surface of the product gradually dries up, for better adhesion of the next turn, it should be slightly moistened with water using a brush, a rag swab, a bunch of feathers.
The described operations are repeated until the end of modeling, i.e. until the capacity of the vessel is completely formed.
If you want to get a vessel with smooth changes in diameter, in the process of work, apply the coils with a slight deviation outward when expanding, and inward when narrowing. To give the product greater strength in the course of modeling, the bundles are smoothed out and leveled from the inside with a stack or hands moistened with water.
After forming the container, you can attach handles, legs, etc. which I do not advise you to do. For carrying, it is better to use wicker products, and put them on special stands or sand.
After finishing modeling, wrap your product in something that looks like a rag or newspaper and place it upside down on the table to dry for two days. Drying of the product should take place in natural conditions. At first, it is desirable that the bottom, and then the neck, dry out, so the vessel is placed in this way, only then the thing will be strong. If the raw product cannot be put on the neck, its upper part is wrapped with a damp cloth and dried in the position in which the thing was molded.
The product must dry to an air-dry state. If it is raw, it may burst during firing. Now the most important procedure is firing.
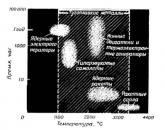
At the first firing within 2-3 hours it is necessary to slowly dial up the temperature of 300°C.
Until the process of sintering of clay particles has begun, the remaining moisture must be removed. The main thing is to prevent sudden temperature fluctuations and one-sided overheating of the product. Then we raise the temperature to 580 ° C, hold for 10-15 minutes, after 15 minutes we give a temperature of 900 ° C.
After that, we stop firing and let the products cool down calmly to a temperature of no more than 30 ° C.
Only then can the product be removed.

Popular
- What is gypsum and where is it mined
- How a nuclear power plant works
- The simplest clay dishes in survival conditions!
- Ao Kamov. Light helicopters of Russia. Production of light helicopters in Russia Where light helicopters are used
- Children's electronic presentations and clips Children's electronic presentations for preschoolers
- How to make a do-it-yourself collage of photos: ideas, methods and design examples Funny do-it-yourself photo collage
- How to make a collage of photos with your own hands on the wall: create home comfort Collage of family photos with your own hands
- Funny fairy tale scene about a turnip Fairy tale turnip for the new year for children
- Prom theme: how to choose and what ideas do you have?
- Batman comics: where to start reading?