DIY collage in vintage style. How to make a do-it-yourself collage of photos: ideas, methods and design examples Funny do-it-yourself photo collage
One of the touching gifts is a photo collage. This is due to the fact that photographs are not only interesting images, but also keepers of human emotions and feelings. Such a gift can be presented absolutely for any holiday, which makes it not only memorable, but also universal. You can make a photo collage with your own hands in various ways, and you can ignite the activity of the imagination based on the ideas below.
One of the touching gifts is a photo collage.
There are many ideas for decorating a collage of photographs, which differ from each other in the complexity of the compositions, the necessary elements and tools. Any of them is a great gift for the holiday, and it doesn’t matter which one, because photos collected in the same style carry positive energy and charge you with positive energy every time you view it.
Most often, photo collages are made for the following holidays:
- wedding and its anniversaries;
- birthday;
- mothers Day;
- anniversaries.
Also, a photo collage can be made from photos of a kindergarten or school. It can decorate the walls of the house and, along with a photo album, carry information about family and friends.
Gallery: photo collage (25 photos)


DIY photo collage for mother's day
Most often, parents are presented with simple compositions from photographs so that they can examine the quivering images as carefully as possible and recall old emotions and feelings. Therefore, the best option for creating a collage for Mother's Day is its design on a substrate. You can also make a beautifully unusual template from whatman paper and photos for a birthday greeting to a man from a woman. In order to make it look festive and unusual, you can look online for free samples and templates on the Internet and insert with Kalash all the photos that have been connecting you for many years.
For this you will need:
- square high-quality bright photos in multiples of 4 (of the same size);
- polyurethane, plywood or plastic base 40x60 centimeters;
- double sided tape;
- foam brushes;
- matte glue for decoupage.

Most often, parents are presented with simple compositions from photographs.
How to do:
- The first step is to outline the future composition. To do this, place the selected photos on the basis. The pictures should be arranged in even rows.
- After the composition is balanced and harmonious, you need to stick all the photos in their places using double-sided tape.
- After gluing all the photos, the collage should be smeared with glue so that it becomes one and is protected from dust and dirt. To process the composition of the terminals, use a foam brush.
- When the glue dries, the collage should be turned over and attached to the base with the fastener necessary to hang the composition on the wall.
For such a composition, you should choose high-quality and bright photographs, it is desirable that they remind your mother of the most important and happiest moments of her life. Therefore, on Mother's Day, you can collect photographs of the hero of the occasion herself, as well as her children from infancy. This will turn out to be a touching story of her life. If there are few such photos, you can arrange a composition by taking images from a vacation or travel.
How to make a birthday photo collage?
Creativity and imagination should be applied to the creation of a birthday present. Compositions based on original geometric shapes look interesting. If your loved one has a birthday, you can make a collage in the shape of a heart, and if a colleague has a birthday, give him a composition-initials from photographs. If the hero of the occasion is an animal lover, the photo can be framed on the silhouette of your beloved pet, and if he recently traveled to rest to the sea - in the form of sunglasses or a beach umbrella.
An original gift is made from the following necessary items:
- photographs of any size and shape;
- the basis of the chosen form;
- ice-backlight and fixtures for it;
- double sided tape.

Creativity and imagination should be applied to the creation of a birthday present.
How is it done:
- The photos are arranged on the base so that there are no empty areas between them. You also need to make sure that the photos do not block each other too much. In order for the composition in the chosen form to look organic, it is allowed to change the angles of mounting photos, but not at a large angle.
- The finished work can be laminated, placed under glass or fixed with decoupage varnish.
- You can decorate the composition with the help of additional elements. Ice lighting looks very impressive. To do this, run a cord along the edge of the mold, securing it with fasteners every 4-5 centimeters.
Also, various paper flowers, buttons, rhinestones, beads, stickers can be used as decorative elements. They will give the composition a special mood and emphasize its individuality.
Collage of wedding anniversary photos
A wedding anniversary is a family holiday, so a gift for it should be chamber and touching. An anniversary photo collage can be made from matchboxes - it turns out an original and delicate composition, devoid of bulky elements.
For manufacturing you will need:
- photographs of various sizes;
- cardboard base;
- pencil;
- glue (preferably use instant crystal);
- double sided tape;
- decorative elements;
- matchboxes;
- scrapbooking paper with various wedding inscriptions;
- acrylic paint.

A wedding anniversary is a family holiday, so a gift for it should be intimate and touching.
Design technology:
- Before you start creating a composition, you need to draw a sketch of it. The sketch should reflect the ratio of different sizes of matchboxes or their group.
- Next, the intended ornament is laid out from the boxes, the extra faces are removed in order to form larger cells.
- All boxes are carefully glued to the base with glue.
- The resulting base is tinted with acrylic paint and left to dry completely.
- Then photos are glued into the cells using double-sided tape. It is worth considering that the picture should not be glued into each cell. Various decorative elements can be added to some cells, by the way, there are various examples of gluing wedding paraphernalia there: rings, images of doves, glasses, dresses and suits, a bride's bouquet.
- Some cells can be decorated with simple scrapbook paper cutouts with inscriptions.
After the glue dries, the collage can be fixed with decoupage glue. It will be possible to broadcast a picture on the wall or give it as a gift after a few hours - as soon as the glue is completely dry.
Photo collage on the theme "My family"
Family photo collages - the most dimensional in size. This is due to the fact that the family history is quite long and can be constantly replenished. Therefore, to create a composition on the theme "Family", it is better to use a collage design scheme from individual shots. Instead of a photo collage, a large postcard is also suitable where you can also paste small photos and write “our friendly family”, a child can carry such a composition to kindergarten.
To compose a composition you need:
- photos of the same size (composition of square photos looks spectacular);
- plastic or foam board;
- stationery knife;
- glue.

A huge plus of this collage is that it can be replenished with new photos at any time.
How to DIY:
- First of all, according to the size of the photo (0.5 centimeters more on each side), a substrate is cut out of plastic or foam board. Cut out the base with a clerical knife.
- Photographs are glued onto the cut out base with glue. The edges of the bases will act as photo frames, so you should leave the same free space on each side. Also, the base can be decorated with wallpaper or other neutral paper or material. For these purposes, you can use samples of wallpaper or furniture upholstery.
- Photos on substrates are placed on the wall. An original and simple move is to arrange all the substrates in several straight rows. This arrangement will resemble a real family photo album.
A huge plus of this collage is that it can be replenished with new photos at any time.
A collage of photos is a creative interior decoration and a great gift for a close friend, girlfriend or relative.
This wonderful piece of art is easy to make yourself. A do-it-yourself collage of photographs will be mastered even by a beginner in handmade art, and the result of the work will delight you and your loved ones for many years.
Do-it-yourself collage of photos on a substrate
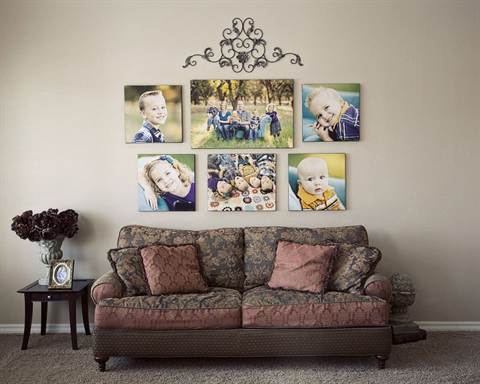
One of the simple collage options is a product of a simple geometric shape on a finished basis. It is done quickly and looks very impressive. The main thing is to choose bright, preferably portrait shots.
So, to make a collage you will need:
Photographs (square, in multiples of 4, 48 as an example)
Substrate (it can be a polyurethane sheet, plywood, plastic) size 40 * 60 cm
Velcro, adhesive tape or special hangers for attaching to the wall
Foam brushes
Decoupage matte glue (you can also use good quality PVA)
Double sided tape
Consider the stages of work. The most important thing is to form a composition. Choose a photo, decide on their number and size, lay it out on a substrate. It is important that the photos are the same size and arranged in even rows. If necessary, carefully mark the rows with chalk or pencil, the main thing is that the markings can then be easily erased. When the composition is ready, start carefully sticking the photo on double-sided tape. After sticking the photo, the collage needs to be covered with a layer of glue so that it looks like a single whole and is protected from dust.
After the glue dries, the collage is ready. It remains only to attach it to the wall with the means of your choice.
Do-it-yourself photo collage of the original form
In addition to the classic geometric shape, you can give the craft a thematic look, for example, choose a heart shape for a wedding collage, give a collage in the form of his initials to a birthday person, sunglasses are suitable for pictures from a summer vacation, and his silhouette for a photo with a four-legged pet.
To create such a collage, you need to prepare:
Base (cardboard, whatman paper)
Glue or double sided tape
On the selected basis, draw a silhouette of the future object, cut it out and start filling in the space of the object. Place photos in such a way that there are no empty spots, but the overlap of one photo on another is not too strong. The finished work can be laminated or placed under glass. And add additional decoration, such as lighting around the perimeter of the product.
Collage of photos using matchboxes
To create a three-dimensional collage, you can use matchboxes.
For work you will need:
Photo of different size
Base (cardboard or paper)
Pencil
Glue moment-crystal
Double sided tape
Jewelry (flowers, butterflies, shells, memorabilia, etc.)
Scrapbook paper with inscriptions
acrylic paint
Before starting work, draw a sketch. It should be a combination of cells of different sizes, forming a square or rectangle. Determine the exact size of each cell. Transfer the sketch to the base. Lay out the cells from the matchboxes, cut off the extra sides to get boxes in place of the cells, corresponding to their size. Glue the boxes to the base. Paint the product with acrylic paint and let dry well. White paint will be universal, but you can choose any color, depending on the theme of your collage. Then distribute the photos into cells, lay out the decorations, fill some cells with scrapbook paper cutouts. After the composition looks harmonious and complete, you can start gluing photos and decorations. Use transparent glue, you can also glue volumetric elements with a glue gun, if you have one. After finishing work, leave the product to dry, it is necessary that the glue grabs well. For greater durability, after drying, you can cover the product with decoupage glue. After a few hours, a collage of photos with your own hands can be hung on the wall.
- So, you have made your own collage of photos with your own hands, now you need to find a suitable place for it.
- The theme of the collage should correspond to the chosen room. Romantic hearts are suitable for the bedroom, and bright photo combinations for the common room.
- If you decide to complement the collage with a frame, then choose a simple rectangular or square frame made of thin baguette to keep the focus on your work.
- The photos themselves should be made in the same style, it’s good if all the photos are from the same photo shoot.
- You can add more creativity to the craft by processing and preparing collage elements using Photoshop or Picasa.
- The latest software even has the ability to automatically create a collage from uploaded photos. If you have the skills to work in these programs, then be sure to use them.
- If necessary, correct the photo, perhaps you will make all the photos black and white, or add some kind of general color accent.
- You can give photos an interesting shape or make a bright background.
- You can complete the entire collage in the program, and then simply print the work in the format you need.
- This option is also popular, especially if you can process the photo with high quality.
- In any case, the use of these programs can add zest to your work.
- Try to create a collage of photos with your own hands, it will be a good alternative to a photo album.
The latest trend in photo collages is to create creative shapes from just unframed photos. It's funny and can give unexpected results. For your inspiration, we have collected 17 of the best DIY examples. In most cases, photos are mounted directly on the wall, sometimes on thick paper, canvas, or hung on a wire. In any case, these are very cheap ways to create a photo collage. It just takes a little time and imagination. You can print photos of the same or different sizes. It depends on your idea.
Photo hearts are trending right now.
The latest fashion is creating a heart-shaped collage from Instagram photos.

Got an empty corner? Make a photo collage in the shape of a heart. postalpix.
A neat idea to combine a wall clock and a photo collage

Photos are located around the clock. photojojo.
Unusual shape inspires

The deer head is very popular lately. Why not make it from your photos?
Decorate your walls

Great idea for decoration.

Use twine to create an interesting geometric shape.
Hang your photos on a wire

Set of square photos from Artifact Uprising

This hanging photo wall looks very modern.


The cloud-shaped collage makes this room very inviting. This idea of posting photos without frames was spied on in one Parisian loft. Learn more about him at remodelista.com
Strict, even, flawless rectangle from the photo

Rectangular photo collage with neatly placed photos.

Do you have a big wall? Make a giant Instagram collage out of photos arranged by color.
To create an eclectic decor, make a free-form photo collage

The frames and the tree itself are actually vinyl decals.

The whole wall is a big collage.

Custom made wallpaper.
Timeless b/w

A collage that can grow...

…and become a chic black and white photo wall.

They say that in b / w any photo is better.
Who would have thought that successful shots exist not only to be stored on computer hard drives, to be bragged about on social networks and shown on smartphones and tablets. But good shots, reminiscent of the happiest and most joyful moments of life, are really a worthy decoration for the interior of your apartment. Therefore, we offer you a master class in which we will tell you how to make a photo collage on the wall with your own hands.
Tools and materials Time: 3 hours Difficulty: 2/10
- printed photos of the same size;
- plastic or foam board;
- stationery knife;
- glue.
From small photos, you can make a beautiful photo collage on the wall with your own hands, which will become a canvas of family history and will remind you of the brightest moments in family life.

Step by step master class
So, let's start together a photo collage on the wall with your own hands.
Step 1: choose a wall
Decide on a suitable empty wall. In Photo 2, it is located to the left of the entrance to the living room.

Step 2: choose a photo
We select photos for the future panel, sort them into collages to print on a color printer. For example, you can place an image on a black background with a white border.

Step 3: cut the photo to size
Cut out the photos with scissors or a utility knife.


Step 4: make the underlay
Paper photos on the wall will look, to put it mildly, unaesthetic. Therefore, they can be placed on a sheet of ordinary or foam board, plastic. The main thing is that it should be a dense material that is able to keep its shape well.
We outline the base and cut out the blanks with a clerical knife.

We glue the photos on the prepared PVA base or with a glue stick. By the way, in this way we saved a significant amount of money on photo frames, which is good news.

Step 5: Hang the Photo on the Wall
Now we put our photos on the wall.
However, it should be noted here that your collage will hang on the wall for a very long time. And when removed, traces of glue or holes will remain on the wallpaper. But if you need a temporary option, then the basis of the photos must be attached to double-sided tape. Alternatively, you can glue all the photos on a large sheet of plywood and hang it like a picture on a nail. True, you can attach it tightly with an adhesive gun.

For accuracy, you need a long ruler. It is convenient to draw a thin line on the wall with a pencil, which will be the upper border of the panel. For these purposes, you can use masking tape.

After gluing the first row of photos at the same distance from each other, use a ruler or masking tape to evenly position the next row.


Each of us has a huge photo archive, photos accumulate on electronic media and it is not always possible to see what interests us at the moment. There are photos that I would like to always have before my eyes, whether it is a family history, a memory of relatives and friends, pleasant events or pets. From this we can conclude that photographs are one of the best decorations for an apartment. They will enliven the atmosphere of the house, bring comfort and allow you to create a unique style of your "nest" without major alterations. In this article, you will learn how to make a collage of photos with your own hands on the wall. The remarkable thing is that when creating this wonderful decor, everyone at home can take part - and just look there will be a new photo of the “happy moment”.
Collage - Literally translated from French as "gluing". In art, they call it a method of decoration, where a material of different color and texture is glued onto a base.
Deciding on a place
Before starting work, you should decide on the location of the collage. The room chosen for placing the collage should be spacious enough, for the wall where we want to place the photos, a good view is required, about 2 meters of free space to cover the entire composition. There are many recommendations for accommodation, which one to choose is up to you.
For example, you can choose a wall in the hallway or kitchen, however, in this case, due to the small size of the premises, there is a danger that the composition will be “lost”.


Think about what photos will go to the design of the collage. One of the main rules is unity of subject matter, subject, such as wedding photos or photos of children. Before placing a photo collage on the wall, it is recommended to lay out the photos on the floor and evaluate their location. At this stage, you can move the photo cards or add new ones.

The photo on the wall should be placed in such a way that the central line of the composition is at the eye level of the person looking at it. If the photos are different in size, then the largest one is located slightly above this level, so that it is more convenient to view the smaller ones. The composition should also not be placed above a bed or sofa - it will be simply uncomfortable for you when you want to look at them, and even if the fastening is incorrect, the composition may fall.
Favorite moments of your life are safer to place above the head of the bed, black and white photographs will look very stylish.

Suitable Ideas
When placing photos, you can use ready-made design tips, or come up with your own, the main thing here is to feel the general style of the room.
You can use frames that are the same size, color, and style, or multi-colored, up to a maximum of three different photo shapes or sizes. Frames are an important element of decor, and not just “framing” a photo. With multi-colored frames it is more difficult, as they require the impeccable taste of the author of the composition. DIY frames are very original, especially in the nursery.

If the photos are different in size, then they should be placed from large to small. Such a composition will look more dynamic.

Original examples
Here is an example of such a way to design a collage:

Let's consider the following workshops on making a collage from photos: on a large drawing paper, draw a base on which photos are glued. Photos can overlap, but the composition should not be oversaturated.

Printed photos of the same format in the same frames are placed on the wall. We attach photos at the same distance from each other, measuring the desired location with a ruler or masking tape.
If you want to be creative, you can place photos in a simple and original way. Attach a clothesline to the wall in the room and attach the photo with clothespins. Such an exposition is very easy to update periodically.

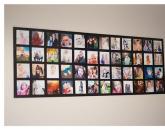
A collage of many small photographs placed in one large frame will look original. For the base, we need, for example, a sheet of plywood ennobled with a beautiful baguette frame. The result is a wonderful whole "picture".

One of the latest creative ideas is to place photos without a frame at all. You will need any substrate: cardboard, plastic or other material that can hold its shape well. The base must be drawn and cut out with a knife, while the size of the photo and the base must match. If you wanted to make the size of the base a little larger, then you get a great frame.
-
 Children's electronic presentations and clips Children's electronic presentations for preschoolers
-
 How to make a do-it-yourself collage of photos: ideas, methods and design examples Funny do-it-yourself photo collage
-
 How to make a collage of photos with your own hands on the wall: create home comfort Collage of family photos with your own hands
-
 Funny fairy tale scene about a turnip Fairy tale turnip for the new year for children
Popular
- Prom theme: how to choose and what ideas do you have?
- Batman comics: where to start reading?
- Remember everything: how to organize graduation at school
- Scenario of the holiday Victory Day in kindergarten Name of the holiday on May 9 in kindergarten
- Scenarios of the holiday Defender of the Fatherland Day for adults
- Thematic entertainment "Spring" (for children of the middle group) Entertainment on the theme of spring
- Agraphia is a complex disorder of speech and writing.
- Presentation on the topic "the development of speech of preschoolers in games and exercises"
- Scenario of a theatrical fairy tale in the senior group
- Writing impairment and correction in left-handed schoolchildren Articles writing impairment in visually impaired schoolchildren