How to establish a Wi-Fi connection. Configuring a wi-fi router
Plug the internet cable into the WAN (or Internet) port of your router (aka router).
Connect the router to the computer: insert one end of the network cable into any of the LAN ports of the router, and the other into the connector of the PC network card. You can use a wireless connection instead of a cable, but it is best not to do this during the setup phase.
Plug the router into a power outlet. If your device has a power button, press it. Then wait a minute or two for the router to boot up.
2. Check the Internet
If your router was pre-configured by the provider or received settings in automatic mode, then the Internet can work in a few seconds after connecting the router to the PC.
To test, launch your browser and try opening several sites. If there are no problems with access to web resources, you can skip the fourth paragraph of the article.
In the address bar of your browser, enter 192.168.1.1 or 192.168.0.1 and press Enter. One of these IP addresses should lead to the router's settings menu. If both options do not work, find the required IP address in the documentation for your router model and try to enter it.
When the page for entering the settings appears in the browser window, the system may request a username and password. Most often, during the initial connection, one word is suitable for both fields - admin... Less commonly, router manufacturers use the combination 1234 .
If necessary, you can find the login information in the instructions for the router or on the provider's website. Well, or try an alternative one.
4. Set up your internet connection
If the Internet still hasn't worked, the router needs special settings. Exactly what options you need depends on your specific device model and Internet service provider. There is no universal configuration. To obtain the necessary instruction, check the provider's website or request it from support.
Once you've obtained a setup guide for your model, follow its prompts. If in the process you set up both an Internet connection and a home Wi-Fi network, you can skip the fifth paragraph of the article.
To get Wi-Fi, it is important to choose the correct security settings.

In the settings menu, find the section responsible for the wireless network (see the documentation for your router model). Here, be sure to set a strong password (you will need it to connect your devices to the router via Wi-Fi) and select WPA2-PSK as a means of protection.
6. Change the password to enter the router settings
Just in case, it's best to restrict outsiders' access to the router's settings menu. If the router is still protected by the default password, replace it with your own.
Find the settings section that is responsible for the security (see the documentation for your router model) of the device, and enter a new strong password here. Save your changes.

If your computer has Wi-Fi module, after completing the setup, the network cable can be pulled out of the PC and connected to the router wirelessly.
7. Install the router in an optimal location
Ideally, the router is in the center of the area where you are using Wi-Fi. Thus, the signal will be equally available to all connected devices.
The fewer walls, furniture, and other obstructions between the receiving device and the router, the better the wireless network will perform.
If the power of the router is not enough for stable Wi-Fi coverage of an apartment, house or office, there is a need for additional devices. There are three ways to strengthen the weak signal of the main router: install an additional antenna, repeater, or another router. Each method has its own advantages and disadvantages, let us dwell on the third option in more detail.
How to set up a router
To configure the router, connect a computer or other device with an installed web browser to it:
- you can connect a computer with a cable by connecting the PC network card to an available LAN port of the router;
- You can connect wirelessly to a Wi-Fi router using a laptop, tablet or smartphone.
By default, the wireless network is assigned a name (SSID) identical to the model name of the router, and access to the shared Wi-Fi network is not password protected.
After establishing a connection with the router, open a web browser on a computer or connected wireless device and type the IP address of the router in the address bar. For example, for a TP-LINK router, the address will be as follows: http://192.168.0.1
Entering the IP address of the router in the address bar of the browser will open access to the control panelThe illustrations are taken from the settings of the TP-LINK TL-WR 1045 router, from other manufacturers the control panel looks different, but general principles, abbreviations and terms will be the same.
The correct IP address, username and password required to enter the control panel are indicated on a plate attached to the bottom of the router.
 The IP address, login and password of the control panel are indicated on the nameplate on the bottom of the router
 The login and password indicated on the plate refer only to the control panel, but not to the wireless network distributed by the router. After entering the login and password, the main screen will appear, displaying information about the state of the device and providing access to menu items for setting modes.
Do not change the factory settings in the router settings unless necessary. After making changes to the router settings, restart the device.
Video: setting up a Wi-Fi router
Two ways to connect routers
Routers are connected into one local network either by cable or wirelessly. It is recommended to use devices from the same manufacturer.
Cable connection
A twisted pair cable (UTP cable) is laid between the main and secondary routers. In the main router, the cable is connected to the LAN jack, and in the additional router, to the WAN jack (this jack is highlighted in color and is sometimes called the Internet). With this connection, the additional router will be for the main network device, and the main one for the additional will act as a provider, distributing the Internet and providing a dynamic IP address.
Before installing an additional router, think over how the cable will be laid, and carefully measure the length of the future cable channel. When purchasing a cable, buy one meter longer than the measured cable duct, and ask the seller to immediately crimp the ends of the cable into the connectors. If the cable duct runs outside the premises and is exposed to natural influences, then purchase a cable with a reinforced sheath.
Advantages of the method:
- reliability and stability of the cable connection;
- easy configuration of both routers;
- the installation location of the additional router is not limited to the wireless coverage area of the main router.
Disadvantages of the method:
- the need to purchase and lay a cable;
- when moving the router, the cable will have to be moved to a new place.
Configuring routers with cable connections
If the main router is already configured to work with the provider and there are no complaints about the work, then nothing needs to be changed in the settings.
Make sure the DHCP function of the host router is enabled to automatically distribute IP addresses to local network... You do not need to change the starting and ending IP addresses.
Setting up an additional router
It is recommended to immediately reset any changes made to the settings of the router to those preset by the manufacturer. To do this, turn on the router, find the Reset button on the back panel, press and hold it for 5–7 seconds. To protect against accidental reset of settings, the button is hidden inside the case and you can press it through the hole using a needle or an unbent paper clip.
 An example of the location of the reset button on the back of the router: the button is hidden inside, only the hole for pressing is visible
 In the additional router, two settings are checked and set:

 Making changes to the additional router's own IP address avoids the conflict of identical addresses in the same network
After changing the IP address of the router, enter the new address in the browser address bar to re-access the control panel.
There is a cable connection option where the cable is connected to the LAN port of an additional router. This option is complex to configure and does not offer any advantages over connecting through the WAN port.
Wi-Fi wireless connection
Advantages of the method:
- does not require physical connection of routers with a cable;
- allows you to easily move an additional router if necessary.
Disadvantages of the method:
- the relative complexity of the setup;
- slow down the speed of the wireless network.
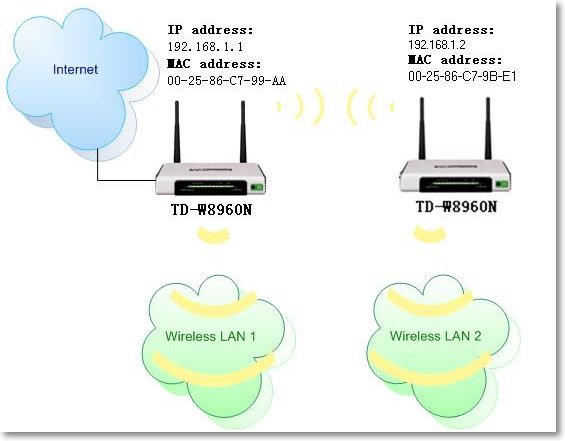 The main router receives the Internet from the provider and distributes it over the wireless LAN1 network; the additional router receives the Internet wirelessly from the main router and distributes it via the wireless LAN2 network
Configuring routers for Wi-Fi connection
When connecting two routers in a local network over a wireless channel, a "bridge" connection is used, in English Wireless Distribution System (WDS), designed specifically to expand the Wi-Fi coverage area.
Understanding Bridge Connection (WDS)
When this type of connection is established, the main router works in standard mode, and the additional one acts as a Wi-Fi amplifier, receiving and distributing the signal further.
To connect the routers in the "bridge" mode, you must establish a permanent (fixed) communication channel between them and specify in the settings physical addresses connected devices. To configure the "bridge", both routers are turned on, the main router is pre-configured for the provider, receives and distributes the Internet, and the additional settings are pre-set to the factory settings by pressing the Reset button.
Configuring a Master Router for WDS Mode
We change the mode of automatic selection of the broadcasting channel to the fixed channel mode (for example, to the 11th channel).
Setting a fixed channel number prohibits the router from automatically scanning the air and choosing the least loaded channel. Therefore, if outside wireless networks are working nearby, you may have to manually experimentally select the least loaded channel or use a special program to find a free channel. The channel number must be simultaneously changed on both routers - the main and the additional.
Configuring an additional router for WDS mode

On the main page of the router's control panel, the line "WDS Status" should display "running". This means that the additional router is connected to the main router and is distributing the Internet.
Video: how to make a Wi-Fi network between routers (WDS)
Building a complex network requires knowledge and experience. If you are confident in your abilities, use our instructions. If you are in doubt about your abilities, it is better to seek help.
How to install a WiFi router?


The stability of a home network largely depends on the correct configuration of all its nodes. As you know, the main component is a router. Understanding his work is not difficult. Almost any user can install a WiFi router at home.
Connection
Before proceeding with the installation of a WiFi router, you should:
- connect it to a computer in the usual way (using a cable);
- connect the provider's cable.
If an ADSL router is used, this should not be a problem, since the LAN cable and telephone line differ in the size of the plugs. It is enough to insert them into the corresponding connectors and supply power to the device.
In other cases, it is important not to mix up the WAN and LAN (Ethernet) connectors. They can be identified either by marking or by the description in the passport. You will have to insert the provider's cable into the WAN, and the computer cable into the LAN. It should be borne in mind that a router can have a different number of LAN ports (depending on the specific model). After all the connectors are connected, and the device itself is connected to the mains, you can start configuring it.
Web interface
A special interface is used to configure the router. To access it you need:
- determine the IP of the router and its “login-password” pair, which are indicated on the sticker on the bottom cover or in the passport;
- launch any browser on your computer;
- enter in the address line of the IP router;
- press the "Enter" key;
- enter the login and password of the router in the appropriate fields;
- press the "Enter" key.
If after completing step 4 the authorization page does not open, you should:
- start the Network and Sharing Center and general access;
- select the item "Change adapter parameters";
- move the cursor to the "Local Area Connection" icon;
- press the right button and select the "Properties" line in the menu;
- go to the "Network" tab;
- click on the item "Internet Protocol version 4 ..." and click the "Properties" button;
- put a marker in front of "Use the following IP address";
- in the field "Main gateway" enter the IP of the router;
- in the "IP-address" field, enter the IP of the router with the last digit changing to 110 (for example);
- click on the "Subnet mask" field (the values will be set automatically);
- in this and in the previous windows, click the "OK" button;
- turn the router on and off.
Customization
The web interface menu is quite informative, which allows you to install a wifi router in just a couple of clicks. First of all, you need to change the standard password for access to it in order to secure the router from outside interference. For this it is enough:
- find the item "Administration";
- to introduce New password and confirm it;
- save changes.
For subsequent actions, you will need provider data:
- connection type;
- login and password for Internet access;
- VPI and VCI (in the case of an ADSL router).
They can be obtained from the office of the Internet provider or by calling the support service.
If they are already known, then:
- find the section "Internet" ("Internet", "WAN");
- fill in the appropriate fields;
- save the changes.
- find the section "Wireless network" (WiFi, Wireless);
- open the subsection "Basic settings" (Wireless Settings);
- fill in the field "Wireless network name" (SSID) - any combination of numbers and letters in Latin;
- choose a region (Russia or Europe);
- set the mode (mode) - "11bgn mixed";
- set the channel (channel) - "Auto";
- save the changes.
The last step will be to change the security settings of the WiFi network. For this:
- open the subsection "Wireless Security";
- we mark the item "WPA / WPA2" (the most secure for today);
- in the "Password" field, enter any combination of numbers and / or letters in the Latin alphabet;
- save the changes.
Now all that remains is to reboot the router (turn it off and on).
DHCP issues
If you had to manually configure the IP on the computer to connect to the router and enter the web interface, you must use a DHCP server. For this:
- we find the item "Network" ("LAN");
- put the marker next to the DHCP item to "Yes" (Enabled);
- save the changes.
Quick Start function
Most routers have a Quick Start feature. When you turn it on, the items and sections necessary for changing will appear automatically. All you have to do is enter the data in accordance with the information received from the provider and click the "Next" button.
You can get more information on this issue in our articles.
According to my observations, few of those who could on their own connect wifi router, if there's wired Internet knew how to do it RIGHT. That is, configure a wireless network with it and combine different devices into it. As a result, they subsequently encounter difficulties that could have been solved at the design stage of the local network.
How to connect a wifi router?
Before proceeding to step by step description on connecting a Wi-Fi router, I want to draw your attention to one point.
To create a full-fledged local wireless network, you need to buy just such a device as a ROUTER, or it is also called a ROUTER.
The fact is that there are a lot of devices that are similar in appearance and functionality for various purposes. For example, unknowingly, it is easy to confuse with a wired router without WiFi, which also distributes the Internet signal to devices. But only with the help of cables - it does not have an antenna.
Another device with a similar outward appearance- access point. She generally has slightly different tasks from ours. The characteristic difference between a router and an access point is that it has several sockets for network cables. While at the point, he is usually alone.
The point of connecting a router is that it is now, and not your PC, that will connect to the Internet via a cable. To do this, all the necessary parameters required to connect to the provider, which were once applied on your desktop computer, will now be registered in the router settings. And all other devices will already receive the Internet via wifi from him and according to the rules that will be set in it.
For clarity, look at the diagram:

In order to connect a router at home and set up a Wi-Fi network, I used a dozen models from completely different manufacturers. I can say with confidence that in terms of the actual configuration of the WiFi router and connection to the provider, the difference between them lies only in the details of the graphical design of the administrator panel. Therefore, having learned once the principle on one model, you can apply them to others. Today, as an example, I will illustrate with screenshots from two routers - TrendNet TEW-632BRP and ASUS WL-520GC.

How to connect a router to the Internet via DHCP?
The first setting that we will discuss is the DHCP server setting.
If before there was only one computer and he alone received an IP address from a provider, then we can hook up a lot of computers and gadgets to the router. This means that it is the router, instead of the computer, that will "communicate" with the provider's equipment. And already within the framework of our home network between these devices, he himself will assign an internal IP address to each computer, laptop, phone, TV and everything else.
Procedure:
- After connecting to the power supply, first of all, you need to configure the router to communicate with the computer. To do this, plug the Internet cable into the WAN slot on the device. And the other cable, with two plugs, which most likely came with the device, is connected with one end to the computer's network card. Where the internet cable used to be. Others - in any of the LAN1, LAN2, LAN3 or LAN4 slots of the router.

I also want to note that it is better to connect the router to the network through an uninterruptible power supply. I had an unpleasant experience when good device from Netgear skipped due to a power surge. It just started broadcasting wifi not 100, but 2 meters. Of course, I had to buy a new one.

- Next, take the installation disc that came with the router. And we start installing the drivers and software.
- After that, we need to configure the computer to work with the router. Now our network card is configured to go directly to the Internet through a provider. This means, perhaps, some data is registered in the control panel, which is important for us to save and use after that when working with a router. To do this, go to the settings of the TCP / IP v.4 protocol as shown in the diagram:
For Windows XP: Start> Control Panel> Switch to Classic View> Network Connections.
In Windows 7: "Start> Control Panel> Network and Internet> Network and Sharing Center> Manage network connections> Change adapter settings."
In the screenshot I go to the "Wireless Connection" settings, but you do not have it yet, and since we connected the computer to the router with a cable, then you need to select the "Local Area Connection" item:

If you have something indicated here, then write this data on a piece of paper. This is especially true for those who have lost their contract for the provision of services and do not know the data for connecting to world wide web... For a certain type of connection, which will be discussed below, this can come in handy. After that, here, in the network connection parameters on the computer, you need to set the IP, gateway and DNS to automatic. We will already enter these parameters in the wireless router itself.
- After that we go to the address "http://192.168.1.1". Usually, configurations with a router happen here, if they did not have to be done at the stage of installing the software. But you will look in the instructions for the device, which way to enter the control panel of the router. As the default preset IPs may differ from model to model. Also another popular place to stay short instructions- sticker on the bottom of the device. Look there too. If there are no instructions in the instructions, or it is lost, then go to the Control Panel, as I described above. Only after right-clicking on "Local Area Connection" in the window that appears, press the "Details" button. In the window that opens, we are looking for IPv4 Default gateway - this is the IP address of the router.

- Now, finally, we go to the address indicated there through the browser (http: // IP ADDRESS OF YOUR ROUTER). And we find the DHCP Server item in the menu (in Trendnet it is combined with the WAN) and set the range of values for the possible IP addresses of devices within your local network. I had it like this: Start IP - 192.168.10.101, End IP 192.168.10.200. And of course, opposite the DHCP Server item there should be an Enabled parameter. Domain Name or Host Name is the name of the future home wifi network. I'll make a reservation right away that the screenshots below were taken from my devices that have already been working or have been working for several years. Their interface is in English, so figuring out what's what for a domestic novice without help would not be easy right away - I hope these pictures will help you. Most of the modern firmware and software are already in Russified form, so it will be even easier to figure it out.
This is how it looked in TrendNet (highlighted in red):

And like this in ASUS:

Setting up a computer to connect to a router via LAN
Now we will set the parameters for our wifi network at home - IP and router mask. For Trendnet this is the same item (see Figure 1, highlighted in green), for Asus - the WAN & LAN section - at the very bottom of the settings page. In the first case, I set the IP 192.168.10.1, in the second - 192.168.1.1. This is the address inside the local network by which we can go through the browser to the admin panel. And through which computers will access the Internet. Mask - by default, 255.255.255.0
Connecting a WiFi router to the Internet via the WAN port
These were all flowers, now the most interesting thing is setting up the external connection of the router to the Internet.
There are several types here, depending on the provider's settings. This happens in the WAN menu.

There are several more options for connecting to the provider's equipment, but they did not come across to me. Therefore, I will not talk about them yet.
How to encrypt your WiFi connection
If you did everything correctly and saved all the settings, then all devices that support wifi should now see new network with the name you specified. However, the question of how to connect wifi at home is not yet closed. Home wifi network it turned out to be open, that is, anyone can use your Internet access for free. To break everyone off and make the wifi network at home available only to its owner, you need to protect the wireless network.
There are several ways, I used two WPE (or Shared Key) and WPA in my practice. The latter is more reliable, so I will consider it. We go to the security settings. In Trendnet it is the Security menu item, in Asus it is Wireless> Interface.
Choose WPE or WPA Personal (PSK, TKIP) in the menu, set the password for authorization - from 7 to 64 characters. And we save. I show how it was with me:


Well, now to enter the Internet through your router, you need to enter a password. The final touch remains - so that there are no problems with connecting all kinds of devices to the router and with the operation of programs, we will manually set the DNS server. The setting of this parameter is located in the same place where you entered the parameters for connecting to the Internet. We activate the function of manually assigning DNS servers and register the IP from Google there:
- DNS-Primary (or DNS Server 1): 8.8.8.8
- DNS-Secondary (or DNS Server 2): 8.8.4.4
You can also specify one of the Yandex servers (for example 77.88.8.8).

As you can see, connecting wifi through a router and making a wifi network at home is quite easy. Hope you can do it too!
Now the traditional video for dessert on connecting a router, which will tell you even more clearly about the typical settings for working with the network.
If you decide to install wi-fi at home, at work, or in any other place, then you definitely need to purchase a special device called a router or router. This is a special device that distributes wireless Internet at a certain distance. Routers are classified by power, number of connected objects, speed, range, etc. Therefore, if you want to purchase a router, be sure to check out its specifications. After purchasing this device, you will need to install it. I'm sure 99% of users will have problems doing this, so this article is about how to set up a router.
How to install a router - step by step guide
Exists great amount routers from different manufacturers, but the most popular ones are from D-Link. That is why we will figure out how to install a D-Link wi-fi router.
1) We open the box with the purchased device, take it out and connect it to the power supply. The lights on the front should light up. If they do not light up, then there is some problem with the router. On the back we see several ports. We need a port labeled "Internet", into which we must insert the plug that was connected to the computer.
2) In any of the other ports, place the cable that came with the router. This cable must be connected to the computer (to the place from where we pulled out the Internet wire).

3) We open any program that gives access to the Internet. In we write the following numbers: 192.168.0.1. This page is the main settings page. You don't need an internet connection to connect to her.
4) We continue to figure out how to install a router. We have opened an authorization page with the fields name and password. In the name field, write admin, and leave the password field blank.
5) On the page that opens, select the Setup item, then the left item Internet Setup and then click Manual Internet connection Setup (Manual Internet connection setup).
6) In the opened Internet Connection Type section, select the item called PPPoE user name / password and select the Dynamic PPPoE item. In the fields Name, Password and Confirm password, enter the data that is specified in the agreement with your Internet provider.
7) We look a little below and see the item "clone poppy address". Click on it. In the Connect mode select item (Select an Internet connection), put a dot in front of Always. The rest of the items do not need to be changed.

8) Discussion on how to install is almost complete. It remains only to understand in the menu of the device, which is on the left, select the item Wireless installation, then the Manual button will appear in the center wireless setting connections, click on it and look at the main settings menu that opens. In the Wireless section, put a checkmark next to Enable wireless network, and in the Wireless network name field, write any name. We also fill in the Wireless network key field and remember it. This field will store the password for your wi-fi. It is needed so that neighbors and other strangers do not connect to the router.
I hope that after reading this article, you figured out how to install a router.
-
 Decorative painting in kindergarten "magic curl" is a joint activity of the teacher and
-
 Synopsis of the organization and conduct of classes on cognitive development in the second junior group "Bird feeder
-
 New professions Where to get information about the right specialists
-
 Plasticine diplodocus. Sculpting lesson. How to easily make basic shapes from plasticine: a ball, cone, cylinder, plait, brick How to make a cylinder from plasticine
Popular
- Rating of recruiting agencies
- Rating of recruiting agencies
- Impenetrable soap bubble
- Impenetrable soap bubble
- Greetings cards for a cute have a good day
- Literary genres of works and their definitions
- Summary of GCD "Game-dramatization based on the fairy tale" Kolobok "
- What does satire mean in literature
- What is the difference between an administrator and a manager
- Scenarios for various holidays