Plasticine diplodocus. Sculpting lesson
Maria Kovaleva (Sidorova)
Summary of a modeling lesson "Acquaintance with plastic material (plasticine)" Ball, cylinder, cone "
Topic: Acquaintance with plastic material - plasticine. "Ball, cylinder, cone» .
Targets and goals:
- introducing children to plastic material;
Safety instructions for working with plasticine;
Teaching a variety of techniques with plasticine: kneading, rolling, rolling, twisting, flattening, pinching, pressing and pulling;
Sausage shaping training ( cylinder, ball, cone;
The development of fine motor skills.
Materials and tools:
Plasticine of bright colors, underlay board, oilcloth, stack, napkins, plastic molds(cylinder, ball, cone) .
The course of the lesson.
1 Org. moment.
Greetings from children. Announcement of the topic and purpose classes.
Educator: Hello guys! Let's get with you get to know?
You made the right choice by deciding to practice molding... We will learn to be little dreamers and try to get into the country « Plasticine» ... And getting into it is very easy, you should take a box with plasticine, close your eyes and to tell: "One, two, three, four, five in « Plasticine» I want to get there! All together now! Hurray! Here we are in the country « Plasticine» .
So what is so unusual about this country? Caught in the hands plasticine he is able to come to life and take various forms, and various images and plots begin to appear in his head that can be fashioned out of him.
But, like any country has its own secrets and rules.
2. Preparing to learn new things material(technical security).
Before you start with plasticine we have to learn some regulations:
1. Plasticine can not be taken in the mouth and tasted.
2. Modeling with plasticine perform only on a board or oilcloth.
3. Do not put plasticine on the table.
4. No need to knead the whole piece at once plasticine... Separate a small part, knead, then add more, etc.
5. Do not throw leftovers plasticine on the floor.
6. Don't swing your stack.
7. Wipe your hands with a tissue after work.
8. When finished work, clean the workplace, wipe the table.
9. Stacks and oilcloth should be well wiped with a napkin.
10. Napkin (paper) use once.
3. Learning new things material.
I show the children a box with plasticine... Usual plasticine made from refined clay with the addition of fat, wax and other substances that do not allow it to dry. We repeat the names of the colors.
Educator: Plasticine comes in different colors, it is soft and plastic, from it you can sculpt various interesting and beautiful crafts. The more colors you have, the brighter your craft will be.
There are also basic techniques. sculpting
Let's play with plasticine? Listen and repeat after me.
Playing with plasticine
1. Kneading
I'll take a lump in my hands, I remember it well,
So that it becomes warm, soft, but does not stick to your hands.
2. Rolling
I look at him, what I want, then I blind.
I'll roll the ball now, I'll play with it a little.
3. Unrolling
I'll take the ball in my hands and start rolling it -
So the column turned out, the column turned into a flagellum.
4. Twisting
I'll twist the flagellum into a spiral and get a shell.
5. Flattening
To make something happen to her, flatten her hunt for me.
So what happened? She turned into a pancake.
6. Pinching
I will roll the pancake into a tube and start pinching.
7. Indentation
You can roll it back into a ball to pierce with your finger
8. Pulling
I will pinch a piece and start pulling.
The tail turned out to be long, the ball turned into a turnip.
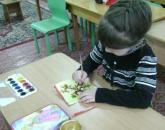
4 Practical part.
I invite the children to choose a piece plasticine that you like.
Educator: Try to pinch off a piece. Mash it up. Flatten. I suggest you roll the ball yourself, cylinder and cone.
Dynamic pause:
We kick top-top, we clap-clap hands,
We are eyes for a moment, we are shoulders chik-chik!
One - here, two - there,
Turn around you!
One - bend over, two - bend over,
Everyone raised their hands up!
And they waved to each other!
Well done. We continue our class.
5. Fastening a new one material.
Remember the safety rules. Remembering the basic techniques action: kneading, rolling, rolling, twisting, flattening, pinching, pressing and pulling.
The teacher notes «+» and «–» works of children, asks who class I liked it, and vice versa, who and what difficulties encountered in the manufacture. An exhibition of works is being organized.
We are putting our workplaces and tools in order.
What new have you learned from our classes?
What forms do you remember (children's answers)
What did we do with you today? (children's answers)
Did you enjoy sculpting? (children's answers)
You all did your best. Well done! Thanks to all. Lesson is over... Goodbye.
Related publications:
Abstract of GCD for FEMP "Cylinder" FEMP: Topic: "Cylinder" PURPOSES AND OBJECTIVES: 1. To form ideas about the cylinder, the ability to recognize the cylinder in objects of the environment.
Synopsis of the game-lesson with didactic material for children of early preschool age "A tower of cubes" A game-lesson with didactic material for children of early preschool age on the topic: "A tower made of cubes." Program tasks: 1. Fix.
Summary of the game-lesson for children of early preschool age with didactic material "Cubes for Bunnies and Bears" Summary of the game-lesson for children of early preschool age with didactic material. Topic: "Cubes for Bunnies and Bears" Program tasks :.
Abstract OD in mathematics for the middle group “Geometric figures. Cone" Abstract OD in mathematics for the middle group “Geometric figures. Cone "Purpose: development of ideas about geometric shapes. Tasks:.
Summary of a lesson in modeling from plasticine "Zaykino treat" Municipal Preschool General Educational Budgetary Institution Kindergarten No. 14 Lesson summary Topic "Zaykino treat" Educator.
Summary of lessons on FEMP "Cube and Ball" Educator: Look, guys, today Krosh came to visit us with a big bag. Krosh: Hello friends! Kar-Karych was in a great hurry.
"Air transport - balloon". Abstract of a lesson in artistic creation (application) Lesson on the application "Air transport - balloon". Purpose: To teach children to create an air form of transport from paper. Tasks:.
Summary of a modeling lesson "Mushrooms" Summary of a modeling lesson in the senior group
When starting to work, first take a small piece of plasticine, as it is easier to knead, and warm it up with your hands. The clay will become soft and pliable. Add new pieces little by little, softening them as well, and start sculpting.
Learn how to perform the basic elements, the description of which is given below, since they can be used to sculpt anything that your fantasy tells you. At the same time, if something did not work out for you, do not be discouraged, because you can just crush everything and try to do it again.
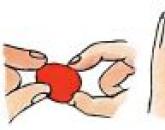
Ball
After plucking off a piece of plasticine, give it the shape of a ball, as shown in the figure. The longer you roll it between your palms, the smoother, softer and smoother it will be. Try to blind
balls of different sizes.

Egg
First, make a ball, and then lightly roll it back and forth between your palms. When it turns into an oblong oval shape, round off the ends.

Pancake
You can make a pancake from a ball. Simply squeeze it between your thumb and forefinger, or flatten it between your palms. If the edge of the pancake suddenly cracks, fill in the tears. Pancakes, like balls, can be of different sizes.

A drop
To make a drop, pinch the ball at one end and pull it out a little. It turned out something like a "nose". Now remember what a drop looks like and compare with what you got.

Cone
If you press the thick end of the drop to the board ("nose" up), you get a flat base. Sharpen the thin end and the drop will become a cone.

Snake
This element is very often used in sculpting. Roll a piece of plasticine back and forth on the board until it is long and thin.
The longer you roll it, the thinner, longer and smoother the snake will be. However, very thin snakes sometimes break, which is not difficult to fix by connecting the break and rolling again.

Sausage
We will call a short thick snake a sausage. Roll a piece of play dough on the board without pressing too hard.
Cylinder
Roll up a short, thick sausage and flatten both ends against a board. If it loses its shape a little, roll it again on the board. Or you can make a cylinder in another way - cut off the ends of the sausage with a knife.


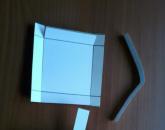
Box
You can make a box out of a cylinder. Place it with the rounded side on a board and lightly press down on top with something flat: another small flat board, a lid from a jar or the bottom of a cup. Turn the cylinder over so the flat surfaces are to the side. Press down on the top of the cylinder again. Now it has six smooth sides: four side and two end. Place it on the end and press it down again. The cylinder has turned into a box. By turning and squeezing it from different sides, you can achieve any shape and size.


ribbon
Roll a thin snake to get the ribbon. Put it on the board and roll it along with a pencil. The pencil, like a small roller, flattens the snake and turns it into a ribbon. The most difficult thing now is to separate the tape from the board.

You may need to practice a little to keep the tape from smearing across the board. This works best if you do not make the tape too thin and work on a very smooth surface after moistening it with water.
Of course, many more different elements can be molded from plasticine, but these are enough for us for now. And now the fun begins!
Horses are very interesting and beloved by many animals. In this article you will find several options for how to mold a horse from plasticine step by step. Sculpting methods will be of different difficulty levels, the first two are simple, the last is a little more difficult. If you are thinking about how to mold a horse from plasticine, then this article is for you.
Preparatory stage
In order to learn how to mold a horse from plasticine, you need to be patient and have some materials:
- Plasticine of various colors (no need to get carried away too much and forget about realism).
- Stack.
- Modeling rug.
If you want to dazzle a simple horse, then this is all you need. For more complex shapes, you will need matches / toothpicks or wire to make a skeleton for the future body.
The first way
It is very simple to mold a horse from plasticine:
- Roll two small balls of plasticine in the color you want. One should be slightly smaller than the other. Connect them together, smoothing the transition. The blank for the head is ready.
- Roll out thin layers of white and black, cut out small circles from them - these are the eyes. From the same color you used in the previous step, make triangular ears. Remember to cut out your nostrils.
- From a large piece of plasticine of the main color, make an oblong oval - the body of a horse. Stick a toothpick / match on one side. Wrap it in plasticine. It should be slightly more near the body than on top. Attach the finished head to the resulting neck.
- Roll one short black cylinder and four identical base shade cylinders. Cut the black cylinder into four identical pieces and stick one to each leg. Notch the bottom to indicate the hooves. Attach the legs to the body.
- Make thin flagella from lighter plasticine, overlap them along the entire length of the neck. Make a lush tail out of them.
The horse is ready!
Second way
There is another option, how to mold a horse from plasticine. You can use brown and white colors.
- Roll a white plasticine ball and stretch it a little - this is a blank for the head.
- Sculpt a crescent moon, cut off the bulge from the bottom.
- Form four identical white cones, make the same number of small brown balls. Flatten them and stick them to the tapered hoof-shaped feet.
- Sculpt an oval body and bend it slightly in the middle.
Let's move on to assembling the horse:
- Stick your legs to the body, attach the head to the thin part of the crescent. Stick the resulting structure to the calf. Smooth out the transitions and make sure the animal is firmly on its feet.
- Roll up thin sausages. Collect the tail and mane from them, do not forget about the bangs.
- Sculpt the eyes from black and white plasticine, make triangular ears and cut out the nostrils.
- Decorate it as you wish, make a saddle or bow or leave it as it is.

The third way
This method will answer the question of how to mold a horse from sculptural plasticine.
- Divide a large ball of plasticine in half. Roll equal sausages from each half, which must be cut into six equal parts. Divide one of the resulting parts in two.
- Let's determine for which part of the body how many pieces of plasticine are: one for each leg, four for the body, one for the mane, one for the tail, half for the head and one and a half for the neck.
- Roll a ball out of the head piece and pull it out a little.
- Form a wide, slightly pointed crescent moon from the chunks for the neck.
- Roll out the four pieces into long legs, they should resemble a cylinder (they should be narrower downward).
- Roll the pieces for the body together and make a thick roller.
- Connect all the pieces together, smooth out all the joints and unevenness.
- From the remaining parts, blind the ears, tail and mane. Attach them to the body, coat the seams and work with a stack.
- Give the horse any position.

Even if you are not very confident with plasticine, you can easily mold a horse. Based on pictures and detailed instructions, you can quickly build a fun horse.
The most valuable quality of plasticine as a sculpting material is the ability to create sculpture by connecting individual parts.
Many crafts can be made from the simplest basic shapes.
Ball- the beginning of all beginnings
Modeling of many crafts from plasticine begins with the formation of a ball. To roll a ball, take a piece of plasticine and roll it between your palms. The longer you roll the plasticine ball, the smoother it will turn out.

On the basis of the ball, using a plastic cover or ruler, you can make a disc, cone, cylinder, tourniquet, brick.
Disk
Method 1: Cover the ball with a plate and lightly press down on the table. If you want a well-defined rim of the disc, turn it on its edge and roll it around the table like a wheel.
 Basic forms from plasticine. Disk. Brick. "Screw".
Method 2: Roll the plasticine into a cake of the desired thickness and cut the disc into a shape.

Brick
By repeating this procedure three times and turning the workpiece 90 degrees each time, you will get a brick that is quite suitable for plasticine construction. True, if you need a lot of bricks, it is better to use a form to create them. Small identical bricks can be cut from a rope twice processed in a similar manner.
Bead
Cover the ball with a plate and roll in a circular motion. You will get an oval bead with an edge in the middle.
Cylinder
Cover a piece of plasticine with a plate and roll it back and forth. The cylinder will be flat and smooth. The longer the plasticine cylinder rolls, the thinner and longer it turns out.

Harness
If you continue to roll the cylinder, you can get an even flagellum.

If you need a large number of flagella, you can roll them in batches, parallel to each other. In this case, the flagella are approximately the same thickness.

A wide variety of details can be obtained on the basis of the flagellum. Modeling with plasticine flagella is an independent direction of modern arts and crafts. You can even lay out pictures with flagella.

It is possible to squeeze out even flagella using a disposable syringe without a needle. If you need to make a lot of flagella of the same thickness, you can use a garlic press. Plasticine should be slightly warmed in warm water. Then it will be softer, it will be easier to squeeze out the flagella. The only drawback of this method is the impossibility of changing the diameter of the flagella at your discretion.
Spiral
Screw the flagella onto a pencil or pen. To get a tape spiral, do the same with a strip of plasticine.
-
 Decorative painting in kindergarten "magic curl" is a joint activity of the teacher and
-
 Synopsis of the organization and conduct of classes on cognitive development in the second junior group "Bird feeder
-
 New professions Where to get information about the right specialists
-
 Plasticine diplodocus. Sculpting lesson. How to easily make basic shapes from plasticine: a ball, cone, cylinder, plait, brick How to make a cylinder from plasticine
Popular
- Rating of recruiting agencies
- Rating of recruiting agencies
- Impenetrable soap bubble
- Impenetrable soap bubble
- Greetings cards for a cute have a good day
- Literary genres of works and their definitions
- Summary of GCD "Game-dramatization based on the fairy tale" Kolobok "
- What does satire mean in literature
- What is the difference between an administrator and a manager
- Scenarios for various holidays