How to make a presentation. How to make a presentation correctly? Simple Tips! What points in the presentation are very important
slide 2
In order for all slide materials to be perceived as a whole and there is no dissonance between its individual fragments, it is necessary to take into account general rules presentation design.
slide 3
Unified styling
a style can include: a specific font (typeface and color), a background color or background image, a small decorative element, etc.
slide 4
- it is not recommended to use more than 3 colors and more than 3 font types in the presentation styling;
- the design of the slide should not distract the attention of the audience from its content;
- All presentation slides should be in the same style.
slide 6
Choosing the type, style and size of the font
- The presentation looks best when using no more than 2 types of fonts.
- The optimal number of lines is no more than 7.
- The number of characters per line is not more than 40 (including spaces).
Slide 8
- It is better not to use punctuation in headings or short phrases (the absence of a dot helps the eye to focus on the main thing)
- Writing short phrases instead of sentences is a step towards the viewer (the more concise the text, the higher the concentration of attention on keywords)
- Remember - a person perceives visual information from left to right; top down.
- The presentation should not be less than 10 slides.
- The first page is the title page, which must be presented: the name of the project; the name of the issuing organization; surname, name, patronymic of the author; MAOU secondary school, where the author of the project works (studies) and his position.
- The next slide should be the content, which presents the main stages (moments) of the presentation lesson. It is desirable that from the content of the hyperlink you can go to the desired page and return again to the content.
Slide 10
- Design-ergonomic requirements: color compatibility, limited number of objects per slide, text color.
- The presentation requires imported objects from existing digital educational resources. (The most acceptable and convenient to work with is the DER "Using Microsoft Office in School". To this resource there are educational and methodological recommendations for teachers. The newly arrived DERs, in general, are difficult to manage, require additional serious knowledge in the field of informatics and ICT from the subject teacher);
- The last slides of the presentation lesson should be a glossary and a list of references.
Microsoft PowerPoint is a powerful set of presentation tools. When you first explore the program, it may seem that creating a demo here is really easy. Maybe so, but most likely a rather primitive version will come out, which is suitable for the most minor shows. But to create something more complex, you need to delve into the functionality.
First of all, you need to create a presentation file. There are two options here.


Now that PowerPoint is working, we need to create the slides - the frames of our presentation. The button is used for this. "Create Slide" tab "Home", or a combination of hot keys "Ctrl" + "M".

Initially, a title slide is created, which will show the title of the presentation topic.

All further frames will be standard by default and have two areas - for the title and content.

A start. Now all you need to do is fill your presentation with data, change the design, and so on. The order of execution does not really matter, so the next steps do not have to be done sequentially.
Appearance customization
As a rule, even before the start of filling the presentation with data, the design is configured. For the most part, they do this because after adjusting the appearance, existing site elements may not look very good, and you have to seriously rework finished document. Because most often they do it right away. To do this, use the tab of the same name in the header of the program, it is the fourth from the left.
To configure, go to the tab "Design".

There are three main areas here.
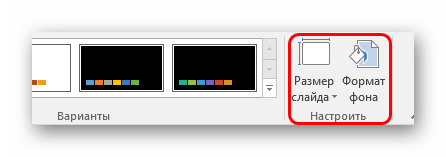
It is worth talking about the last option in a little more detail.
Button "Background Format" opens an additional side menu on the right. Here, in the case of installing any design, there are three tabs.


These tools are quite enough to make the presentation design not only colorful, but also completely unique. If the presentation does not have the specified standard style selected by this time, then in the menu "Background Format" will only "Pouring".
Slide layout customization
As a rule, before filling the presentation with information, the format is also configured. There is a wide range of templates for this. Most often, none advanced settings layouts are not required, since the developers provide a good and functional assortment.


If, nevertheless, there is a need to create a slide in a layout that is not provided for by standard templates, then you can make your own blank.


At the end of all work, press the button "Close sample mode". After that, the system will return to working with the presentation again, and the template can be applied to the slide in the manner described above.

Filling with data
Whatever was described above, the main thing in the presentation is filling it with information. Anything can be inserted into the show, as long as it harmoniously combines with each other.
By default, each slide has its own title and a separate area is allocated for this. Here you should enter the name of the slide, the topic, what is being said in this case, and so on. If a series of slides speaks about the same thing, then you can either delete the title, or simply do not write anything there - the empty area is not displayed when the presentation is shown. In the first case, you need to click on the border of the frame and click the button Del. In both cases the slide will not have a title and the system will label it as "nameless".

Most slide layouts use "Content Area". This section can be used both for entering text and for inserting other files. In principle, any content added to the site automatically tries to occupy this particular slot, adjusting to the size on its own.

If we talk about the text, then it is quietly formatted standard means Microsoft office, which are also present in other products of this package. That is, the user can freely change the font, color, size, special effects and other aspects.

As for adding files, the list is wide. It can be:
- Images;
- Mathematical, physical and chemical formulas;
- SmartArt schemes, etc.
To add all this, the most different ways. In most cases, this is done through the tab "Insert".

Also, the content area itself contains 6 icons for quickly adding tables, charts, SmartArt objects, pictures from a computer, images from the Internet, and video files. To insert, you need to click on the corresponding icon, after which the toolkit or browser will open to select the desired object.
Inserted elements can be freely moved around the slide with the mouse, manually selecting the desired layout. Also, no one forbids changing sizes, position priority, and so on.
Additional functions
There is also a wide range of different features that enhance the presentation, but are not required to be used.
Transition setup
This item is half related to design and appearance presentations. It does not have such paramount importance as setting up the external one, so it is not necessary to do it at all. This toolkit is located in the tab "Transitions".

In the area of "Go to this slide" presents a wide selection of different animation compositions that will be used to transition from one slide to another. You can choose the presentation you like the most or suit the mood of the presentation, as well as use the customization function. The button is used for this. "Effect Options", each animation has its own set of settings.
Region "Slide Show Time" no longer has to do with visual style. Here you can set the duration of viewing one slide, provided that they will change without the author's command. But it is also worth noting here the important button for the last paragraph - "Apply to all" allows you not to apply the transition effect between slides on each frame manually.

Animation settings
You can add a special effect to each element, whether it is text, a media file or anything else. It's called "Animation". The settings for this aspect are located in the corresponding tab in the program header. You can add, for example, the animation of the appearance of an object, as well as the subsequent disappearance. detailed instructions for creating and configuring animation is in a separate article.
Hyperlinks and control system
In many serious presentations, control systems are also set up - control keys, slide menus, and so on. For all this, the hyperlink setting is used. Not in all cases, there should be such components, but in many cases it improves perception and systematizes the presentation well, practically turning it into a separate manual or program with an interface.
Outcome
Based on the foregoing, we can come to the following most optimal algorithm for creating a presentation, consisting of 7 steps:
- Create as many slides as you need
It is far from always possible for the user to say in advance how long the presentation will be, but it is best to have an idea. This will help in the future to harmoniously distribute the entire amount of information, set up various menus, and so on.
- Customize visual design
- Distribute slide layout options
To do this, either existing templates are selected, or new ones are created, and then distributed to each slide individually, based on its purpose. In some cases, this step may even precede the setting of the visual style, so that the author can adjust the design parameters just for the chosen arrangement of elements.
- Enter all data
The user brings all the necessary text, media or other types of data into the presentation, distributing it over the slides in the desired logical sequence. All information is edited and formatted here.
- Create and configure additional elements
At this stage, the author creates control buttons, various content menus, and so on. It is also not uncommon for individual moments (for example, creating slide control buttons) to be created during the framing stage so that you do not have to manually add buttons each time.
- Add secondary components and effects
Setting up animations, transitions, musical accompaniment etc. Usually done already at the last stage, when everything else is ready. These aspects have little effect on the finished document and can always be abandoned, which is why they are dealt with last.
- Check and fix bugs
It remains only to double-check everything by running the preview, and make the necessary adjustments.

Additionally
In the end, I would like to make a couple of important points.
- Like any other document, a presentation has its own weight. And it is the larger, the more objects are inserted inside. This is especially true for music and video files in high quality. So you should once again take care to add optimized media files, since a multi-gigabyte presentation not only presents difficulties with transportation and transfer to other devices, but in general can work extremely slowly.
- There are various requirements for the design and content of the presentation. Before starting work, it is best to find out the regulations from the management, so as not to make a mistake and not come to the need to completely redo the finished work.
- By the standards of professional presentations, it is recommended not to make large piles of text for those cases where the work is intended to accompany a presentation. No one will read all this, all the basic information should be delivered by the announcer. If the presentation is intended for individual study by the recipient (for example, an instruction), then this rule does not apply.
As you can understand, the procedure for creating a presentation includes many more options and steps than it might seem from the very beginning. No tutorial will teach you how to create demos better than just experience. So you need to practice, try different elements, actions, look for new solutions.
Getting ready to present
The focus is on the speaker. The most important thing that you should understand is that people came to the presentation to listen to you, and not to read the inscriptions on your slides with you. Do not slip them a presentation of your words. If you are presenting new material, show photos illustrating it. If it is very difficult to show something live, then create a presentation. The presentation is your story, and what is shown on the projector screen is additional illustrative materials.
The principle of "10/20/30"(first described by Guy Kawasky). The essence of the principle: 10
slides in a presentation 20
minutes of time for the presentation; 30
-th font typed text on the slides;
To this principle, I would like to add only one more element proposed by Steve Jobs (founder and CEO Apple Inc.). During a presentation, Jobs typically points out the possibilities of a new product or new product every 10 minutes. interesting feature product, gives the floor to invited guests. distract something your audience, ask questions on what you hear, get feedback.
main focus essence of the presentation. Identify 10 main ideas, thoughts, conclusions that you want to convey to the audience and, based on them, make a presentation. In no case do not include additional information in the presentation - it should be in the handout or in your words. Slides should be only the most important. After all, when you come to the store and ask something from the seller, does he reread the entire product manual for you? Not! He presents exclusively the advantages of the product, the main and main points that distinguish this product from others. When preparing for a presentation, feel like a seller of what you are presenting. Your ideas, thoughts, conclusions are your intellectual goods.
What will we present?
Presentation- it not a document. Always follow the rule: I make presentations in Microsoft PowerPoint, and documents in Word. Do not confuse presentation and handout. If you want to convey the text of the report to the audience, include it in a separate Word file and attach it to the report. Only include information in your presentation that will help your listeners to better understand the material.Information, not data. Do you know how data differs from information? Data is a set of certain figures, facts, they are not suitable for making a decision. Information is processed data, presented in a form convenient for perception, for decision making. A table with a bunch of numbers and column names "Sum of annual indicators" in multimedia presentation is data, not information for decision making. Information to be placed in the presentation in this example should be a diagram, which would show the difference between the average data for 2001 and 2011.

Final slide. Please note that in all concerts, the most popular performers perform at the end, this is due to the fact that people remember better what they saw last. Always make a final slide in which you fix people's attention on the main "message" that you want to convey to them with your presentation. If your presentation has several topics, make a summary slide after each of these topics, and at the end of the presentation, make a summary summary slide - this will allow you to ensure that the audience perceives the main points of your presentation.
How to present
Observe rule "Scheme - figure - graph - table - text". It is in such sequences. Once you have formulated what you want to convey to your audience in a particular slide, first think about how it present in the form of a diagram? It does not work as a diagram, think about how to show it with a picture, graph, table. Use text in presentations only if all the previous ways of displaying information did not suit you.Remember rule "5 objects per slide". No need to create a vinaigrette on a slide. This rule is based on a pattern discovered by American psychologist George Miller. As a result of experiments, he discovered that a person’s short-term memory is able to memorize, on average, nine binary numbers, eight decimal numbers, seven letters of the alphabet and five monosyllabic words - that is, a person is able to simultaneously remember 7 ± 2 elements. Thus, when placing information on the slide of your multimedia presentation, try to make the slide contain only 5 elements in total. If this is a diagram, then try to simplify it to 5 elements or group the elements so that 5 blocks visually stand out in the diagram.
What software to use?
/ 2010. Simple and handy program has become perhaps the best way to clearly and clearly convey your ideas or achievements to any audience. If you know how to use an office suite, then it will not be difficult for you to deal with PowerPoint.One picture replaces 1000 words. When preparing your presentation, you will need illustrations. Use Google and Yandex image search services to find the necessary images.
These simple tips and rules will help you create interesting presentations for your audience, as well as present them effectively.
The article was prepared based on materials from the GROTORG website.
It is not enough to create a presentation in PowerPoint technically. It is necessary to clearly present its structure and be able to correctly present information. The presentation should complement the text, not interfere or repeat it. We suggest that you familiarize yourself with the algorithm that will help you do the job efficiently.
Preparing to Create a Presentation
Many people ignore this step, but it is the key one. Take a draft, sketch approximate structure. Consider title slide content, headings, content. Ideas for visualization will come during the creation of the presentation.
Creating the first slide and choosing a style
The first slide is created automatically when you start PowerPoint. First, choose the right style. Click the "Design" tab, select the appropriate design theme. It can be applied to one slide, or to all at once. You can also select a background color. There are a lot of parameters, you can choose your own image. All this is in the "Background Styles">>"Format Background" section. Here we select the font for the title, further information. Now you can write the title and design the title slide.
To continue, you must click on the "Create Slide" tab or perform the appropriate action on the panel where the content of the presentation is displayed. You will be prompted to select its type:
- If you want to create a unique slide from scratch - choose "blank slide".
- Need a specific structure - choose from those offered.
If all slides should be the same in their structure, you can simply copy the main one.
Working with multimedia
Working with text, graphics, images, audio and other data is very convenient. A picture or photo can simply be dragged onto the PowerPoint window and then resized. Go to the "Insert" tab: there you will be offered options for attaching different data to the presentation. PowerPoint can work with tables, as well as charts, the values of which are conveniently set (as in Excel). You can set the slide number, this is also done in the insert menu.
The Animation tab allows you to add movement to slide shows and individual elements. This will add dynamics, especially if the speech is long and a lot of visualization is required. After everything is ready, be sure to check and view the presentation on your own and other computers (the program versions may not match or there may be other problems).
How to make the presentation not banal?
Use a few tips:
- Avoid unnecessary textual information on the slide. All this will have to be told, no one will be able to read the huge "sheet" of the text, no one needs it.
- Work on the visualization, but don't overwhelm your audience with unnecessary flowcharts, layered structures, obscure graphs.
- Don't mess with fonts, colors, and images. One font is often enough, the text color is dark on a light background (and not vice versa!). Remember that the text must be readable in any light.
- Be as concise as possible and make sure that the presentation complements the text, and is not a projection of it.
Description of the presentation on individual slides:
1 slide
Description of the slide:
2 slide

Description of the slide:
Presentation plan Plan your presentation in advance. Don't forget about the required sections: Title page (first slide); Introduction; The main part of the presentation (usually contains several subsections); Conclusion.
3 slide

Description of the slide:
Presentation design Design the text and titles of different slides in the same style. Quotations and notes can be highlighted in a different font and color (but there should not be too many of them). Do not get carried away with excessive selection of bold, italic and colored text.
4 slide

Description of the slide:
Font Design Rules Serif fonts are easier to read than sans-serif fonts; Capital letters are not recommended for body text. Font contrast can be created through: font size, font weight, style, shape, direction, and color.
5 slide

Description of the slide:
Rules for choosing a color scheme The color scheme should consist of no more than two or three colors. There are incompatible color combinations. Black color has a negative (gloomy) connotation. White text on a black background is poorly readable (inversion is poorly readable).
6 slide

Description of the slide:
General Composition Rules There should not be more than seven significant objects on the strip, since a person is not able to remember more than seven points of something at a time. The logo on the strip should be located at the bottom right (top left, etc.). The logo should be simple and concise. The design should be simple and the text short. Images of pets, children, women, etc. are positive images. Large objects in any composition look rather unimportant. 1-inch headings, navigation buttons 40 pixels high, single-column layout 600 pixels wide, single-color divider stretched to full screen - all this gives the design an unprofessional look.
7 slide

Description of the slide:
Presentation background color Make sure that the text does not blend into the background, keep in mind that the contrast on the projector will be less than on your monitor. Best Background- white (or close to it), and the best text color is black (or very dark of the desired shade).
8 slide

Description of the slide:
We make out the title (first) slide From the contents of the first slide it should be clear what it is about, to whom it refers, who is the author. To do this, do not forget to specify: Organization ( educational institution, enterprise, etc.); Topic of the report (title); Surname, name and patronymic of the speaker (in full); Your manager (if the work is done under someone else's supervision); Contact details (e-mail, website address, phone).
9 slide

Description of the slide:
Text information font size: 24–54 pt (headline), 18–36 pt (plain text); font color and background color should contrast (the text should be well read), but not hurt the eyes; font type: smooth sans-serif font for body text (Arial, Tahoma, Verdana), decorative font can be used for heading if it is legible; italics, underlining, bold, capital letters are recommended to be used only for semantic highlighting of a text fragment.
10 slide

Description of the slide:
Graphic information drawings, photographs, diagrams are designed to complement text information or convey it in a more visual form; it is desirable to avoid drawings in the presentation that do not carry a semantic load if they are not part of the style design; the color of graphic images should not contrast sharply with the overall style of the slide; illustrations are recommended to be accompanied by explanatory text; if a graphic image is used as a background, then the text on this background should be well readable.
11 slide

Description of the slide:
Animation Animation effects are used to attract the attention of the audience or to demonstrate the dynamics of the development of a process. In these cases, the use of animation is justified, but you should not oversaturate the presentation with such effects, otherwise it will cause a negative reaction from the audience. Sound the soundtrack should reflect the essence or emphasize the peculiarity of the theme of the slide, presentation; it is necessary to choose the optimal volume so that the sound is audible to all listeners, but not deafening; if this is background music, then it should not distract the attention of the listeners and not drown out the words of the speaker. In order for all slide materials to be perceived as a whole, and there is no dissonance between its individual fragments, it is necessary to take into account the general rules for designing a presentation.
12 slide


Popular
- How to sell vintage scarves and shawls on Etsy What scarves can you sell through
- What has changed in the life of an accountant?
- Development plan for an already open hotel
- Business idea: how to make money growing sunflowers?
- agricultural products
- Best-selling goods in Russia: statistics
- Own business: raising camels
- Recording studio business plan
- Is it possible to trade agricultural products on the roadside in our country according to European schemes
- Camel breeding as a business - open your own farm