Ostrich egg engraving drawing drawing. Shell carving - master class
Each new thing is a small victory of man over nature. Even primitive people learned to give stone, wood, bones new form, turn them into tools to help fight enemies, hunt, cook food. And then man began to create things just for the soul. About two masters who create things that are unlike each other, but unite them with aesthetic beauty - under the cut.
For many peoples, the egg is a symbol of the beginning of life, but sometimes the same egg can become an object of delicate art.
Vitaly Fedotov is the only master engraver in the country who applies his work to eggshells. He can make a unique and exquisite product from this material.
I have been engraving for a very long time, since 1984, but it is precisely engraving on eggshell- since July 2011. It all started with the desire to try something new.
Precious metals are expensive for Vitaly, and his hands themselves asked him to find a use for them. On the Internet, he found out that there are craftsmen who carve bizarre designs on eggshells. I tried it - it worked
This work is extremely painstaking and requires utmost concentration. The process itself should take place in absolute peace, since a small oversight can turn the finished product into a pile of powder in the blink of an eye.
The eggshell is hardly scratched with a knife and is close to marble in hardness. It is perfectly sanded and polished, acquiring a pleasant soft shine.
Before picking up a graver or a drill, which makes a through drawing, the egg must be prepared, - says Vitaly. - To get rid of the contents of the egg, at first I pulled everything out with my mouth. It got to the point of nausea, a very dreary and unpleasant occupation. And then everything turned out to be elementary - you just need to draw out the protein with the yolk with a syringe
After the egg is empty, it must be degreased from the inside with a special solution, and then again from the inside, strengthen the shell with office glue. After that, the egg should lie for at least two days.
The most expensive work Vitaly costs about 30,000 tenge: an ostrich egg depicts Jesus Christ, on whose face Fedotov worked for two months. Other ostrich egg is a symbol of Kazakhstan - an eagle is engraved there in the rays of the sun
For work, Vitaly uses chicken, ostrich, duck and goose eggs. With the latter two species, the country is tense, paradoxically, it is easier to get ostrich eggs here.
The hardest is the ostrich egg, which consists of three layers. From each layer, you can create your own composition, and you get a complex, multi-layered drawing. The chicken egg has the most fragile shell, but you can create real works of art from it
For example, here's an emu egg, which can range in color from dark green to almost black. The shell is embossed. Craftsmen are very fond of engraving a drawing on such material, because a lighter surface appears under the top layer.
In no case should you start engraving while in nervous tension... It so happens that it remains to process the last few millimeters of the surface, but it is at this moment that the shell cracks and the work of several weeks goes down the drain. The hardest part of my job is the inability to control whether you cut the lines correctly, since the drawing turns out to be white on white. Only when you paint, it becomes clear what you portrayed
Especially for our site, Vitaly decided to show the process of drawing a picture on egg.
Here I have already transferred the drawing from a sheet of paper to a surface previously sanded with a sandpaper. With the help of a pencil cutter, I traced all the contours.
In order to create my works, I had to change my tools, some I invented myself
After that, the master retouches the drawing. In some places it removes the paint, weakens the intensity of the color, somewhere on the contrary adds
Paying attention to shadows ...
Small details, drawing is in progress
After that, using a drill, Fedotov engraves for expressiveness of the image.
The material is fragile, crumbles, that is, you need to calculate the efforts, pressure, line length, because the egg is spherical and does not have a straight plane
When the paint is applied, the craft is varnished.
Vitaly finds a stand on which he fixes the egg.
It is not so easy to find such coasters, and if you did find them, they are unreasonably expensive, ”the master complains. - I try to order them for friends who go on a business trip to Russia, they are cheaper there
This is what happened, and this is not the final version, whipped up in an hour and a half.
Another master turned out to be Firuza, who creates wonderful crystal trees.
In creative circles I am known as AzuriF. I never thought before that I would be so plunged into creative life. After the birth of my second child, it was as if I fell off the chain, all my deeply buried creative nature poured out. Now I barely have time to balance everything in my life important points... During the day I run a small company, in the evening I am a mom and a wife, and at night and always on weekends I create what my soul requires - decorative trees made of crystal crystals! Trees of happiness!
All trees are created by hand, without any machines and machines. Firuza orders almost all the necessary material on the Internet.
Of course, in Almaty you can find something from the necessary materials, but not in such quantity as I need. I went for a very long time and stubbornly towards the well-established work, tried different materials and methods, and through my own trial and error came to what I have.
Once I got hold of a bunch of these crystals, I fingered them for so long in my hands, admired them, they attracted me with their flicker. And I wanted to do something of them so that I could continue to admire them. This is how my first crystal tree was born. I gave it to my sister, and it went with her to St. Petersburg, but how much that tree differs from those that you see now! But it was this that laid the foundation for my creativity, my second self
Each tree begins with a selection of colors. It is very important that the chosen colors of the crystals match with each other, with the color of the barrel winding, with the base of the tree. So that in the end we get more than one color spot, not a pronounced sharp contrast, but a combination that is pleasing to the eye. The main thing here is not to make a mistake, because after the tree is ready and the final result is visible, it will be too late to change something.
Firuza made about 30 trees. About 10 of them were preparing for the April exhibition
I mainly exhibit my trees at exhibitions. self made because this is the only way people can see the beauty of crystal with their own eyes. Not a single photograph conveys the play of crystal crystals that is visible through direct contact. People who see my work in photographs for the first time cannot understand what the trees are made of. Therefore, only exhibitions. It would be possible, of course, to come to an agreement with shops and boutiques in order to hand over trees to them for sale, especially since there were such proposals. But the fact is that in this case the price of the product will double. Why do I need it?
First, the master threads each crystal onto a thin wire. In one tree, depending on the size, from 300 to 700 crystals
This is the longest part of the work, it takes about 1-2 weeks.
Then the crystals are collected in piles and twisted together.
Further, the piles slowly but surely turn into twigs. This is also a long and painstaking work, it is very important that appearance each twig was neat. The twig is wrapped with a special metallized thread, turn to turn
This is an important stage of work, the strength of future branches depends on it, so here you have to make a lot of effort. Especially if it's a big tree! Imagine, with one hand you need to hold on the weight about a 3-kilogram branch, and with the other you must carefully wrap it with a metallized thread. Then my hands hurt terribly!
And the most pleasant moment, of course, is when the process of unbending the branches begins. When the tree is given its final look and satisfaction comes from the work done. I love this moment! It takes 2 to 4 weeks to make one tree. If I make to order, and the client needs it faster, then I try to keep within 2 weeks maximum. There are such trees from 8 thousand and more
In Almaty from 27 to 30 April at the Central State Museum of Kazakhstan was held International Exhibition handicrafts "Creative seasons"
Various genres of arts and crafts were widely presented at the exhibition.
The aim of the exhibition was to show the Almaty residents and guests of the capital all the variety of handmade work, to acquaint them with local craftsmen, to bring creative people to a different level.
Any guest of the exhibition could purchase any work he liked
The appearance of Firuza's works at the exhibition aroused interest among the audience. People came up, looked at the trees, someone bought it as a souvenir
I have no idea why exactly trees! Why exactly from crystal! But, damn it, I get high from my work! - laughs Firuza. - I am absolutely happy, and I want everyone around to also receive a piece of this boundless joy! In this way, I try to light in the eyes of those around me the very sparkle and sparks of happiness that I myself see in the crystal!
All friends and acquaintances, of course, are shocked by me, they do not understand three things: firstly, why did this suddenly turn me over to needlework? Second, how do I have time for all this? After all, I have two small children. And thirdly, why do I need all this? It is a little annoying and offensive when they tell me that I just have nothing to do, that they say I have a lot of free time ... and other nonsense in the same style. Believe me, if your soul requires something, then you will always find the opportunity to take time for your favorite business!
Original taken from pervakov
| . |
In order to paint Easter eggs, it is not at all necessary to masterfully own a brush. In addition to the traditional painting with an artistic brush, there are more simple techniques, in some of which this tool is not needed at all. Let's consider the most popular ones.
Stucco painting
To paint Easter eggs using this technique, you will need:
- cotton swabs (pokes);
- acrylic paints;
- brushes;
- sponge;
- cotton pads;
- sunflower oil or furniture varnish.

Progress:
1. Boil a hard-boiled egg, dry and chill. If you want to make a real Easter souvenir, carefully remove the contents of the raw egg through the small holes in the bottom and top and paint on the dried shells.
2. Using a foam sponge, paint the entire surface of the egg with white acrylic paint. Let it dry for a few minutes. If the coating is not thick enough, apply another coat.
3. Start painting your Easter egg. We suggest you decorate the shell with rowan bunches. Dip a poke (cotton swab) in red paint and, applying it in perpendicular movements to the shell, draw 10-15 large berries that form a bunch.
4. The second element of our Easter eggs painting will be rowan leaves. First, with a cotton swab, draw with green paint the lines - the base of the leaves. To liven up the painting, apply a thicker brush stroke over each green line with a thin brush.
5. Yellow strokes made on the leaves with a thin brush will liven up the painting even more, make it more voluminous.
6. Draw highlights on the berries and leaves by applying a few white strokes with a brush or cotton swab.
7. Add some black dots to the base of the berries to create contrast.
8. After the painting on the Easter egg is dry, cover it with furniture varnish. Boiled egg can be processed for shine vegetable oil using a cotton pad.

Easter egg painting with wax
Easter eggs painted with wax are called Easter eggs. This technique is traditionally popular in Ukraine and allows you to create both simple souvenirs and genuine artistic masterpieces.
To paint eggs using the wax technique, you will need:
- a raw egg;
- scribbler - a device for applying hot wax to the shell. You can make a little scribbler yourself by twisting a small piece of foil into a funnel and fixing it on a wooden stick. Wax is placed in the foil, heated over a flame to a liquid state and applied to the shell through a hole in the funnel;
- candle;
- vinegar;
- cotton pads.
Progress:
1. From a raw egg at room temperature (not cold!) Remove the contents through the small holes at the bottom and top. Wipe the shells with a cotton pad dipped in vinegar.
2. Prepare dye for eggs - it can be natural or artificial dye.
4. Immerse the scribe in the melted wax and once again heat the contents of the funnel over the flame.
5. Apply the wax by rotating the egg, but not moving the scribblers.
6. After the wax has set, dip the egg in the dye and let the paint dry.
7. While heating the wax painting over the candle flame, gradually remove the wax mark from the shell surface with a woolen cloth. The spots where the wax has been applied will remain unpainted, and you will have a light ornament on a colored background.

Working with a scribbler

The traditional color of Easter eggs is red.


The Easter egg is a model of the world, so eggs are often painted with belts.
(heaven, earth and the underworld) and draw animals and plants on them

On the painting - birds, flowers and ornaments with waves

Color and variety of styles

And this is how Lusatian painting Easter eggs with wax looks like
Easter egg painting engraving
Easter eggs painted in this original technique are called "shkryabankas". To create a painting-engraving you will need:
- chicken, duck or ostrich eggs, peeled from the contents;
- a sharp and thin engraving tool, such as a stationery knife;
- paint for Easter eggs.
Progress:
1. Dye the eggs of your choice using natural or artificial dye.
2. Dry the shells within 24 hours so that the dye hardens well.
3. Using a sharp tool, "scrape" the selected ornament on the eggshell (you can use a stencil).


Modern shkryabanki

Even a simple shkryabanka can be performed masterly
Ornaments for painting eggs
Browse through our selection of Easter egg ornaments to see if one of them will inspire you to experiment.

Simple pattern for bonding painting and painting with traditional solstice

Traditional painting

Ornament "Intercessor"


By the way, you can decorate not only ordinary chicken eggs, but also wooden models - they definitely won't crack, and a particularly beautiful pattern can be preserved for years. If it is customary in your family to exchange Easter souvenirs, do it.
One of the biggest and most important holidays for Christians is approaching - Easter. She personifies not only rebirth and the beginning of a new life, but also spring and the awakening of nature from hibernation. Eggs are an integral sacred attribute of Easter, which are often covered with elaborate patterns and images. There are various techniques and varieties of painting eggs for Easter. Let's take a closer look at each of them.
Easter egg painting techniques
Easter eggs symbolize rebirth and the creation of new life. They are covered with special sacred signs in order to attract them to their home for next year well-being.
Previously, many different rituals were associated with Easter eggs, most of which are completely forgotten today. For example, young girls took eggs skillfully painted with certain symbols and images, danced around the fire, and then beat them against each other in a dance. Then they were buried in the ground, thereby attracting the goddess of fertility.
Today, it is customary to distinguish between the following techniques for painting Easter eggs:

The meaning of sacred symbols in painting
Traditionally, in the painting of Easter eggs, various sacred symbols and images of animals are used. Each of them has a specific meaning.


Let's look at the meanings of the most used symbols in painting:

Quite often, in addition to patterns and images, the inscriptions are applied to Easter eggs: "Christ is Risen!" or just "XB".


How can you paint eggs for Easter?
Today there are 4 main types of painting eggs for Easter. Among them:
- Pysanka is one of the most complex paintings made with hot wax.
- Krashanka - coloring the egg in one color.
- Drapanka - drawing a pattern by scratching it out on a pre-painted surface of an egg.
- Krapanka - painting, as well as for Easter eggs, is carried out using paint and hot wax. However, in this case, those places that cannot be stained are covered with wax.
 Pysanka
  Krapanka
  Drapanka
  Krashanka
In addition, there are many other types of Easter egg painting. Let's take a look at the most interesting ones:

Pysanka: features and technique
The oldest tradition of ritual painting is the Easter egg. It is the application of patterns and images sacred in their meaning with the help of hot wax, paints and a special tool.
The technique for painting Easter eggs has the following sequence:

As a rule, a similar painting is applied to a raw chicken egg. You can find interesting patterns for painting Easter eggs on the Internet at specialized sites.
Slavic pysanka: how to paint an egg beautifully - video
Krashanki: features of execution
This is the easiest and fastest way to decorate Easter eggs. Most often they are painted red, which is a symbol of love, eternal life, solar warmth, fertility and beauty. Coloring is carried out using special paints or natural dyes.
Natural paints are completely composed of natural ingredients and do not contain harmful chemical elements. In addition, they do not spread or smudge during the application of a pattern or pattern to the surface of the shell, which cannot be said about artificial colors.
Let's take a look at how you can get a specific color using natural dyes:

Please note that natural dyes, as opposed to artificial ones, have a lower degree of persistence. Over time, their color becomes dull, and then almost completely disappears. Therefore, such dyes are used exclusively for natural eggs, which are intended for a festive Easter table.
Drapanki: features and execution technique
This is one of the varieties of Easter painting, which is used to decorate natural or artificial Easter eggs. The drawing and patterns are applied using the engraving technique. With the proper skill, they turn out beautiful and neat.
The technology for making drapanok is interesting primarily because it does not require special tools and a set of paints. For her, you can choose an egg of a dark color and tint it with a darker dye (natural or artificial). The ornament is applied with a simple pencil, and then scratched onto the surface of the shell using a regular sewing needle, knife or awl.

To make drapani, you can use a goose, chicken or duck egg. The strongest are the goose. Therefore, they are often preferred for performing engraving techniques.
Before dyeing, a fresh egg is washed well in warm water with the addition of a small amount of ordinary kitchen salt. Then they wipe it off soft cloth and blow the contents out of it.
To blow out the contents, you need to make 2 holes in the shell on opposite sides from each other. The hole diameter is about 3 mm. Then, holding the egg over the glass, blow into one of its holes, as a result, its contents flow out through the other. Before painting, the holes are well covered with paraffin or wax so that the paint does not get inside.
Drapunk egg decor - video
Krapanki: features and technique
Compared to Easter eggs, the technique of making speckles is quite simple, although it is performed using hot wax and a piper with a sharp metal tip. To make pruning, the following procedure should be followed:

Some interesting ideas on how to paint eggs
With the painting of Easter eggs, you can safely experiment and fully express your imagination. This is your creativity, so you don't have to stick to traditional options.
On this page, you and I can take a little part in her work and study the master class she kindly posted on decorating an Easter egg in the style of cutwork.
First of all, you will need:
empty ostrich shell
machine for cutters.
acrylic paints
regular bleach
contour paints for glass
I want to make a reservation right away that if you do not have an ostrich egg, then you can use a goose or, in extreme cases, a chicken one. The situation with this machine is more complicated, but it is quite possible to skip this stage and use only the decoration technique.
Carefully empty the egg in advance. We draw a drawing on it with a pencil, which you will then trace and drill in certain places. If you find it difficult to draw, then transfer the cutwork stencil through a carbon copy.

Let's start drilling. a machine at high speeds, for example the miniszlifierka Dremel 300 with a speed of 10.000-33.000obr / min. You need to work with drills covered with diamond powder, so they must be purchased separately at the store ..

Since this procedure is very dusty, be sure to wear safety glasses and a respirator.

Since there is a film inside the egg, it appears in shreds from the inside out. To get rid of it, use bleach (Ace). Soak the drilled egg in the liquid for a while. You will need to hold a goose egg for about 20 minutes, and for an ostrich egg, you will need about an hour. But keep in mind - bleaching weakens the empty shell of the egg, so control this process and do not overexpose the egg. As soon as you see that the film has dissolved, remove the shell from the liquid as soon as possible and rinse thoroughly under running water. Of course, you got the idea that then it would be easier to pour bleach into the egg hole in advance and hold it for a while, but don't do it! The egg will become brittle and may crush during drilling!

After you've thoroughly washed and dried your Easter egg, it's time to start painting. acrylic paints in two stages with intermediate drying. If you have not drilled an egg, then this is considered First stage, then carefully apply the drawing. on a primed egg.

To create a cutwork effect, we use the outlines for painting on glass. We work in several stages, since the contour paints dry for a long enough time, so you need to give time to dry a certain part, so that you can then move on to the next. Since the plasticity of contour paints is very strong, they will perfectly hang in the air, thereby creating the effect of joining with a thread, like in a conventional cutwork. 


Popular
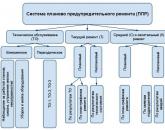
- Preventive maintenance and its role in production
- Planned preventive maintenance of equipment
- On the procedure for placing non-stationary objects of seasonal trade
- Provisions on the placement of non-stationary shopping facilities
- Decorative painting in kindergarten "magic curl" is a joint activity of the teacher and
- Synopsis of the organization and conduct of classes on cognitive development in the second junior group "Bird feeder
- New professions Where to get information about the right specialists
- Plasticine diplodocus. Sculpting lesson. How to easily make basic shapes from plasticine: a ball, cone, cylinder, plait, brick How to make a cylinder from plasticine
- Rating of recruiting agencies
- Rating of recruiting agencies