Table of the most important technological inventions of the 19th century conclusion. The most important technical inventions of the 19th century
Today, I will show my favorite recipe for gingerbread for painting with icing, which are very tasty, fragrant, and at the same time easy to prepare. For it, you can use your favorite spices - ginger, cinnamon, nutmeg, cardamom, cloves, and you can also add citrus zest to it. I will show the basic recipe, which, in my opinion, is the simplest and at the same time, successful and tasty. You can make both cookies and gingerbread from it, simply by changing the size of the product and their thickness. If you make painted gingerbread cookies to order, then this recipe will be really optimal for you, as well as for me, although I have already tried quite a few options.
Gingerbread self made- This is a beautiful and cute gift that is nice to receive at any age. And what is not unimportant is that they are easy to make with your own hands. If your child loves some kind of cartoon, then he will definitely be delighted with gingerbread with the characters of this cartoon. Even if you do not have special molds for squeezing them out of the dough, this is not a problem, as I will show you how to do everything without them. I made these gingerbread cookies for a child in kindergarten on autumn fair, but according to the same recipe and I cook them to order, so I will be happy to share with you the various subtleties of this matter.
These iced honey gingerbread cookies stay soft even after a few days and can be stored in the package for up to a month. I know that there are people who keep them for more than a year, simply because it is a pity to eat such beauty. But still, I advise you to keep them for a short time, and then still enjoy them with tea or coffee.
I will also show you the perfect recipe for colored icing for gingerbread made from powdered sugar and protein, which can be made in different consistencies, both contour and aspic, and I will also show you how to adjust the density in practice. With the help of different food colors, it is so easy and simple to make it colorful. And to decorate them even more beautifully, I advise you to do it. So I advise you to bake these gingerbread with icing, step by step recipe which I made with detailed photos to make it easier to repeat everything.
Ingredients:
- Wheat flour - 280 g
- Butter - 100 g
- Sugar - 100 g
- Chicken egg - 1 pc.
- Honey - 2 tbsp
- Soda - 0.5 tsp
- Ground ginger - 1 tsp
- Cinnamon - 1 tsp
- Nutmeg - a pinch
Glaze:
- Egg white - 1 pc.
- Powdered sugar - 180 g
- Starch - 0.5 tsp
- Lemon juice - 0.5 tsp
Additionally:
- colored sugar
- confectionery sprinkles
How to bake gingerbread at home
The recipe for gingerbread at home is not complicated, the main thing is to follow the sequence of actions and everything will turn out perfectly, as in the photo. The oil must first be taken out of the refrigerator so that it comes to room temperature. Then I sift the flour and add soda, cinnamon, ginger and nutmeg to it.
 Next, mix with a whisk or spatula until smooth. To give the cake a darker color, I advise you to add another teaspoon of cocoa powder.
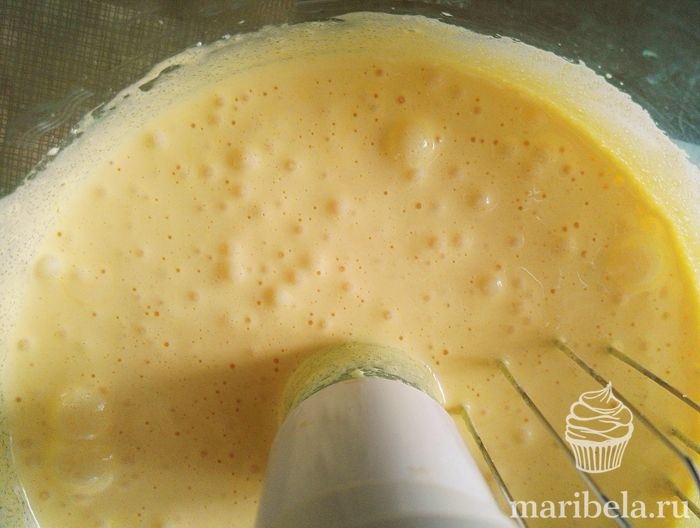
 Pour sugar into the mixer bowl and add softened butter. At first I just mix them, and then I start to beat for about 2 minutes, until the mass becomes a little lighter.
 I add 1 egg to the lush mass and continue to beat everything. This will take another 2-3 minutes. Then add honey and mix well.
 Then I begin to add flour with spices, you can do this by adding 1 - 2 tablespoons and stirring, or pour half of the required amount at a time and stir.
 The dough will still be sticky, so I spread it on the surface sprinkled with flour, which is still left and continue to knead it.
 It is very important not to fill it with flour so that the products remain soft for a long time and do not get stale. after you have entered all the required amount, the dough will still be soft and may even be a little sticky. Maximum amount added flour 300 grams, minimum 250 grams.
 After kneading, I put it in a bag or wrap it with cling film and send it to the refrigerator for a couple of hours, and preferably overnight, so that it ripens well. After the refrigerator, it will be more solid, and it will be very convenient to work with it.
 Now I am preparing the molds, and if there are no necessary ones, they can be easily made by drawing a picture on a piece of paper and cutting it out. Thanks to these blanks, I will make the necessary drawings. I have these gingerbread maple leaf, carrot, mushrooms and pumpkin, on an autumn theme. I also make them in the form of ice cream and cakes.
 I sprinkle the working surface with flour, spread a piece of dough on it, which has become very dense and no longer sticky.
 As I showed earlier, you need either two planks of the same width or two books of the same thickness in order to roll out the dough evenly. To do this, I put them on both sides of it and start rolling. In the process, it is better to sprinkle the surface with flour a couple more times so that our products do not stick in the future.
 As a result, an even layer was obtained, from all sides. Next, I apply paper blanks to it, at a small distance from each other, so that it is more convenient to cut them out.
 I also dust the knife with flour and carefully cut out the dough around the shapes, getting the necessary shapes.
 I cover the baking sheet with parchment or you can bake on the film from the baking sleeve. Some people like a silicone mat for this, so you choose the method you prefer. And I transfer the figures to a baking sheet, but very carefully so as not to deform. They should be at a small distance from each other.
 Then I put them to bake in the oven, at a temperature of 180 degrees, for 6 - 7 minutes, until light golden. It is important not to overdry them, otherwise they will become crispy. Immediately after that, I take them out of the oven and transfer them to a flat surface to cool.
 Now I will show you how to make icing sugar for gingerbread cookies at home. To do this, I drive one egg white into a bowl and add powdered sugar and starch. I mix them with a whisk, and then start whipping. First I beat everything for a couple of minutes, then I add more lemon juice and continue to beat the same amount. As a result, a very white and airy glaze is obtained, a slightly thick consistency, which is more suitable for contours and small drawings.
 Next, I divide the glaze into as many parts as you need colors for the pattern. And I add food coloring to it, it can be both liquid and dry. And the glaze, which is not yet needed, is transferred to a plastic container or jar and closed with a lid. It can be stored for several days in this way, but only in the refrigerator.
 I make glaze of one consistency, adding a couple of drops of water to it and mixing until I get the desired result. Such a glaze is considered medium, because it is not thick and not liquid.
 Now I transfer it to a pastry bag and tie it, and on the other hand I cut off a small hole with which I will draw. You can also use special nozzles. To get a drawing, with a needle I carefully mark all the lines of the drawing on the gingerbread, that is, the contours. To do this, I apply a leaf to the product and pierce the contours with a needle. First, I draw the outline of the desired part with glaze, and then fill in the middle.
 Please note that two adjacent parts cannot be poured at the same time, the first part must first dry for at least 15 minutes, and then draw the second. As you can see, the master class (MK) for painting gingerbread with icing for beginners, since there is nothing complicated in this. To make the drawing lie flat, just shake the gingerbread cookies from side to side with sharp movements. Do not forget to help yourself with a toothpick, aligning the pattern.
 When the bottom drawing has dried up, at least an hour, you can draw the top lines, which are already being made with a thicker glaze. If you plan to decorate these lines with colored sugar, then you need to sprinkle them with it, immediately, when all the contours are still wet and the sugar will stick.
 The rest I draw on the same principle. Now you also know how to make gingerbread with icing at home, so that it turns out both tasty and beautiful. I painted the dots on the mushrooms wet, that is, I filled in the red cap of the mushroom and immediately put white dots, then they are evenly distributed. I decorated cakes and ice cream with confectionery topping, it must also be poured on wet glaze so that it sticks. Now I leave them to dry completely, this one will take about 6 hours.
 Here is such a great recipe for gingerbread for painting with icing I got. This is my autumn mood, I advise you to do such an exciting thing. And you can also call the kids for help, believe me, they definitely will not refuse to draw their own masterpiece. Good luck in the kitchen!
We make a rose from mastic.
We sculpt individual flower petals, then sequentially, one by one, we roll them into a rose.

We make a sweet bouquet from ready-made dried flowers, interspersing flowers with leaves.

Mastic flowers served in this way can be an independent original dessert.

We sculpt flowers and curly decorations from mastic of different colors in advance so that they dry out and harden a little.

To cover the product, roll out the mastic on a table dusted with a mixture of powdered sugar and starch into a layer about 5 mm thick.
We wrap the layer on a rolling pin, transfer it to the product, carefully align it, cut off the excess from below and smooth everything.
We apply patterns from the cornet, glue colored sugar beads. The product is ready.

Or we install prepared jewelry on the product.

On the surface of the icing coating, you can, after slightly moistening with water, stick beautiful colored applications cut from thin sheets of icing.
We close the lower edge of the coating with a decorative rope twisted from icing of two or more colors.
See below for necessary guidance.


On Halloween, a gingerbread or cake can be decorated with such a handsome man.

Decoration with a wickerwork collected from strips of mastic, deposited from a pastry bag on the table and slightly dried for ease of working with them.
Fondant can cover the surface of any cake, gingerbread or cupcake.
If we are talking about a fruit cake, then it is best to pre-cover it with a layer of marzipan.
Sponge cake can be immediately covered with fondant, after smearing its surface with a thin layer of apricot icing or cream. If you would like to make a coating of colored fondant, please refer to the Fondant Techniques section.
1. Moisten the surface of a fruit cake pre-coated with marzipan with cold water or strong spirits (gin or vodka). Lubricate the surface of the biscuit cake with apricot icing or cover with a thin layer of cream.
2. Before you begin, knead the fondant with your hands to soften it and make it more pliable. Lay the fondant on a smooth, flat surface.
3. Measure the diameter of the top of the cake and the height of its sides. Add a gap of 2.5 cm. Roll out a sheet of fondant of the desired size to a thickness of 5 mm. To keep the fondant from sticking to your worktop, keep turning the sheet over and dusting it with a little powdered sugar.
4. Buff the fondant sheet with the palm of your hand to remove any bumps and sticky lumps of sugar. Make sure there are no air bubbles inside the fondant.
5. Lift a sheet of fondant with a rolling pin, place its edge against the edge of the cake, and then unfold it across the top of the cake to its opposite edge.

6. Smooth the top of the cake with the palm of your hand, starting from the center and gradually moving towards the edges. This is necessary in order to avoid air bubbles between the surface of the cake and the fondant coating.

7. Go to the sides of the cake and, as gently as possible, smooth a sheet of fondant on them. If wrinkles begin to appear on the surface, lift the bottom edge of the fondant sheet and gently press it again against the side of the cake.
8. Continue smoothing the fondant sheet, moving from top to bottom. If desired, you can smooth the fondant not with your hand, but with a special spatula.

9. Take a knife and remove excess fondant from the base of the cake, giving it an even, absolutely regular shape.
Covering the cake and coaster with fondant
1. Put the cake on a stand. Roll out the fondant into a sheet, leaving the desired gap to cover the base. Remove the sheet of fondant from the cutting board and bring it to the cake, but this time start coating not from its edge, but from the edge of the stand. Then move to the side of the cake, then to the top, to the opposite edge of the cake, and finally to the opposite edge of the stand.
2. Start spreading the fondant sheet from the center of the top of the cake, then down along the sides and onto the stand. Trim the fondant on the edges of the base with a sharp knife (see photo).

Making hot glazes consists in thoroughly stirring or rubbing the components provided for in the recipe in a bowl placed in a water or steam bath. In this way, chocolate or transparent glazes are most often prepared.
They are prepared in the same hot way boiled glazes, during the preparation of which the mixture of components provided for in the recipe is thoroughly mixed with a whisk and slightly boiled with a light boil to the desired glaze consistency. In this way, mainly milk or cream glazes are prepared with various flavors and dyes (cocoa powder, chocolate, etc.).
The consistency of the glaze should be such that it covers the surface of the product, flowing around it and not chipping. You can adjust the density of the glaze mass by adding sugar, or a few drops (!) of liquid. Having decorated the surface of the cakes with icing, you can apply various patterns or inscriptions on it, using separately prepared icing, contrasting in color, or various drawing masses.
Using stencils is a very simple way to decorate virtually any cake, dessert or pastry in an original way.
This is a very simple technology, and it is easy to cut such stencils with a knife from thick paper or cardboard.
Opportunities are wide enough:
- apply a pattern by sprinkling with powdered sugar or cocoa, depending on the color;
- apply a full-color drawing with food coloring and airbrush;
- create a relief pattern on marzipan: roll out the dough with a rolling pin, using a stencil to create a relief;
- for restaurants, you can put a picture on a dish or a cup of coffee.
With the help of stencils, you can achieve a wonderful effect when creating any additional symbols or congratulations on the product.
I’ll tell you a secret, for a long time I have been staring at this kind of gingerbread, or rather at decorating cakes with such toppers. It does look very cute. Until the last moment, I put off my acquaintance with this test, thinking that all this is extremely difficult. Indeed, many confectioners do not perform this type of decor on their own, but order them from the “gingerbread fairies”.
Of course, in order to color the gingerbread with any cartoon character, it will take a lot of time and artistic talent. But, here are the most frequently ordered gingerbread cookies in the form of hearts, numbers, letters, stars, etc. You can cook it yourself. This does not require special talents.
So, how to make gingerbread recipe at home with a photo step by step.
Ingredients:
- 250 gr honey
- 250 gr butter (82.5% fat)
- 400 gr sugar
- 850 gr flour
- 4 eggs
- 1 teaspoon of soda without a slide
- 1-2 teaspoons cinnamon and ginger
- 1 teaspoon nutmeg, cloves, black pepper (these spices can be substituted for your favorites or omitted altogether)
Cooking:
I want to warn you right away, the dough must be made in advance. It should reach the desired consistency in the refrigerator, and this takes at least 6-8 hours, and even 12 is better. It seemed to me that the indicated portion was very large and I made only half, which I later regretted very much. The finished dough is perfectly stored in the refrigerator for a long time (2 months calmly), as well as the gingerbreads themselves. So my advice is to make a full portion at once, and simply spread the finished dough into several bags and bake as needed.
Let's get started.
We put honey with spices in a saucepan with a thick bottom and bring it to a boil, stirring occasionally.

As soon as the honey boils, remove it from the stove and melt our butter there.

While the honey and butter are cooling, we will prepare the rest of the ingredients. We need to beat the eggs with sugar. At first glance, it may seem that there is a lot of sugar in the recipe (because there is also honey in the composition), but believe me, in the end, the gingerbread cookies are not cloying!
The eggs should turn white and noticeably increase in volume.
We introduce our honey with oil in a thin stream into the egg mixture. Attention, honey syrup should not be hot! Cool it down to a pleasant temperature. While adding honey, the mass should be gently mixed, trying to keep all its airiness.


The finished dough is watery. As I wrote above, it reaches the desired density in the refrigerator.

We pack our dough into bags and put it in the refrigerator. I clean up at night.

After the specified time, the dough acquires a dense, velvety texture. But, it's still pretty sticky. Therefore, roll it out on a floured surface.

The thickness of the rolling depends on the size of the figures, about 3-5 mm ideally.

We cut out the figures we need with the help of molds or, if there is no necessary cutting, you can print the desired picture on the printer and cut it out with a knife tracing the outline.
Another tip, try to place your elements when cutting out of the dough as close to each other as possible. This will leave very few scraps. The fact is that during the subsequent rolling of the same portion, the dough will absorb even more flour each time, which may eventually cause problems, such as deformation of the lower surface of the finished gingerbread. Of course, for a family there is not much difference whether gingerbread with dimples will turn out or not, but you definitely shouldn’t give such masterpieces for sale.

We transfer the cut out figures to bake on a baking sheet covered with parchment. I baked them on a silicone mat, which I do not recommend doing, because the mat high temperature it goes in waves and the gingerbreads then turn out to be not even, and there may be voids from below. by the most the best option is a Teflon mat, but since I don’t have one in my arsenal, good baking paper is an adequate replacement.

As in the case of cottage cheese cookies, it is better to place the gingerbread cookies on a baking sheet about the same size, or you will have to take out some earlier so as not to dry them out. Still very important point, gingerbread increases in volume during baking, so we leave them a decent supply of space. The larger the gingerbread, the more space it needs.
We put the baking sheet in a preheated oven and bake at 170º for 12-15 minutes. The baking time depends on the size of your cookies. Oven mode top-bottom.
How to understand that the gingerbread is ready? This is a matter of practice. It should not darken much, if it is browned around the edges, it is overbaked. Remember, gingerbread is soft in the oven! But if you press it with your finger and it leaves a noticeable dent, then the gingerbread is not ready yet. The baked gingerbread easily moves away from the surface on which it was baked. Over time, you will find the best time for you. Watch.
We cool the finished gingerbread cookies on a flat surface. Many people advise to press the gingerbread on top with a load so that it does not change its shape. I've tried this and that. I didn’t notice much difference, so the next time I didn’t use the load. But, if you notice that the edges of the gingerbread are bent, then do not be too lazy to put a plank on top of them until it cools completely.
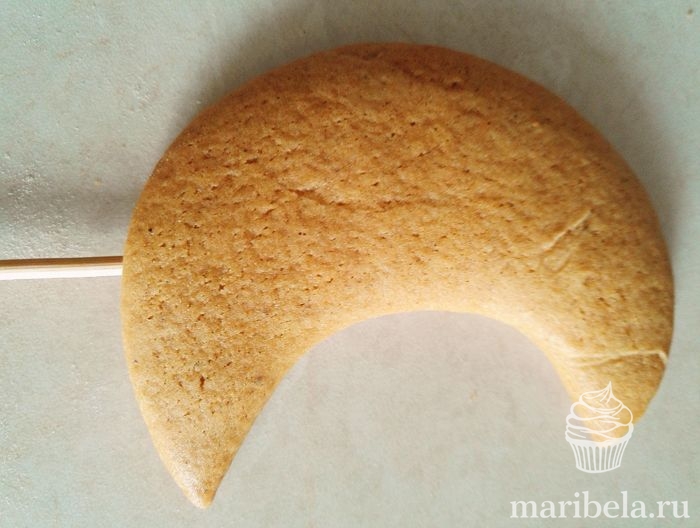
If you want to decorate the cake with gingerbread sticks, then there are 2 ways. Either we bake the gingerbread with the stick already inserted, or we place the stick in the gingerbread as soon as we take it out of the oven, while it is soft. On my own behalf, I want to say that I tried both options, but it was more convenient for me to string the gingerbread just after baking. This makes it easier and faster for me. However, skill is required here, this must be done quickly, until the edges are frozen. If you bake with chopsticks, then I advise you to pre-soak them in water so that they do not change their color during baking.
The cookies will harden as they cool. It is better to paint them after they have completely cooled down, and it is even better to give them half a day to rest and only then start decorating, this is if you use them for a cake. But let me warn you, they are delicious. And personally, I, not a fan of extra colors in food, prefer to eat them without icing.

It is necessary to decorate the cake with them immediately before giving, as the surface gets wet from the cream.
These bright gingerbread cookies decorated my cake. Even after 2 weeks, the gingerbread did not change its taste and texture. They remain crispy and delicious.

Please your children, because these cookies can also be cut together with the kids. And the meringue recipe on a stick is already on the blog, here is a link to the article -.
I hid inside this cake with yogurt cream and fresh strawberries in a layer, the cake is leveled on top. All recipes are on the blog, links are clickable.
By the way, such gingerbread can be prepared without the use of honey. This is extremely important for those who are allergic to bee products. If you need a recipe for a replacement syrup - write. I'll try to post it.
Enjoy your meal.
COMPOUND
gingerbread,
mastic
Mastic
First of all, you need to bake gingerbread cookies (for example, according to a recipe) and prepare mastic of different colors.
Mastic can be prepared independently (see recipe), but it is better to buy in a special pastry shop.
Mastic can be of different colors. If there is no colored mastic, then you can color white mastic by adding gel or water dyes to it, and then stirring thoroughly. If the mastic becomes sticky during staining, then you need to add powdered sugar.

Bonding liquid
Then you need to prepare a special glue that will glue the mastic and the gingerbread.
Most often at home they use liquor, vodka or a mixture of vodka and honey in a 1: 1 ratio.
But if you make a large number of gingerbread with mastic, then it is advisable to purchase a special decor gel. Decor gel is a transparent, thick, very sticky mass, similar to silicone glue. Decor gel is made on the basis of pectin or agar-agar. Most often, decor gel is used to cover berries on cakes and pastries, it protects them from weathering and gives a beautiful shine. Decor gel is also used in the preparation of mastic cakes - mastic details are very well glued to it.

Decorating gingerbread with mastic
When baking, the gingerbread cookies increase by about 2 centimeters. Therefore, to cut out the mastic for the coating, you can use the cutting, which was used to cut the gingerbread.

To roll out the mastic, it is convenient to use a flexible plastic board and a flat rolling pin; the rolling pin can be plastic or wooden. The mastic should not stick to either the board or the rolling pin.
Roll out the mastic very thinly and cut out the main figure to cover the gingerbread.

If vodka or liquor will be used, then grease the reverse side of the mastic figure with them.
If decor gel is used, then grease the gingerbread.
In both cases, it is necessary to lubricate very slightly so that the liquid layer is thin and the surface is semi-dry. If the mastic is too wet, it will begin to dissolve.
It is advisable to lubricate not with a brush, but with your finger, so it is easier to feel the correct humidity.

Put the mastic on the gingerbread and lightly smooth on top.
Use your finger to round off the sharp edge on the mastic.


Or you can use special silicone confectionery molds called molds.

The mastic is stuffed into the hole and the mold with mastic is placed in the freezer for 5 minutes. Then the frozen figure from the mastic can be easily removed from the mold.

Glue the resulting figures on the gingerbread, forming the desired pattern.

Store gingerbread with mastic at room temperature in an open container.

You can also see:
There is a lot of snow right now and it is everywhere, but how about making snowflakes sweet and turn into a truly winter sugar cookie decor. For everyone who wants to master this magic, I share detailed plan action :)
Of course, for baking and decorating cookies, you need to be patient, but if you have a desire to create, the process will only be a joy :) In addition, such cookies are a great option for a hand-made gift.
sugar cookie
Ingredients:
(for about 35 pieces)
225 g butter at room temperature
180 g powdered sugar
1 egg at room temperature
450 g flour
1 tsp baking powder
- ¼ tsp salt (grind to dust)
1 tsp vanilla essence or vanilla sugar
1. Beat softened butter with powdered sugar until a uniform, slightly whitened mass.
2. Add 1 egg, vanilla essence or vanilla sugar. Mix.
3. Sift flour with baking powder and salt. Pour into the butter mixture, mix until the traces of flour disappear. Firm the dough with your hands, wrap in cling film and refrigerate for at least 1 hour.
4. Dust the rolling surface and the rolling pin with flour. Roll out the dough to a thickness of about 0.5-0.7 cm and cut out the desired shapes with cutters. Scraps of dough again say in a single mass. Place the cookies on a baking sheet lined with baking paper, leaving about 2-3 cm between each cookie.
5. Bake the cookies in a preheated 180 degree oven for about 14 minutes, time may vary depending on your oven. The cookies should remain pale with slightly browned edges and bottom. Cool cookies completely on wire rack. Due to its smooth surface, these cookies are perfect for decorating with icing.
sugar mastic
Ingredients:
15 g powdered gelatin
45 g water
175 g honey (light and liquid, I have lime)
900 g powdered sugar
Corn starch
For bright white color titanium dioxide powder ("Super White", "Extra White")
Gel food coloring
1. Mix gelatin with water, leave to swell. Add honey and stir. Heat the mixture in the microwave for 30 seconds, stir. Heat for another 30 seconds until bubbles form on the surface.
2. Sift the powdered sugar into a deep bowl. Pour the hot gelatin mass through a strainer (gelatin clots may remain). Stir first with a spatula or spoon from the edges to the center, and then with your hands.
3. Dust the surface to knead the mastic with corn starch. Pour in the mixture and knead until smooth. Mastic sticks to the hands, this is normal. For ease of kneading, sprinkle the mastic and palms with starch.
The mastic is elastic and moderately dense. Such honey mastic is suitable for wrapping cakes, decorating the surface of cookies and cutting out figures.
Mastic can be stored in an airtight container or in cling film for several months at room temperature or about six months in the refrigerator. In the refrigerator, the mastic hardens, it should be slightly heated in the microwave (about 10-15 seconds at minimum power), then the mastic regains its elastic state.

Decorating cookies with sugar paste
To decorate the cookies, I dyed more than half of the mastic with Super White (titanium dioxide) powder dye, which gives extra whiteness. However, it is not necessary to do this, the mastic already turns out to be a warm white color (therefore, it is better to use light honey). I colored the other part of the mastic with Americolor Navy Blue gel dye. To achieve the desired color saturation, the mastic must be kneaded with a small amount of dye: add a drop of dye or dye on the tip of a toothpick, knead the mastic until it is evenly colored. If the color is not enough, repeat the steps, and thus gradually achieve the desired color.
Sprinkle a silicone mat or other smooth surface with a little cornstarch, also sprinkle a rolling pin. Roll out a piece of white mastic with smooth movements, without pressing down, otherwise the mastic may stick to the surface. Have cornstarch on hand and, if necessary, lightly dust the surface with it. Do not overdo it with starch, the mastic can absorb its excess, become denser and less elastic.
For a white background of cookies, roll out the mastic about 1-1.5 mm thick and cut out circles with cookie cutters. Using a silicone brush, cover the “wrong side” of the circle with water, attach it to the liver, smooth the surface and edges with your fingers. Thus, cover all cookies. Put the remaining scraps together in a lump and heat slightly in the microwave. Then knead again, cool to room temperature, roll out for reuse.
For a colored decor, knead and roll out a part of the tinted mastic into a layer about 2-2.5 mm thick. Cut out the decor with a snowflake plunger or curly cuts. Leave the decor to dry for 10-15 minutes, then moisten the back of the snowflake with water and transfer it to the cookies, pressing down firmly.
Pack cookies in bags or in a box, tie with a ribbon. Surprise your loved ones with cookies! :)

-
 Thematic entertainment "Spring" (for children of the middle group) Entertainment on the theme of spring
-
 Agraphia is a complex disorder of speech and writing.
-
 Presentation on the topic "the development of speech of preschoolers in games and exercises"
-
 Scenario of a theatrical fairy tale in the senior group
Popular
- Writing impairment and correction in left-handed schoolchildren Articles writing impairment in visually impaired schoolchildren
- Vyacheslav Doronin is a Russian oligarch who is part of the circle of Hollywood stars "Mark Rich gave us financial leverage"
- Lexical theme "Wintering birds" educational and methodological material (senior group) on the topic
- Project activities in the work of a speech therapist
- Ksenia Sobchak and Tina Kandelaki: the scandal continues
- Ksenia Sobchak and Tina Kandelaki: the scandal continues Kiss Sobchak and Kandelaki
- Lexical theme "professions"
- Do-it-yourself fuel briquette - step by step instructions
- Woodcarving lessons in the style of "Tatyanka"
- Educational Open Carpentry Workshop Rubankov Carpentry co-working