Artistic woodcarving tatyanka 1. Woodcarving lessons in the style of "tatyanka"
The art of wood carving is available to almost everyone, regardless of age, gender, and even the presence of artistic abilities. Such a statement, quite recently, would have seemed at least strange, but today it is confirmed by many years of experience of carvers and teachers working in the Tatyanka style of woodcarving.
This technique was born in 1990 as a result of the creative experiment of the master Shamil Sasykov and has turned into a whole artistic system, which has already trained more than 10 thousand people. For some of them, carving "Tatyanka" has become an exciting hobby, for some it has become a favorite work, and for some it has simply opened the door to the world of carved art. You may also want to try your hand at this kind of creativity after getting acquainted with a series of lessons on carving "Tatyanka" for beginners, which we will publish on the site.
Workplace
Woodcarving is a fun but time-consuming process, so it is very important that your workplace is as comfortable as possible. For a carver in the Tatyanka style, any flat wooden plane, workbench, even the corner of a table or window sill, or even just a stool, will do. It is better, of course, that it be a table or workbench, heavy and resting against the wall, with a wooden top. But a polished table is also suitable, just put a piece of plywood or a drawing board measuring at least 20x20 cm on its surface. Then the tool will not break if it suddenly breaks and sticks into the table top. By the way, a very good material for the surface of the table is linden, aspen, spruce.
Please note that we do not fix the study board - it lies freely on the table - and often work without emphasis. It is important that you immediately get used to doing the work in this way, because the linden blanks are soft and dents form on their surface from resting on something hard.
Lighting
The work of the carver is quite painstaking, it requires clarity of execution and accuracy, therefore, everything should be clearly visible. Lighting is best to choose natural or modern with a wide spectrum. Not bad if the table is in front of the window and has additional lighting from any table lamp. The main thing is to make sure that the light does not shine from the board into the eyes.
Since the trace from the pencil is completely cut off during carving (“disappearing pattern”), then only pure wood remains without color contrast, but already with relief. If such a board is additionally illuminated from the side, then the unevenness of the relief casts shadows, and everything becomes clearly distinguishable.
Material
For wood carving, in principle, any wood is suitable, but only smooth, even, without defects and knots. Although, if desired, the master will be able to beat any curl or knot. We use blank boards or blanks, because we cut out, as if drawing on a sheet of paper, without taking into account the texture of wood, and we develop the composition, guided only by the technique of carving and design. Linden wood is best suited for our purposes. We can say with confidence that the most complex products in terms of technique and pattern, the most virtuoso and interesting carving in the style of "Tatyanka" are obtained on it. In addition, it is a fairly common tree species in our country, which is traditionally used in arts and crafts, for example, for the manufacture of blanks and forms for painting. Linden - the material is soft, plastic and convenient for carving. It is easily cut in almost all directions and does not require much physical strength, so both women and children can work with it.
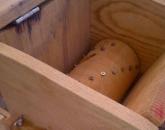
When choosing a board for cutting educational ornaments, first of all, pay attention to its end - here the wood should be dense, uniform and not loose.
On the end of the board you can immediately see from which part of the log it was taken. The closer to the middle of the log, the steeper the annual rings are located to the surface of the board. In the middle (radial) board, the layers are located completely across, therefore, such boards have increased chipping in transverse cuts. The closer the board is to the bark, that is, to the edge of the log, where the layers are placed gently to the surface, the denser the wood. Such a board can be cut easily and freely: almost everywhere, a uniform density is maintained over the entire plane, and the carving is performed better.
It is bad when the layers are placed at an angle to the plane of the board, obliquely, forming an oblique layer. On the surface of such a board, it is easy to cut only in the direction of the fibers, but in the other direction - against the fibers it is more difficult: here the layers go down, so the chips from the chisel also go down. It is possible to cope with grief in half, but nevertheless, the cuts are most often unclean, splintery, and chips are formed. Thus, any inclusions, deviations from the “calm”, “even” placement of layers complicate the carving process, especially for beginner carvers who do not have sufficient experience with wood.
Board storage
In between work, the board should not be kept in a bag or in a wet rag, otherwise various bacteria develop in the wood, it darkens and may become moldy.
Unheated rooms with street humidity are best suited for storing boards: a shed, a canopy, a bathhouse, a garage, a loggia or a balcony. I do not recommend keeping boards in the bathroom, refrigerator, basement or in the sun.
Humidity
During the carving process, the surface of the training board dries up all the time, so it must be constantly moistened to maintain it in working condition - about 12-15% moisture. This must be taken very seriously! Therefore, it is possible in advance, a few hours before work, to slightly moisten the board, soaking mainly the ends. Since all boards are different, you should personally analyze the results of wetting in practice and determine the duration of the soaking of the board.
But products, unlike boards, cannot be soaked. Especially glued boxes: they are deformed and can fall apart. Therefore, starting to work with a fresh workpiece, try to complete the work within a few days. To cut at a sufficient speed for this, first hone all the carving techniques and cut out the pattern on simple training boards. But, of course, there are some tricks. For example, a large product can be moistened locally with tampons, slightly wetting the top layer, but in no case allowing moisture to exceed five percent of the entire plane.
Tool
For convenience and a clear organization of the educational process, a special tool "Tatyanka" was developed, which has parameters designed specifically for working on soft plastic wood species and making a jewelry-thin, openwork and technically complex floral ornament "Tatyanka" from a single solid wood. Home-made or factory tools are of little use: they have a lot of marriage and inconsistencies, including in size, profile, thickness of the chisel web, etc. Of course, if it is not possible to use a special tool to perform the techniques described in the lessons on Tatyanka, then can be adapted to work and other incisors. But in this case, practical training will be complicated, take more time, and the very nature of the thread will change.
To complete the first simple educational ornaments, you will need a minimal, so-called “three-piece” student set, which includes a joint knife, chisels No. 17 and No. 6.
Chisels
At the first stage of learning to carve "Tatyanka" it is best to start working with semicircular (radius) chisels of medium diameter. These are chisels with a blade profile having a part of a circle in cross section. If you put them end to end on the board and rotate around the axis, their blade should cut through the tree, closing the circle.
The chisels we use allow us to make a good, fairly deep cut and get a clear relief, while they are quite maneuverable and well suited for practicing the basic techniques of working with a tool.
Please note that in "Tatyanka" we do not use a hammer or a mallet - cutting a tree is done only by applying the effort of the hands. This, by the way, is very useful for the development of fine motor skills of hands in both school-age children and adults.
joint knife
One of the main tools of the carver is the joint knife, named after the shape of the blade with an oblique cut. Knife-jamb "Tatyanka" is designed for a medium-sized hand. The length of the blade from the handle to the heel should be such that the heel does not reach 2 cm with its angle to the hand. And the length of the blade from the handle to the toe is determined by the distance to the heel at an angle of 45 degrees. The width of the blade blade should be in the range of 15-25 mm, and the thickness of the blade should be about 1.5 mm.
Good to know
How to deal with carving materials
First of all, pay attention to the end of the board - the wood should be dense, uniform and not loose, as in the picture.

On the end of the board you can immediately see from which part of the log it was taken. The closer to the middle of the log, the steeper the annual rings are located to the surface of the board.
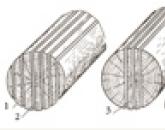
The main sections of the trunk:
- Transverse - a cut passing perpendicular to the axis of the trunk and the direction of the fibers and forming the end plane of the trunk, board, bar. On the cross section of the trunk, the core, bark and wood with its annual layers are visible.
- Radial - a longitudinal section passing along the axis of the trunk through its core, such boards have increased chipping in transverse sections.
- Tangential - a longitudinal section passing at some distance from the core. The wood on these cuts has a different look and texture.
 The closer the board is to the bark, the denser the wood. Such a board can be cut easily and freely: almost everywhere, a uniform density is maintained over the entire plane, and the carving is performed better.
For many years, wood carving has attracted the attention of not only art connoisseurs, but also people who want to master this decorative type of craft. Giving a unique look to wooden products is the most popular way of artistic carving.
The original technology of wood carving "Tatyanka" has gathered admirers of different ages around the world. Moreover, to create an unusual product, only a few tools are required: a chisel and a cutter.
Where can I learn woodcarving using the Tatyanka technique?
The Tatyanka method allows a novice carver to easily master all the principles and rules of woodcarving. You can study the technique with the help of training courses, which are conducted by its founder Shamil Sasykov, or through training in courses at other schools. In the training sessions, every carver from a beginner to an experienced craftsman will learn the step-by-step process of making a creative wood product.
An individual approach is selected for each student, on the basis of which the lesson plan is built. The duration of the lessons is unlimited. Selects a specific thread level for each cutter.
Wood carving "Tatyanka" can be studied independently with the help of videos on the Internet. Many carvers share their experience and give useful advice. Through video lessons, you can master the phased woodcarving. First you need to perform simple elements.
There are also many tutorials on sale that teach the Tatyanka technique. From book illustrations, you can learn how to correctly apply a pattern to blanks, how to cut out recesses and much more.
Production of wooden products using the Tatyanka technique
Wood carving "Tatyanka" is a unique technology for making a carved floral pattern, which allows you to make amazing masterpieces of wood. For example, you can create elegant jewelry and accessories, souvenirs, decorative panels, furniture and decorative interior items.
With the help of woodcarving, you can create three-dimensional sculptures decorated with carved ornaments and lace.
Furniture created by the Tatyanka method will organically fit into any interior of the room. Exclusive tables, chairs, racks, doors and other handmade products will bring aesthetics and flavor to the interior.
Wood carving: process and technology
To get started, you need to apply the selected pattern to the workpiece. Beginners should not choose complex patterns, it is enough to start with a simple geometric ornament. The contours of the main parts must be circled with a cutter. The cutter must be sharpened on both sides and have a long polished chamfer.
After drawing a picture and outlining the contours, chisels enter the process. They need to be selected so that the width of the tool matches the width of the image. Chisels cut out notches on small parts in the direction of the stroke. Each recess is cut with one movement of the chisel, while its edge must be polished and lengthened.
The transition of the chisel to the forming element should be carried out as follows: the chamfer is pressed into the element with the second hand, after which a corresponding trace is formed. Notches on the main elements are also cut with one precise pass of the chisel.
Small details are completed with a vertical cut of wood with the same chisels. The contour of the parts is outlined at a slight angle to the surface of the workpiece, which should be directed inward or outward relative to the contour.
You can make an additional stroke at an inner angle if the outline's borders point outward and are stroked at an angle. Using this method, you can make an openwork, elegant carving, which consists of a plant element using an ornament or figures of birds, animals or insects.
To make a thread, place the workpiece on a horizontal work surface. Cutting tools must be held with both hands. In this case, the cutter or chisel must be held in such a position that several fingers and the palm of one hand are directly on the tool, and the second hand moves the workpiece in the required direction.
The chamfer in the recess to be cut must be pressed with the index finger. During the cutting process, sloping, semicircular chisels of medium and steep slope are used. The cut element starts from the outlined contour or from the middle, and ends in the place of the contour that was previously outlined by the cutter.
Holding the cutter or chisel with both hands allows you to ensure the safety of the person and control the force of pressure on the tool.
Advantages of woodcarving using the Tatyanka method
With the help of woodcarving, extraordinary products are created that are unique in nature. This technique includes:
- high quality thread;
- unusual way;
- minimum time spent;
- security;
- use of any wood;
- accurate stroke contours;
- use of minimal tools;
- aesthetic appearance of each product.
Wood carving "Tatyanka" is an unusual way in which special cutting tools are used. With the help of tools that have the principle of single processing, you can make amazing decorative products from solid wood.
You can learn wood carving techniques in a short time and without significant physical exertion. A little experience, and every beginner in a short time can create a form obtained by the method of relief carving.
Tip 1. Before starting work, the tools should be well prepared, namely, sharpened, then any type of wood will be processed easily and simply.
Tip 2. The elements of the first layer must be cut with special care. Otherwise, the unfinished main layer, the rest will lie incorrectly and ugly.
Tip 3. In order to exclude damage to the layers, it is necessary to think over the sequence of reproduction of details.
Recently, such a type of needlework as author's wood carving has been especially popular. Artistic woodcarving "Tatyanka", woodcarving "Russian woman" is a fascinating form of leisure and an excellent hobby that does not require serious material costs. Different types of artistic wood carving are suitable for both adults and children of senior school age.
Schoolchildren (both boys and girls) often engage in carving in the “Tatyanka” style in circles and art classes, as well as adults who are not indifferent to beauty. Required for work instruments can be purchased at stores that sell everything for woodcarving and creativity.
There are many different styles of woodcarving in the world. Many of them require the purchase of rare woods and expensive tools, as well as many years of painstaking training in the technique. Of all the types of tenderloin, such a species as “Tatyanka” stands apart, because it does not require long training. The working technique is very simple. Everything you need for work can be found at home or bought in specialized stores. So, before starting work, the master of artistic carving "Tatyanka" must first prepare:
In order to better understand the very technology of working with wood, it is recommended to watch a training video or attend a master class of experienced carvers. Also, you can learn all the details about the Tatyanka carving technique by visiting art exhibitions of domestic masters of arts and crafts. As a rule, during each woodcarving exhibition, creative meetings are held with the artists-authors of the works, during which you can get answers to all your questions.
Gallery: woodcarving in the style of "Tatyanka" (25 photos)


Wood carving school: how to become a real master of carving "tatyanka"
 In order to understand and comprehend all the subtleties of working with such an interesting and noble material as wood, it takes time. Nevertheless, mastering the Tatyanka carving technique is quite simple, the main thing- patience, attentiveness, ardent desire and a creative approach to business. For beginners, soft woods are recommended because they are easier to work with. The color of wood can be any.
The finished work can be treated with a special varnish (stain) or painted with paints. But still, the work in which all the wealth is fully preserved will look more spectacular. natural wood colors.
In order for the finished work to be preserved as long as possible, all well-known carving masters pre-treat wooden blanks with a water-repellent and anti-fungal compound. If these rules are neglected, the work may suffer greatly in the future due to improper storage conditions. It is also necessary to ensure that the material intended for work is not initially damaged. For example, you should not take wood covered with mold or affected by bugs to make a product.
How to create masterpieces of woodcarving: practical recommendations
In order to master the technique of wood carving and create real man-made masterpieces in this technique, it is necessary to take into account the following practical recommendations:

Using the wood carving technique, you can make original gifts for relatives and friends. The main thing is to show imagination and carefully study the natural texture of a piece of wood before starting work. This will help to creatively approach the work and most fully convey the beauty of the tree. Woodworking is a great hobby developing imagination, spatial thinking and fine motor skills of the hands, as well as artistic taste. Visiting exhibitions and master classes will help you to fully touch the beauty and delve deeper into the specifics of working with wood.
This study guide is a table book and a wood carver's guide in the style of "Tatyanka". It is addressed primarily to teachers of technology, fine arts in schools, masters of folk art crafts - to all those who would like to teach Tatyanka carving lessons, as well as do-it-yourself lovers: men and women, pensioners and the disabled, children and adults - to all people, regardless of their age and physical abilities.
From the book you will learn:
- how to master "Tatyanka" without leaving home and without signing up for special courses
- how to choose the right wood (humidity, age), how to store it, what blanks are suitable for work
- what tool is needed (steel, types, how to edit and extend the life of your chisel)
- how to create a composition for working with wood, what are the rules
- why does a carver need sculpting
- how to provide yourself with fresh leaves in winter or how to make a durable herbarium
- how to learn to draw and train your hand
and much more.
This tutorial is not only for carvers in the Tatyanka style, but also for everyone who is interested in carving and wants to become not just a carver, but a carver-artist. A wonderful gift for yourself and your friends.
More about the book
The principle of the structure of the tutorial is not "see how you can master carving", but "let's try to discover the wonderful world of carving together through trial and error." Carving lessons and practical exercises are presented in the tutorial in detail, in detail, step by step, with the necessary drawings, photographs and explanations. The author tried to provide and answer all the questions that may arise from a reader who independently comprehends the basics of woodcarving. It should be noted that the implementation of only new elements is covered step by step, and variations of the already studied ones are left for independent work. Thus, a flexible scheme for mastering the thread is created, including a system of repetitions and gradual mastery of the new. This is especially important for the practical application of the information obtained, when different variations of techniques are appropriate for certain forms of products. In the manual, the author embodies an innovative method of presenting the course of carving. In one edition, the carver is given all the information necessary for his education: the basics of drawing, composition and perspective, plastic arts, the history of art and the traditions of folk arts and crafts both in Russia and abroad, not only their rich past, but also modern condition. The reader who decides to engage in carving can get all the necessary information about the procurement, use and storage of wood, the selection and sharpening of tools. To facilitate the search for information, the material in these sections is grouped into separate, self-sufficient, but interconnected blocks.
Reissue is coming!
The youngest type of wooden carving is, invented in the 90s of the last century, a method called "Tatyanka". Woodcarver Shamil Sasykov, who developed the original technology, gave it a name in honor of his wife Tatyana. Since the end of the past 20th century, the popularity of the author's carving method has grown to unprecedented proportions, and now it is one of the most used, even special schools have appeared where people of different ages study Tatyanka's methods. One of the advantages of this method is that, having mastered it, a novice carver will easily understand the principles of other types of woodcarving.
The peculiarity of the method lies in the fact that special tools are used for Tatyanka, which, thanks to the principle of single processing, allow you to create decorative elements from wood. The same forms obtained by the method of relief carving are created by an experienced craftsman within a few hours, the method of Shamil Sasykov allows you to spend much less time on them, without applying significant physical exertion.

For carving in the Tatyanka style, almost any type of wood, both hard and soft, can be used. Special tools, if they are well sharpened, can easily process any material. However, sharpening tools should be done taking into account the characteristics of a particular type of wood.

The Tatyanka carving is multi-layered, so the process of transition from one stage of work to another is very important. If the elements of the first layer are cut out with insufficient quality or are not completed at all, then the subsequent ones will not be able to lie correctly and beautifully. When cutting through the lower fragments of the pattern, difficulties may arise if the upper ones are already finished, since access to the base without damaging existing elements will be difficult. And even if painstaking efforts, in the end, are crowned with success, and the bottom layer is reached for processing, there is little chance that its drawing will turn out to be expressive. In order to optimize the work process and exclude damage to the layers, it is necessary to thoroughly study the cutting stages, consider the location of the parts and the sequence of their reproduction. One wrong move and an incorrectly cut element will be impossible to restore.

"Tatyanka" is a very promising type of carving. A home master who has mastered it will never be left without work, since buy woodcarving created by the Tatyanka method, a fairly large number of people want it.

Popular
- How to choose a CNC milling machine (milling cutter) for wood with your own hands
- The easiest way to transfer any image to fabric or wood How to paint on plywood with acrylic paints
- Order on the provision of one free day from work per week to prepare for writing a thesis
- CNC milling machine for the manufacture of straight and curved facades
- Underground greenhouse - a new trend or a forgotten technology
- Decoupage of caskets: master classes and ideas for decoration Decorating wooden caskets with your own hands
- How band saws are welded
- When and how did the first zoos appear?
- Organization and holding of the graduation party
- Winter patterns on glass painted with frost What are the names of patterns on windows in winter