Photoshop combine two images. How to combine two photos with a smooth transition between them
23.06.2015 27.01.2018
Photoshop tutorial in which you will learn how to combine several photos into one using Photoshop. In fact, everything is very simple and I wrote this detailed step-by-step instruction especially for you.
We will compose such a composition from photographs. Here 6 pictures combined into one image.
- Of course, this is a miniature copy, specially to fit on the site to show as an example.
- Of course, having understood the whole essence of the method, you can create your own collages and templates. Post photos as you like, anywhere and as much as you like in one image.
Where to begin? With planning. Most Photoshop users do a lot of unnecessary steps to create such a small collage. As usual, this happens - they scatter the photographs by eye across the working field, here they will reduce it, there they will reduce it, here they will crop it, there it will crop it, and so on. I try not to work that way in order to save my time and increase productivity.
Therefore, first you need to prepare a template. What will it give? Firstly, you can immediately and accurately arrange the photos according to the intended template. Secondly, if necessary, you can quickly and easily insert new other photos using the template. In my opinion, the advantages are obvious.
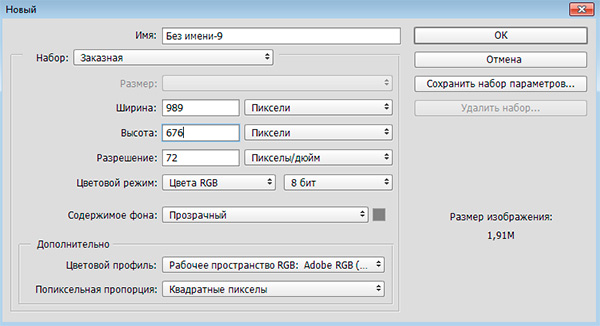
Create new document in Photoshop, the size is 989x676 pixels.
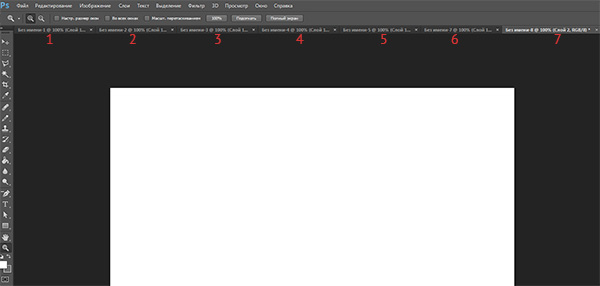
In addition, immediately open all 6 photos that you will use in Photoshop. You will see that they all opened in different tabs. Leave the tab of the newly created document enabled, where we will create the template. There are 7 tabs in total.
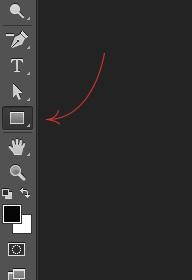
Now we will create places for photos. We will use the tool Rectangle(Rectangle), it can be found in the toolbar on the left.
Use any color for the rectangle, as long as not the background color so as not to merge.
Place the first rectangle on the image. Here you can make, actually by eye, its length, width and location on the working field. But try to stick to the scheme that we conceived at the very beginning.
The first rectangle is the main big picture... I marked the borders of the image in the form of a frame so that you understand how I positioned the rectangle on a white background.

Draw the rest of the rectangles using the same method.

As you can see, I placed them at the same distance from each other, so that everything was even and beautiful.
Place the rectangles without paying attention to the blank areas of the image that remain in different places. After you arrange all the rectangles as you intended, you can crop the image (working area) from unnecessary - using the tool Frame... You can also find it in the panel on the left.
The list of layers will look like this:
Now we will add photos.
Go to the tab with any photo, select all of it using the tool Rectangular area or simply by clicking CTRL + A... Push CTRL + C to copy to clipboard.
Go to the tab with our template and select the layer in the layers with the rectangle instead of which we want to insert a photo. In this case, it is the largest rectangle. Push CTRL + V and the photo will be inserted on a new layer above the rectangle - this is important.
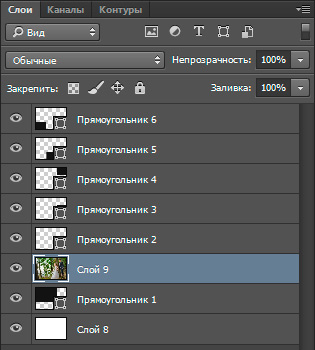
Now right-click on the photo layer and select Create Clipping Mask.
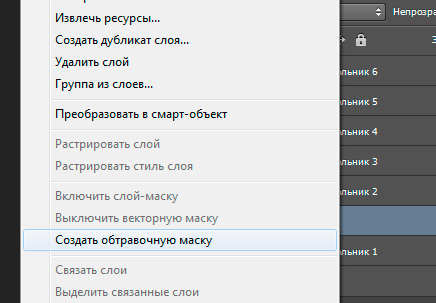
Created a clipping mask from the photo and it acts on the layer below. And the layer below is our rectangle. What does it mean? This means that the photo will only be displayed within the borders of the rectangle.

This is how it looks at the moment.

It remains only to scale down the photo so that you can see it all. This can be done in clipping mask mode, no crash will occur.
What should be done. Select the layer with the photo and click CTRL + T- so we can transform the photo.
There are squares on the borders of the photo - we drag for them with the mouse and the photo will be reduced. For example, with SHIFT held down, drag the bottom square diagonally upward, the photo will decrease proportionally.
.jpg)
Reduce the photo and move it up a little, so that the photo is maximally displayed in the visible area.

Press ENTER and the first photo is ready.

Take all the other photos using the same method. Select the rectangles, paste on a new layer of the photo and make clipping masks, then adjust the size of the photo. Everything is like with this photo.

Gradually you will take all the photos. Thus, we have completed the task set earlier - we have combined several photographs into one image. Thus, we have created our own simple collage of photos.

You can download the PSD template of this work. To see how everything works.
The most popular among professionals, the Photoshop graphic editor is distinguished by its wide capabilities in processing graphic images and complex tools for an ordinary user. Combining two images is a technologically straightforward process that does not require much experience and special skills.
By combining photographs, we mean several ways, depending on the final result that needs to be obtained: combining can be in the form of a neat "gluing" of two images on a sheet, it can be superimposing one photograph on top of another (one of them becomes the background), and it can also be combining-mixing two images into a single whole.
Fast navigation through the article
Photo stitching
The easiest way to combine two photos in Photoshop is to place them on the same plane. It is important that the dimensions of the photos are the same, otherwise, when adjusting the width and height, you may lose the quality of the final image. To carry out a simple combination, you need:
- Open two original photos;
- Go to the "Image" -> "Canvas Size" menu. In the window that opens, double the width and height parameters. In the same place, select the direction of expanding the canvas to the right and click "OK";
- On the toolbar, select "Move" (Move Tool), move the cursor over the second photo and move to the white field to the first;
- Go to the menu "Image" -> "Image size" and set the desired size parameters.
Mixing effect
Combining two images with an artistic blending effect is used primarily in advertising or poster production. For such a combination of photos, you must:
- Open two source photos in Photoshop (for example, vertical photo # 1 and horizontal photo # 2);
- Select the Move Tool from the panel and use it to drag photo # 2 onto photo # 1 (the top image should overlap the bottom one by more than half). Two layers appeared on the layers palette;
- So that the borders of horizontal photo # 2 do not go beyond the borders of photo # 1, by pressing the cursor, activate the top layer and use the Transform Tool (Free Transform Tool) or Ctrl + T to align the layer to the size of the canvas;
- Press Ctrl + O to inscribe the top layer to the canvas;
- If there is a need to move the bottom photo # 1, you should rename this layer from the locked Background to Layer 0 by double-clicking on the layer with the mouse while pressing the Alt key;
- Select the tool "Move" (Move Tool) on the panel and hold down the Shift key, slightly pull the bottom photo # 1 up;
- Select the top layer and click the "Layer mask" icon on the layers palette;
- Opposite Layer 1 (Layer 1) there is a mask that needs to be filled with black and white gradient using the tool "Gradient" (Gradient Tool);
- Press Shift, selecting the layer mask with the cursor;
- Clicking in the right place images start to paint the gradient where the blending is intended;
- Select Layer 1 and press Ctrl + Shift + Alt + E to merge the layers into one.
If desired, you can apply filters, noise, additional adjustment layers to the resulting "mixed" image.
Learn to combine two photos into one image using Photoshop. Step by step guide for Photoshop CC and CS6.
In the example, we will use photographs in portrait (vertical) orientation so that the composite image does not turn out to be wide. It is desirable that both images are the same height and width.
How to place two photos side by side
I am using the latest version of Photoshop CC. However, the steps described below are also valid for the CS6 version of the program.
Step 1: select the command "Load files into stack"
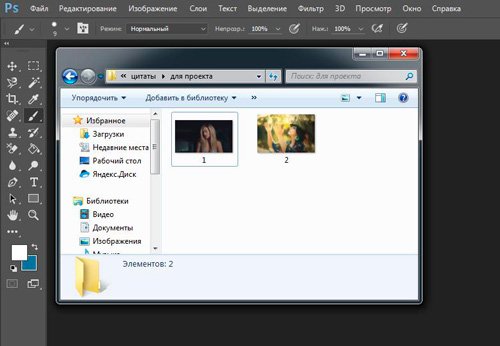
First you need to open the images. By default, Photoshop opens images in a separate document. But we need to put two images in one document.
Therefore, go to the File menu, select the "Scripts" item, " Load files onto the stack»:
Path: File> Scripts> Load Files into Stack.
Step 2: select images
In the "Load Layers" dialog box, select the "Apply to files" item and then click on the "Browse" button:
Load Layers dialog box.
We indicate the photos that we want to open. Next, click on the "Open" button.
Select the images and click "Open" (Open).
Step 3: load the images into Photoshop
Return to the Load Layers dialog box.
Leave the two options at the bottom "Attempt to automatically align the original images" and "Create smart object after loading layers" unchecked. Then load the images into Photoshop by clicking on the OK button:
Click "OK" to load the images into Photoshop.
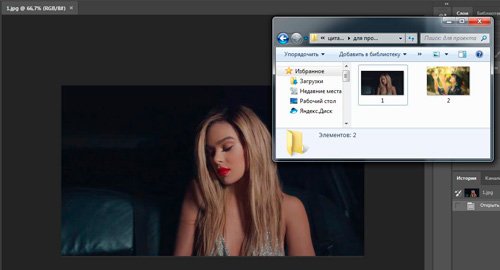
Photoshop loads both images into one document. In the layers panel, each image is located on a separate layer. In this case, the file names are used in the name of the layers:
The Layers panel shows each image on a separate layer.
Viewing two images
The image located on the top layer ( photo of mom and daughter from Adobe Stock Photo Bank):
The first of the two images.
Turn off the visibility of the top layer by clicking on the eye icon:
Hide the top layer image.
After that, we will see the image located on the bottom layer ( photo of a football player from Adobe Stock Photo Bank):
Second image.
Turn on the visibility of the top layer:
Turn on the visibility of the top layer.
Step 4: Using the Move Tool
Now the two images are in the same document. But how do you place them next to each other?
One way is to increase the size of the document stage using the Canvas Size command and drag one of the images to a new space. But you can do both operations at the same time. To do this, use the "Move" tool:
Select the Move Tool.
Step 5: Make sure Snap and Snap To Document Bounds are active
To use this method, you need to snap the image to the edges of the document. To do this, you need to activate several parameters.
Go to the "View" menu and check if the "Bind" option is active:
Check if the Snap option is active.
Below we enable the "Bind to" parameter and check the activity of the " Document boundaries»:
Make sure the "Snap to Document Borders" option is active.
Step 6: select the top layer
In the "Layers" panel, select the top layer:
Click on the top layer to select it.
Step 7: drag the image to the edge of another image
Using the Move tool, drag the image in the document to the left or right relative to the image below it. Press and hold the Shift key while dragging to constrain the direction in which you can move.
Dragging the top image to the right of the bottom image.
Snap an image to the edge of the document
Once you get close enough to the edge of the document, your image will be dramatically pulled to the edge. The top image is now hidden as it is at the edge of the canvas:
The top image is hidden behind the edge of the canvas.
Step 8: select the "Show all" option
To activate the visibility of both images, in the "Image" menu, select the option "Show All".
Going to the Image> Reveal All menu.
This causes Photoshop to resize the canvas to accommodate the two images:
The result after using the Reveal All option.
How to swap images
But what if you need to swap images?
Step 1: activate the Move tool
Make sure the Move tool is still active:
Check if the Move Tool is active.
Step 2: select the entire canvas
We're not going to use the Move tool itself. It needs to be active. This gives us access to the alignment options. We will swap the images, aligning their edges with the edges of the canvas. To do this, you need to select the entire canvas. In the "Selection" menu, select the "All" item. After that, a selection outline will appear at the edges of the document:
Going to Select> All.
Step 3: select the top image
In the layers panel, select the top image by clicking on it:
Selecting the top layer.
Step 4: Click on the "Left Align" or "Right Align" icons
After that, in the parameters panel, click on the icon or Right Align.
I need to move the image from right to left, so I click on the icon Left Align.
1 voteHello dear readers of my blog. Today we will talk about one very simple manipulation, thanks to which you can create quite beautiful objects... It's great when just one function is enough to do something complete, unique and useful. This is just such a case.
Today I will tell you how to combine two pictures in Photoshop. You will receive not only step by step instructions, but in the future, thanks to this article, you will be able to process the edges of the image: outline the borders, and also create smooth transitions. All this will add grace to your work and allow it to look good on the wall if you want to print a collage.
Portraits like this can even be sold if you have a bit of ambition, an entrepreneurial streak, and a subscription to my blog. I often talk about simple ways to promote your business on the Internet, you just have to choose the right advice and use them.

Well, now let's move on directly to working on photographs. How do you combine them?
Merge the photo together
For work, I downloaded 2 photos from. You may have several pictures, this is not so important. Save them in a folder, open Photoshop and be ready for further action.
There are several ways to add an image to the program. For example, the item "File" - "Open" in the top menu. I love a different method that is perfect for creating a collage. I just drag one image into the working area of the program from the folder, and then another.
In general, this method is considered "correct" for this job. In the article, I told you why. If you add a picture in the usual way, then a few manipulations with the size can lead to the fact that the pixels in the photo are broken and the quality suffers. If you paste a picture from a folder, Photoshop treats it as a Smart Object and prevents pixel breakage.
If you drag several pictures at once, they will open in adjacent windows. If you first add one to the working field, and then the second or third, and so on, then they are superimposed on the original image.
Reducing, enlarging or dragging and dropping a new photo is easy. All this is done with the mouse. The only thing I can reveal is a few useful secrets. If you hold down Shift and then start manipulating the cursor, the proportions will be preserved. The picture will not be "stretched" horizontally or vertically.
One more useful combination keys - Ctrl + T. If you, suppose, have already worked on the image and hit enter to apply the formatting, and then again want to change the size of the image or its location, then these hot buttons will help you call the same function again.

Are you generally good at the term ""? If knowledge is not enough, I recommend reading the publication on my blog, in which I thoroughly talk about this Photoshop feature. There will be no blank spots in knowledge.
Now I will only remind you of the main points. Do not forget that clicking on one of the layers activates it, you can work with the selected one, and the rest will remain untouched. However, if you want to do this now, then many functions will be closed to you. What is the reason?
The top layer (under the number "2") is not rasterized, and the second ("Background") is closed from editing. Click on the lock on the right to unlock the lower options.
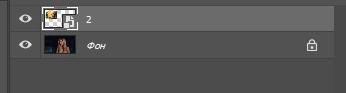
What I called "2" will have to be done differently. Click the right mouse button, and then in the menu that appears, select the function "Rasterize layer".
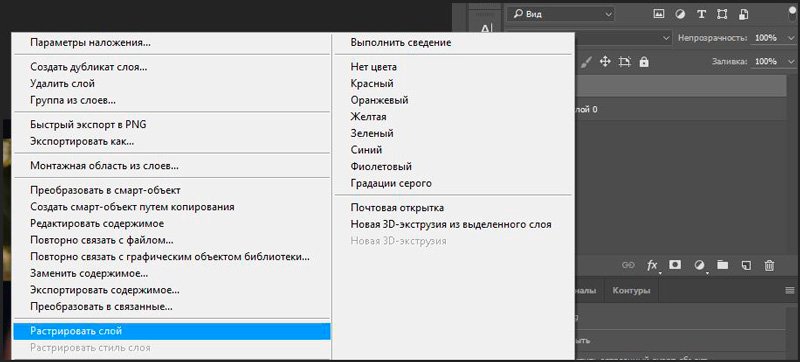
That's it, now you have access to all the functions of Photoshop and can apply them on both photos.
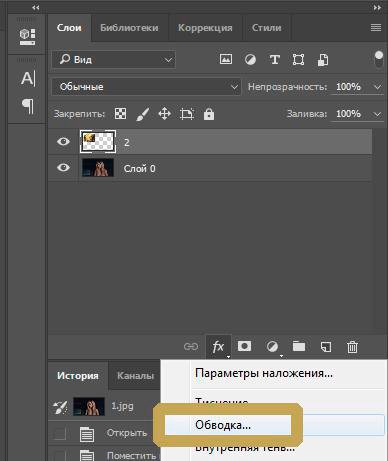
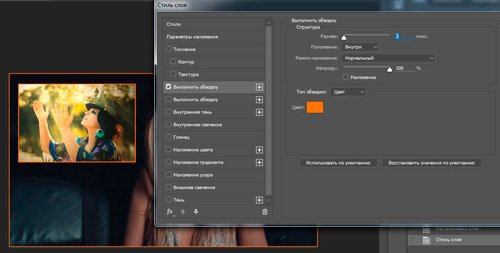
Outline
This blog is already there, in it you can learn how to work with complex paths. Now, I think we need a simple way to design a frame for an image.
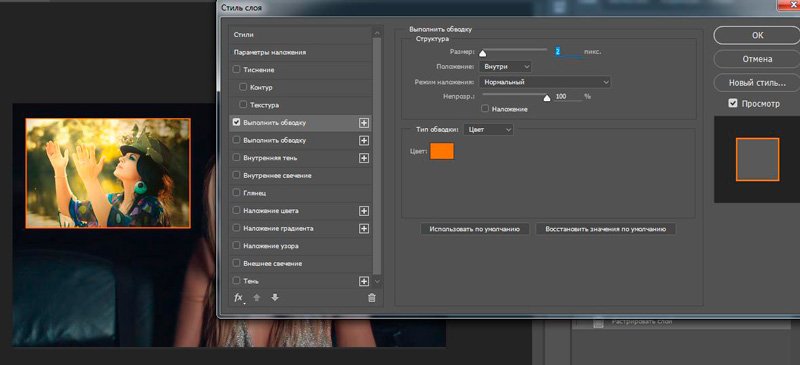
To do this, click on the Fx function in the right menu and select "Stroke" in the window that appears. Do not forget that it will be applied to the layer you clicked on, and it will be highlighted afterwards. In this case, "2".
It's easy to figure out the settings. The size determines the width of the frame, you can choose the position (from the center, outside or inside the picture), make the shade more or less saturated - the "Opacity" parameter is responsible for this, and, in fact, the color itself, which, if desired, can be replaced with a gradient or pattern in the Type menu.
Play around with these settings yourself. Do not forget to enable "View", to do this, put a check mark under the buttons " New style" on right.
I will apply a stroke for both pictures side by side.
Smooth transition
In order for one image to merge with another, you need to do a little differently. Now I'll show you an easy way for beginners.
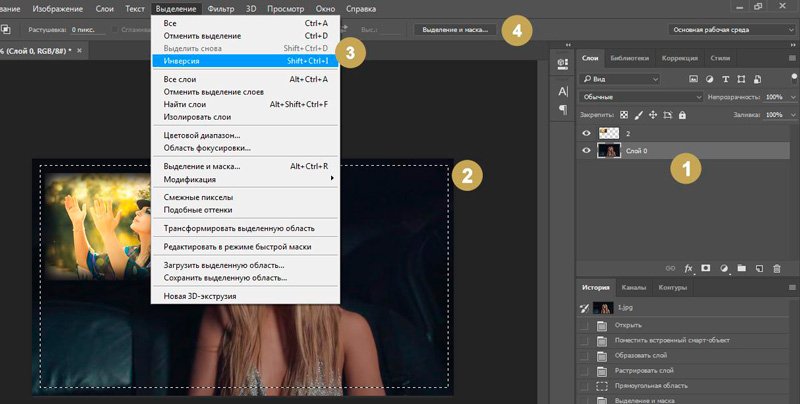
First, I will choose a rectangular selection, you can read in the last publication. Then I select the borders of the picture, which will be blurred, and then the "Selection and Mask" parameter.

To see the result better, select the "On Layers" view.
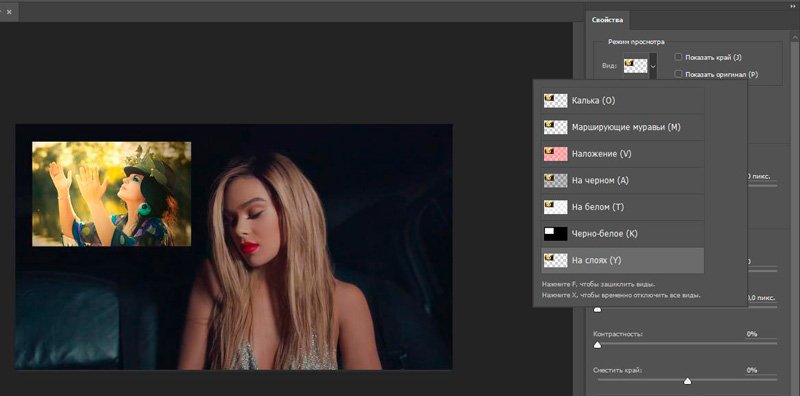
There are also many settings here, but for now we only need Feather and possibly Offset Edge. Drag the sliders and then click Invert.

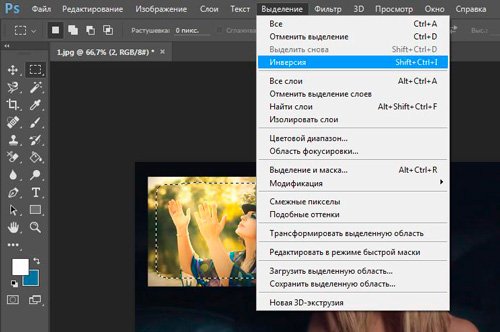
Now to make it work out in in the best possible way, select "Selection" and then "Invert" from the top menu. You can simply use the hotkeys Shift + Ctrl + I.
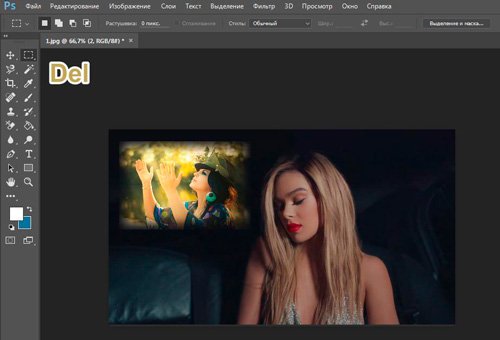
Done, press the Del button on your keyboard. If you had not applied the "Invert" parameter, then now not the edges of your picture would be removed, but everything that is in the center.
You can do a little differently from the previous example. First select the layer (now I'm working with the background), then outline the image using a rectangular selection, then apply the inverse, and at the end open the "Select and mask" function.
Ready. This is what the photo looks like now. You forget to press Del. By the way, to get rid of the excretory ants along the border of the picture, use the combination Ctrl + D.

Our drawing is translucent. Check it out if you want more details. I suggest you create a new layer as a background. Next to the "Trash" icon in the menu on the right you will find a button to create a new layer. Then drag it under the background image.

Choose a suitable color and fill tool and apply it to the picture. By the way, I think right now you might need an article about being for an image. This post contains many interesting simple ways and manual creation techniques.

That's basically it.
Video instruction
If you still have questions, you can watch a video on how to combine two pictures side by side.
Well, this tutorial is for you if you want to take a photo with a smooth transition. There are settings in this video that I did not talk about in the text of this article, so do not pass it by.
Well, I just have to remind you that if you want to learn more about the tools that are in Photoshop, then the course will help you with this. « Photoshop from scratch in video format » ... Lots of detailed information for a novice user, especially if in the future you are thinking about how to make money on your skill.

Well, for those who want to achieve maximum results in their hobby - the course « Magic collage » ... An incredibly useful piece, in which more attention is paid to the artistic component of the work: light, shadows, and so on, as well as a maximum of professional secrets of drawing processing.
That's all for me. Don't forget to subscribe to group Start-Lak Vkontakte so you don't miss out on something useful. Until next time and good luck.


Popular
- Quantum model of personality evolution
- Sell sales to everyone
- Selling secrets for all occasions
- Deming William Edwards New Economy Edward Deming New Economy
- How to register a company abroad?
- How the passenger pays for the trip Benefits of travel for corporate orders
- Organization of a paid extended day group as an idea for a private business!
- Own business: using thermal imaging cameras to inspect houses Thermal imaging cameras as a business can you make money
- Technology and timing of installation work
- Serbia - the life of Russian emigrants in the Balkans Cost and terms of company registration in Serbia