Printing large photos on A4 sheets. How to print an image on multiple A4 sheets
Here, as in that joke, we have several options. To begin with, let's clarify that a picture (or other information) that needs to be printed on several sheets is called a poster. The simplest and most versatile way to print a picture on several sheets is to use a spreadsheet editor. Its main advantage is the ability to print a poster in any case, using any number of sheets; the disadvantage is that it takes a little longer than when printing a poster using the printer options. It takes much less time to print a poster using the printer interface, however, not all printer programs have this option in their composition. Therefore, you have to use the first method. So, let's consider the options for the first way to print a poster, i.e. using editors on the two most common operating systems: Microsoft Windows and Apple Mac OS. 1. In operating system Microsoft Windows The most versatile way to print a poster is to place our picture in MS Excel. The algorithm of actions is as follows: Start->All Programs->Microsoft Office->Microsoft Excel; in the menu, select Insert-> Picture (-> From File), after which the "Insert Picture" window opens, where we find our picture and press the "Insert" button; File->Page settings (Page layout->Page settings)->"Page" tab - go to the direct choice of the orientation of the sheets of the poster in the "Orientation" field (landscape or portrait), their number in width and height in the "Scale" field - > "number of sheets:"; go to the document window with a picture, increase our picture to the required number of sheets. The "Preview" option (File->Preview or File->Print) allows you to see exactly how the image will be placed. When the result satisfies us, boldly click on "Print" and print our poster. The result is carefully cut where necessary, and glued. 2. In the Apple Mac OS operating system, similar manipulations can be done using the Calc editor from OpenOffice. Actions in this editor are almost the same as those in the MS Excel editor. That is, we open the Calc editor, set the parameters of our poster through the Format->Page menu ... select the "Sheet" tab, look at the "Scale" option below, where we are interested in choosing the property "Fit print range to the number of pages" in "Scaling mode " on the left, as well as the choice of the number of pages in the "Number of pages" property on the right. Now we insert our picture by selecting Insert->Image->From File... in the top menu, expand its size to the required size with control in the "Preview" (in the "File" menu), and then boldly start printing. Let's consider the software for printers of the most popular firms Epson and Canon. Since their interfaces are most typical for all modifications of the Epson line, as well as Canon, it is easy to build general algorithms of actions. 3. The Epson printer software has the following interface and procedure for printing a multi-sheet poster: "Properties" -> "Printing Preferences" -> "Layout" tab; on the left we look at the "multi-page" field and put a bird there; also put a dot in front of the "poster print" property; using the poster layout counter, select one of the four options - 2x1, 2x2, 3x3, 4x4; when choosing poster options, we look at the preview layout. 4. The printing program for Canon printers requires the following algorithm of actions: "Properties" -\u003e "Printing Preferences" -\u003e "Page Setup" tab; option "Orientation" - allows you to select a portrait or landscape type of poster sheets; the "Page layout" option has a selection box, by clicking which we can choose one of the three options we like - poster, poster, poster; when choosing poster options, look at the preview window on the left. After confirming the printer settings changes, we can print our poster. I hope this explanation helped you, and in the future it will not be difficult for you to print any poster on several sheets. Good luck!
If you need to print big poster at home without resorting to the services of a plotter - then this article is for you. But how can this be done? You can break our document into a large number of small fragments and print it on A4 sheets with your home printer. As a result, we get a large, almost seamless poster. In this article, we'll take a closer look at two methods. print a poster - no additional software required, only standard means, and also consider a special program that can print with a simple home printer big poster. As always, the article will detailed instructions how to quickly achieve the desired result. Let's say we have a large document, a picture, a graph, a map of the area - in general, anything from which we need to make a large poster. We will need a printer, a pair of scissors, PVA glue and half an hour of time. If everything is ready, let's get started!
To print a large poster from A4 sheets, you can do without additional software. In standard software The printer has a variety of print settings options. Among other things, there (in most cases) there is such a function as "print poster". It is she who will help us print any document on a variety of A4 sheets. Thus, after gluing the sheets, we will get a large poster or picture on the wall. If this is the result you are trying to achieve, then let's look at an example.
Example: How to print a poster from multiple A4 sheets
Open the picture or document from which you want to make a large poster and press "print" or the keyboard shortcut "Ctrl + P". You should have a similar menu (see Fig1)

in which you need to select the properties of your printer.

Set the page size and the desired orientation of the sheets (Portrait or Landscape). Then, scrolling down a bit (in my Page Layout section) you need to find "Print Poster". Standard poster print sizes are 4 sheets. This means that your picture will be divided into four fragments, which will be printed by the printer. After putting these pieces together like a puzzle, you will get a large drawing. If the size of 4 A4 sheets does not suit you, click the "Set" button.

Here you can specify a different number of segments into which your image will be divided. And also (very conveniently) you need to check the "Cutting lines in the margins" and on each sheet the edge will be taken away ( Cut ) which needs to be trimmed evenly and the field is marked ( paste ) on which you need to apply glue and apply the next fragment of our large poster. All settings are made - we send everything to print. The result is an almost seamless large poster. If you are satisfied - then we have achieved the desired result by standard means. But as you can see, there are quite a few settings for printing a poster. That is why there are special programs for printing large posters on A4. They allow more flexible partitioning. We will talk about this in another part of the article.
Many beginner modellers have a question: "How to print a drawing in the right scale with an A4 printer?". In this case, often a drawing of your favorite aircraft comes across in an image format ( *.jpg, *.png, *.bmp). I will show you how to do this using 2 programs as an example: and Microsoft Office Publisher 2010.
To begin with, we need a drawing in image format, many of these drawings can be found on the AirWar.ru website (Great Aviation Encyclopedia).
Further, if necessary, you can clean the drawing from extra details and elements using any graphic editor (for example, Adobe Photoshop, Paint). I have already prepared such a drawing with the Mitsubishi A6M Reisen.
Let's startfromMicrosoft Office Publisher 2010.
The Publisher application has been included in the office suite since Microsoft Office Professional 2007. Therefore, many will not have problems finding this program, as they can with Corel Draw.
1. Launch Publisher. In the window that opens, to create a document, you need to select a document template, select Posters. Then, from the list that appears, you need to find a poster format that fits our drawing. I chose 118.9 x 84.1cm.


2. Next, you need to import the drawing of the drawing. Go to the tab Insert- button Picture. A dialog box will open Inserting a picture, then select our drawing file. 

3. After our drawing is inserted, we need to draw a rectangle with which we will measure the wing span. It was decided to make the span of one half of the wing 40 cm under the size of the ceiling tiles. Go to the tab Insert – figures- button Rectangle.


After inserting the rectangle, change its size in height with a value of 40cm. When the rectangle is selected in the toolbar Drawing tools – Format – Size – Height.


Next, find the button Layout Options and press it. A dialog box will open in which you need to set the page overlap that will serve to glue the drawing. You can set 0.4-0.6 cm, this is enough. You can also change other print settings, such as the paper layout: Landscape or Portrait.
6. After all the settings are set, press the button.

How to do it in Corel Draw.
1. Launch Corel Draw.

2. Press the button New (Create new document) or menu File (File)- New (New) .


3. Then we need to import the drawing image file. To do this, go to the menu File -Import… (Import).


After selecting the file, the cursor will change to a triangle, which you need to click on the document field to place our drawing.


To fit the drawing to the desired scale, you need to select the created rectangle and on the toolbar, as in the screenshot, set 40cm in height.
The result is a long rectangle. Then we click on the image of the drawing with the cursor to select it and dragging it by the edges with squares we change the size of the image, adjusting it until the length of the rectangle is equal to the length of the wing. After we adjusted the scale, the rectangle can be deleted.


5. Next, open the preview by clicking the menu File(File) -printPreview. A preview window will open, but only the part of the drawing that fits into the A4 page will be visible on the screen.


6. In order to split the drawing into sheets, press the Print Tiled Pages button, which is located on the toolbar. After clicking on this button, we will see the drawing in full and the pagination grid.


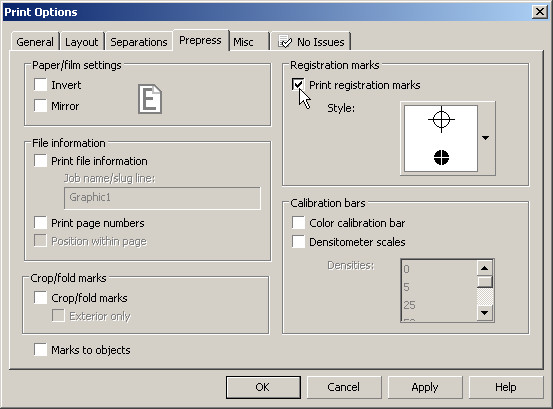
7. Next, go to the print settings by clicking on the button printOptions on the toolbar and in the window that opens, go to the tab Prepress. On this tab we find the option printregistrationmarks and tick the box. This option is responsible for marking the borders of the print for further more convenient cutting and gluing of the drawing. Click OK.

8. That's it. Now it remains only to click on the print button.

Conclusion.
As you can see from the above instructions, there is nothing complicated. It remains only to glue the drawing. Also, these methods can be used in other cases. For example: when in some CAD programs it is not possible to print on an A4 printer, but you can save it in image format.
Need help?
Do you want to know 1C: Accounting? Sign up for free first lesson!
Now I will show you a universal way to print posters on a regular A4 printer. The large poster printing method described here is great for more than just Microsoft Word, but also for any program from which you can print. Printing a poster from A4 sheets is very easy!
By the way, along with this page about printing posters from Word, the article about printing letters in A4 size is also very popular on the site. So I recommend solving two problems at once.
I also note that if you don’t have a printer at home, but you still want to print a poster, printing to a file will help you.
The result of printing a poster from A4 sheets using Word
Many people have a regular printer, but large-format plotters are, as a rule, only in specialized printing companies. The cost of such equipment compared to a conventional A4 printer is quite large, so it makes no sense to keep it at home. Let's use a regular printer to print a large A4 poster.
The photo shows the result on A4 sheets. The printer is normal. Don't pay attention to the typo in the picture - you just don't want to fix it :) Now I'll show you how all this is done using the example of printing a poster with a picture from MS Word.
Note: Printer settings are different for different printers, but the principles are the same! In addition, I will show poster printing here using an example of a picture, but the same applies to text simply typed in Word.
The example given in this article is far from the only one.
If you want to learn how to work well in Word, then you should definitely watch video tutorials, which show other ways to solve this and other tasks in the most effective way.
Let's start printing a poster from A4 sheets
First of all, you need to prepare a regular Word document. I inserted a picture into it, but it was possible to print the text as well. We come from the menu "File / Print". I'm using Word with a Ribbon type menu.

First of all, select the desired printer - the one on which you will print the poster. This is important, because we will use the appropriate function of the printer to convert a regular document into an A4 poster. You should not be afraid, since the function of printing posters is almost (!) In any printer. Open properties your his printer and see something like the window shown below. Of course, yours may be a little different.

The meaning of the method of printing posters shown by me from A4 sheets is based precisely on the use of printer properties, not Word itself or another program. The fact is that in this case, the printer driver will divide the document into parts and enlarge them, which saves you from having to do it manually. Of all the ways to print posters at home, this one is the easiest.
To print your document as a poster from A4 sheets, you need to find the item in the printer properties that is responsible for this opportunity. I give an example for my printer.

After choosing the size of the poster you need, you only need to save the settings and then click the print button in Word. The size of the poster is indicated in A4 sheets according to the X * Y principle. In the given example, this is a 3 * 3 A4 sheet poster. You can see the result of printing on the very first picture.
There was an important part of the article, but without JavaScript it is not visible!
Feature of printing posters from A4 sheets
If you are printing text that is easily scalable, then in principle you can print a poster made up of as many A4 sheets as your printer allows.
If you are printing a picture, then its original size should be large enough. Otherwise, you risk getting a low quality poster.
After printing the poster, you will need to take scissors and cut off the printed margins to join the parts of the poster (A4 sheets) into one piece. Don't try to print borderless! As I wrote earlier in one of the previous articles, when printing without borders, you may lose part of the document - it simply will not print.
Video tutorial on printing a Word document in the form of a poster from separate A4 sheets
The simplest option for printing a large poster using the capabilities built into the printer driver is shown. The availability of such a function directly depends on the printer used!

Summing up
One of the main principles that guides my training courses is that the main thing is to understand the essence, and not just memorize something! If you can't do something one way, there's always another! In this case, instead of looking for how to print a poster in Word from A4 sheets, I suggest simply using the universal poster printing function built into the printer. This is much more efficient and allows you to print large posters on regular A4 sheets from almost any program.
http://temniykot.ru
“There are several programs that open JPG files (maps are usually in this format).
This is Adobe Photoshop, and ACDSee and others.
But I will describe the work with the program that is in any computer, since it is included by default in any Microsoft office. This is the Paint program.
1. Open the folder with the desired map.
2. Right-click on the desired map and select Open with - Paint. The Paint program will start and the desired sheet will open in it.
3. Set up printing. File-Page Options. We do everything by 3-5 mm (the default is 19.1 mm). Uncheck Centering. Orientation can be either Portrait or Landscape.
Now Scale. You can leave 100%. Then the map will be printed in the original scale, which is not always convenient (1 cm - 1260 m). It is often more convenient to have a round scale - 1 cm - 1 km or 1 cm = 500 m.
4. To print 3 layouts on a scale of 1 cm = 1 km, the scale must be set to 126%. In this case, the total sheet size will increase, and the card will be printed not on 6, but on 8 or 9 sheets of A4 format.
5. To print a 1-verst map on a scale of 1 cm = 500 m, set the scale to 86%.
6. After the settings, you can see how many sheets it will turn out: File-Preview. Sometimes by changing the orientation of the sheets from Portrait to Landscape (see step 3), you can reduce the number of sheets. You can also trim the margins of the card a little so as not to print almost empty pages with margins at the bottom of the card.
7. Click File-Print. In the settings of your printer, select the print quality (I put the Best). And we print.
That seems to be the whole explanation.”
http://www.spin-club.ru/showthread.php?t=513 -
advise:
Corel Draw (CorelDRAW) -
Photoshop - Through the paper size table, set the value in Photoshop and do everything there. If there is no place nearby where such formats are printed, then divide the sheet, for accuracy with the help of guides in half (if it is A3 for example), select and copy this fragment, paste it into a separate file with the given dimensions a4. Print. Do the same for the second part.
You can create separate A4 pages in Word by throwing fragments of a common image on them.
Acd see - you can set canvas size parameters and copy/paste/crop.
seventh mind manager
http://forum.ixbt.com/topic.cgi?id=23:14415 -
In CorelDRAW, you can set the size of the "overlap" of one page to another, which is good for gluing maps. In short, this is done like this: Print->Print Layout->Print Tiled Pages Checkbox
QuarkXpress is the best.
http://www.linux.org.ru/forum/general/5433206 -
In Gimp, I made the required number of lines with the interval I needed, then I chose "image mapping" from the scripts and got a lot of pieces, each of which I then printed separately.
In Gimp, pull out the rulers, then Image -> Transform -> Guillotine.
http://answer.google.ru -
Question:
It is necessary to divide the picture into 4 parts in order to print further on 4 sheets of A4 format.
Answer:
4 A4 sheets are A2 format.
CorelDraw program, set the A2 format, horizontal or vertical (there are buttons), at the top left, insert your picture on the sheet (as if it were 4 sheets already compiled). And print it out. It may ask if it should do the breakdown automatically. Say "yeah" :)
Set the print options to A4. Next, do a "view". In the preview you see the borders of 4 sheets. There you can still correct your picture (reduce, enlarge). And you print.
When printing on sheets, there will be about 0.5 cm of space for gluing sheets.
CorelDraw is best suited for splitting pictures into sheets.
For general erudition:
This is how messy it gets.
-
 Basic elements of personnel management Basic elements of personnel management
-
 Quality management at the enterprise: standards, stages of implementation, tips
-
 How is the quarterly bonus calculated and how is it paid?
-
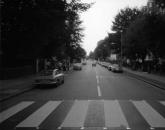 Mysterious crossing on Abbey Road in England John Lennon originally named the group differently
Popular
- "Abbey Road" cover as the basis for a conspiracy legend
- How to write a letter of guarantee?
- Merchandising, its types and principles Fundamentals of merchandising in the textile industry
- Marketing activities in wholesale and retail trade
- Indicators and criteria for management effectiveness
- Why is "Bird's milk" called "bird"?
- Analysis of the labor resources of the enterprise
- Management functions, management levels One of the management functions
- Basic management functions How many basic management functions do you know
- Theoretical aspects of the organization of wages at the enterprise