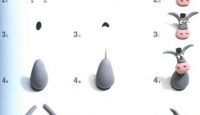
The sequence of sculpting animals. Plasticine modeling video
When kids get to know this fun, sooner or later the question will be asked: “Mom! Dad! Grandmother! Grandfather! How to make animals from plasticine. " Then the existing experience, fantasy and crazy improvisation are used. Horses and cows are the most different forms and flowers, not without the participation of the child.
In this post, we will introduce you to a number of schemes and algorithms that will help you make beautiful animals from plasticine with your own hands.
Below we give pictures with step-by-step instructions on how to make this or that animal from plasticine. Here we did not divide them into domestic and wild, into familiar and exotic. There is a whole zoo or a nature reserve, whatever you like.
Plasticine is great because it is readily available and does not require any special skills to work. I took some sculpting, but there are a lot of benefits - a fun and useful time, the organization of leisure, as well as the development of creative abilities!
Therefore, this post with do-it-yourself diagrams and patterns of plasticine animals will be useful to both young parents and teachers and kindergarten teachers. After-school groups, hobby groups and just free time - you can do modeling anytime, anywhere.
Let's start with one of the creatures closest to man - dogs - our most loyal and loyal friends from the animal world.
Assembling animals from plasticine would be incomplete without one of the main characters in many cartoons and most Russian fairy tales - bunnies! Let's figure out how to sculpt it.

In this section you will find more detailed analyzes and other options for similar and other crafts. It is worth making a couple of clicks on the links to our articles, and you will find what you were looking for.


This collection of instructions and recommendations on how to make animals from plasticine uses a similar blank format for all the above crafts. Therefore, you can easily upgrade each and make your own version. Or, using these templates, make other animals.
Closest to us, but often imperceptible, the most unhurried exhibit is a snail.

Let's add some exoticism to our zoo. Let's touch on the coldest corners of our planet - we offer you a penguin sculpting scheme.

Dear friends, of course, these are not all plasticine animals that are collected on the pages of our portal. A couple of clicks will convince you of this!
Looking through news from friends and communities on Vkontakte, you often find something interesting. For example, today I noticed some good pictures that tell about how to sculpt animals from plasticine... I edited them a little to make it clearer, and I post it to you. Perhaps they will be useful to you and me in the future. So. Stock up on plasticine or modeling clay, and go!
Let's start by learning from animals that are easy to make, gradually moving on to more complex crafts.
Mouse
It is easiest to mold a mouse from plasticine (or special clay). Make a blank for a white body, stick a pink nose and ears to it.

And then the same pink paws and ponytail.

Snail
The snail is already a more complex craft, but still one of the simplest.
Make a blue sausage. Start twisting the end of it until you get something that looks like a snail.

Then add the body and head.

At the last stage, you can attach eyes, a nose and something similar to ears to the animal's head.

Rooster (or maybe a chicken)
We start sculpting from the body. Add three small balls to the yellow oval - a comb, as well as blanks for the eyes and beak, as shown in the picture below.

Now we sculpt the wings.

At the third stage, we make a tail from multi-colored sausages.

And finally, the legs.

Frog
Start sculpting a plasticine frog by making a body blank. In the first step and beyond, you will need a sculpting stick.

Now insert the tab into the hole.

Add eyes and nose.

Now you need to make the legs.

And at the last stage - pens. That's it, your frog is ready!

Donkey
The donkey is the most difficult craft of all that I have described on this page. But I think you can do it, especially if you practice well.
Good old plasticine will help solve the question of what is useful and interesting to do with your child. Sculpting animals from plasticine is a pleasant pastime that will benefit the development of children. Together with the baby, come up with what kind of animal you want to sculpt, and get down to business.
Psychologists say that working with plasticine has a beneficial effect on the development of a child. These activities have a beneficial effect on thinking, improve memory and attention. They also develop fine motor skills of the hands, as a result of which the child learns speech faster, uses imagination during creative games.
To make the work process productive and enjoyable, parents need to choose the right plasticine.
It should be bought in accordance with the age of the child, the purposes of using plasticine.
Modern manufacturers have created new types of plasticine:
- you can cook and get an eraser;
- plasticine, which changes color under the influence sun rays;
- the sculpting material looks like a rubber bouncy;
- fluorescent plastic;
- plasticine as a magnet.
For sculpting animals, it is better to choose two types of plasticine: soft (it is more convenient to use it in drawing) and hard (it will make solid figures).
When choosing plasticine, it is necessary to take into account some criteria:
- plasticine should not be fragile and stick to the skin;
- it is necessary that it be plastic and malleable to softening with children's fingers;
- greasy colored spots do not remain after using plasticine good quality;
- it is necessary to choose plant-based products (traditionally it consists of clay powder with the addition of wax, petroleum jelly, fatty components);
- should be avoided chemical substances such as a thickener and solvent, as well as artificial colors and flavors;
- plasticine latex, gluten and petroleum products causes allergies in children;
- high-quality plasticine with a sharp odor, acid colors, it is pleasant to the touch.
What you need to work
In order for the sculpting process to bring joy and not cause any discomfort, you must have all the necessary tools and components at hand.
In addition, you need to choose a comfortable place for such work:

For the process of sculpting animals from plasticine, children will need:
- Plasticine set.
- Special board for sculpting.
- Several blank A4 sheets.
- A special stick - a stack, for a more comfortable use of plasticine.
- Pictures depicting an animal, or step-by-step instruction before your eyes.
- Wet wipes or a bowl of warm water and a towel to clean your hands.
Plasticine sculpting: getting started
If a child first encounters this material, first you need to familiarize the child with the properties of plasticine, show how to interact with it, what can come of it. Depending on the age, the child can hold attention on the same thing for a different amount of time. For the first time, the optimal time for sculpting or getting to know the material will be 10-20 minutes. 
To arouse and maintain interest, it is better to finish the process a little earlier, when the child experiences positive emotions and hobby for the activity, rather than later, when he is no longer interested and he is tired. Indeed, in this case, the child will have an unpleasant aftertaste, and the very process of this creative enjoyable activity will be associated with fatigue and boredom.
Show the child the following plasticine manipulations, and then offer repeat them yourself under your supervision and willingness to help if necessary:
- Heat the clay in your hands, demonstrate that then it becomes softer and more pliable, it is easier to work with it.
- Remember it in your hands, roll it into a ball, flatten it, connect different colors together, tear parts of the same color into different components, add different shapes consisting of one and several colors.
- Show that the clay sticks to your hands and that it needs to be washed off after the robots with water or at least a damp cloth. Demonstrate that if you grab a hand like this, for example, a dry napkin or piece of paper, it will stick. Explain that to prevent this from happening, it is necessary to rinse off the remaining plasticine from the skin.
- Invite your child to do the same manipulations under your supervision.
What animals can be made from plasticine with your own hands
In fact, you can choose any animal from plasticine, even an imaginary one, imagination, diligence, time and, of course, plasticine would be enough. To facilitate the manufacturing process, the best option there will be step-by-step instructions before your eyes, especially if everyone new stage described with detailed instructions and shown in a separate photo.
Plasticine animals for children are an entertaining modeling option that will captivate both parent and child.
In addition, it will help develop the child's fine motor skills, while simultaneously using his cognitive, cognitive processes, because when making this or that animal, the baby will simultaneously study how this animal works. Choose your favorite animal, bird, fish and start making.
Plasticine zoo how to mold any animal in 15 minutes
There is nothing complicated in sculpting plasticine animals. It is enough to blind the first few figures, then the hand will get filled, and the process will go much faster. The book "Plasticine Zoo: How to mold any animal in 15 minutes" by Marya Novatskaya can become a good helper in modeling with plasticine together with a child. 
The book presents sixteen animals from different continents, which the child could see with his own eyes when visiting a real zoo with his parents or on an excursion. Delighted with learning new things, the child, of course, will want to meet the animals he sees again, and parents can give him such an opportunity by creating their own zoo from plasticine at home.
Unlike a real prototype, in a home zoo there are no cells and no prohibitions to feed or pet the animal, the baby can play with the animals and study them absolutely freely, which will give a gamut of positive emotions and carry away for a long time.
Plasticine pets
If a child loves and adores an animal that lives in your home, then he will definitely be delighted with the idea of making his pet out of plasticine. In addition, the process of creativity itself is much more important for children than the result. With a little practice, you can mold any animal from plasticine: a cat, dog, mouse, chicken, goose, goat, cow, pig, any animal that lives near you. 
How to blind a mouse:
- Warm up the plasticine in your hands.
- Roll 2 medium balls for the torso and head.
- Next, roll up 4 small balls-legs, connect the parts together.
- Make a ball-protrusion on the face, a small ball-nose, 2 ears-disks by flattening 2 rolled balls.
- Make eyes by matching 2 small balls with 2 smaller balls.
- Connect the eyes, ears, spout to the entire structure.
- Roll up a ponytail string and attach to the body.
- The mouse is ready.
Master class on making a cat
A cat is an animal that walks by itself, which does not prevent such a freedom-loving creature from being a favorite of most children. Invite your child to make a cat out of plasticine, he will definitely like this activity. 
Performance:
- Warm up the plasticine (of different selected colors) in your hands until it softens.
- Roll out the oval-body and use a stack to divide the ends of the oval into 4 legs, as shown in the picture.
- Bend the resulting shape so that it stands on its paws.
- Roll up a ball-muzzle, from a different color roll a round protrusion onto the muzzle, a small ball-nose and 2 balls-eyes of a different color too, triangles-ears and 6 thin sausages-mustaches. Connect all the parts of the head one by one.
- Connect the head and torso, draw a mouth with a stack on the face.
- Roll the tail sausage, thickened towards the end, and attach it to the cat's torso.
- Make 5 sausage strips and attach 3 to the cat's back and 2 to the tail.
- The cat is ready!
How to sculpt ponies and horses from plasticine
Performance:

Wild animals from plasticine
Children are naturally inquisitive and eager to learn the world, surely their attention will be attracted not only by those animals that can be seen every day next to them, but also by representatives wildlife... Plasticine modeling will help to satisfy the need for knowledge and brighten up the evening. Sculpt what your heart desires: even a tiger, even a lion, even a giraffe. 
A large elephant will require the most plasticine!
Plasticine lion. Step by step sculpting lesson
The king of all animals, the plasticine lion is an excellent excuse for children to stretch their fingers with creativity. 
To make a lion, you need the following:

Plasticine marine animals
Plasticine marine animals - this is an opportunity for children to learn underwater inhabitants.  The aquatic world is diverse and interesting: not only fish live there, but also octopuses, seals, crayfish, turtles and dolphins.
We sculpt an octopus: step by step instructions
To dazzle an octopus, you must follow the step-by-step instructions:

How to mold a hedgehog from plasticine
It is quite simple to make a cute hedgehog:

How older child, the more complex and detailed the hedgehog will be.
Making a plasticine turtle
To get a turtle, just follow the 5 following steps:

And to make it look like a real one, you can decorate its shell with small shells instead of plasticine parts.
Peppa pig from plasticine
Often children are carried away not only by real animals, but also by cartoon characters. The reason to look away from the screen may be an offer to make your favorite hero from plasticine with your own hands.
 Plasticine animals for children are molded very simply, while perfectly developing the child's motor skills.
 To create Peppa Pig, you need to follow these steps:
- Make 2 balls: pink and red.
- Form the hem of the dress by placing a red ball on the board and stretching out the flat side with your fingers.
- Make a small hole on top.
- In a pink ball, stretch out a wide nose, glue the eyes on top.
- Piglet and mouth are made using thin plasticine red salting.
- Attach the ears to the top of the head.
- Connect the head to the body.
- Make handles and attach them to the torso.
Snake: sculpting in stages
Performance:

The main secrets and techniques of working with plasticine
Plasticine is not cunning in its use, but still, there are several secrets that will play a good role while working with it:
- Before starting the process, make sure you have all the necessary ingredients on hand, including warm water or wet wipes for cleaning hands. This will also help you not to mix different colors with each other when sculpting from different pieces of plasticine.
- Having chosen to sculpt this or that plasticine animal, find a photo of how the final result should look and step by step detailed instructions.
- Warm up the plasticine in your hands before sculpting - this will make it softer and more pliable.
- At the end of the work, be sure to fold the different colors apart, since the plasticine is warm after the hands, and in the box it will harden and it will be difficult to separate it from another color without tearing a separate piece.
There are many options for what kind of animal can be molded from plasticine with children.
The main thing is for everyone to like the process: both the parent and the child. To do this, you should ask the child exactly whom he would like to sculpt and provide a choice, for example, by showing different pictures of finished crafts. Such a free and exciting creative process will bring joy and benefit to all its participants.
Video: plasticine animals for children
Simon the cat from plasticine, master class:
How to mold a plasticine caterpillar, see the video clip:
Animals are perhaps the most favorite topic of children's crafts. Each child independently chooses his character from cartoons and stories, acting out various scenes with plasticine toys made with his own hands or with the help of parents. How to make various animals with your own hands from purchased or homemade plasticine for children - we will tell you in our article.
Modeling develops spatial thinking, helps in mastering the form and material, colors, teaches the kid to observe the world around him. Before sculpting a dog or a cat, you need to remember what color they are, their appearance, behavior, details and many other points. Seeing some animal in the zoo or on TV, the young creator will certainly want to dazzle it. How easy it is to make animals from plasticine, you will be prompted by step-by-step modeling lessons with visual photos.
How to make animals from plasticine with your own hands in simple MK
Affectionate kitty:- Let's divide the material into parts. Roll three balls out of white plasticine: a large one for the body, a slightly smaller one for the head, and the smallest one for the tail. For the ears and whiskers, make two more small white balls, and twelve tiny balls will make excellent pads on the legs. The green and black balls are useful for the eyes, and one pink for the nose and muzzle.
- Divide the pink ball into two halves. Make a round nose out of one and attach it to the cat's head. Roll a thin sausage from the other half and bend it into a smile.
- Extrude indentations in the green circles. Insert black balls into them. It turned out cute eyes!
- Roll the plasticine prepared for the ears into a roller, pointed at both ends. Press it down with your fingers and split it in half with a stack.
- In the blank for the head, make two holes with a rod from ballpoint pen or a used felt-tip pen. Place the cat's eyes in them.
- Roll the antennae for the antennae into a thin tube and divide into six small parts. Stick them to your head, equally on each side, and then attach the ears and a smile. Leave a few dots with a toothpick near the mustache.
- Roll a thick cylinder from the ball prepared for the body and cut it on both sides.
- From the resulting parts, mold the legs.
- If you are sculpting a cat with a variegated skin, make spots of it from pieces of brown and orange plasticine, flattened into small pancakes. Stick them on the body of the animal. Some specks can overlap and merge.
- For a black cat, yellow eyes with vertical pupils are more suitable. Making them is simple: squeeze the yellow balls and give them an oval shape, and then attach small black stripes to them.
- Bend the legs to make the craft more stable.
Stretch the tail ball into a long sausage, bend it as you like and attach it to the body. Attach tiny drops of plasticine to the legs, three things for each - these will be pads. Using a toothpick for extra strength, connect your head to your torso.
Ready! Now this adorable kitty will become a cute decoration for a nursery, or your baby's favorite toy.
Then you can dazzle other pets, for example, a funny dog.
Do-it-yourself mischievous dachshund.As usual, let's start with the blanks. Take brown plasticine and mold seven different balls from it: one small for the head, two cherry-sized balls for the front legs, two smaller ones for the ears, and the smallest one for the tail. Prepare black and white lumps for the eyes and nose.

Roll out the largest ball in the form of a roller and divide it into two branches on one side - this will be the body and hind legs.
Turn the gingerbread man prepared for the head into a cone with a rounded base.
To make the eyes, make small indentations in the white pieces of plasticine and insert black balls into them.
Roll out the future front legs into cylinders and press them against a hard surface at an angle. So it will be more convenient to attach them to the body. Bend the other end and make it slightly flattened. The right and left legs should be symmetrical.

Make triangular ears. Fold one of them as if it hung slightly to one side.
On the head, prepare the indentations for the nose and ears using a pen shaft or any other convenient object. Replace the eyes and nose.
Round off the hind legs. Make the ponytail in the form of a thin oblong cone, press its wide part against the board.
Replace the ears of the dachshund.
Attach the front legs to the body, and bend the hind legs forward. Use a plastic knife to cut the toes on the feet.
With the same knife, form the mouth on the muzzle, making a horizontal incision under the nose. Punch holes for the mustache.
Break off a piece of a wooden toothpick and use it to attach the head to the body. Attach the ponytail.
The funny dachshund is ready to play!

In addition to the animals that we are all used to seeing nearby, there are many exotic creatures. Next, we gradually blind the mysterious inhabitant of the deep sea - the many-legged octopus.
We sculpt a brooding octopus.When working on this craft, you don't have to think about choosing a color. An octopus can be green, red, or blue. One block of plasticine will be enough, but for a larger figure you can take more. Divide the entire plasticine into five equal parts, knead each of them well and form balls.
Roll four balls into oblong sausages.
Lay them so that they intersect each other at the center point. Squeeze the intersection. It turned out something like a snowflake with eight ends - these will be the tentacles of an octopus.

On one side, apply dark dots from plasticine droplets to the legs.
Pierce each of the dots with something sharp, a toothpick, for example. Great suckers came out.
Shape the remaining ball into a pear shape. The bulkier part will be the top of the head.
Stick your eyes and mouth over your head.
Attach the finished head to the center of the intertwined tentacles. You can decorate it with something if you want.
The craft is almost ready. Bend the octopus tentacles for a more realistic look.
You can make a "house" for the octopus: set the figurine on a blue sheet of cardboard and surround it with small crafts in the form of shells and underwater plants.

That's all! In the process of creativity, you will acquire a real home zoo. Children will be delighted, because plasticine figures can not only please the eye, but also be used as toys.
You can make even more interesting crafts by watching the video on the topic of sculpting animals from plasticine.
Related videos
An activity such as modeling animals from plasticine develops not only fine motor skills, but also speech think tanks, abstract thinking and imagination. Sculpting animals is a fairly diligent and step-by-step process, so it is imperative that you help and guide your children.
In today's lesson, we will be engaged in sculpting a pet - a lamb and a crocodile.
How to make a turtle in stages, see
Materials for sculpting a sheep:
- board;
- stack;
- plasticine of white, black, blue colors
How to make:
We begin to sculpt the muzzle. We sculpt a small rectangle from black plasticine. We make the upper part concave. Above we outline a place for the eyes. We sculpt the body in the shape of a circle. We connect the face and body.

We sculpt horns on the top of the head. To do this, we sculpt a small flattened rectangle from black plasticine. We attach it over the head. We sculpt four legs in the form of tubes. We attach two in the front and two in the back.

We will sculpt the wool from white in the form of circles of different sizes. We sculpt four small circles and two larger ones. We glue three small circles on the body in a row. Below them are two large ones, below there is another circle.

We sculpt four more circles: one large, three smaller ones. On the bottom row we attach one small circle, then one large, and then two more others.

For white eyes, we sculpt two ovals, attach to the intended part. From blue plasticine, we again sculpt two smaller ovals. We attach them to white ovals.

Sculpt the pupils in the form of dots and attach them over the blue color. We make holes on the nose with a stack.

The sheep is ready!
Crocodile sculpting materials:
- green plasticine;
- lightning;
- board;
How to make:
First, let's make the torso. To do this, we make a "sausage" - the body, then pull it out and flatten it from above. In the neck area, squeeze the plasticine from the sides, trim the nose.

We sculpt paws. Cut out the toes in a stack. We bend each leg.


-
 How to register a company abroad?
-
 How the passenger pays for the trip Benefits of travel for corporate orders
-
 Organization of a paid extended day group as an idea for a private business!
-
 Own business: using thermal imaging cameras to inspect houses Thermal imaging cameras as a business can you make money
Popular
- Technology and timing of installation work
- Serbia - the life of Russian emigrants in the Balkans Cost and terms of company registration in Serbia
- Hospitality - by whom to work, a list of professions, in which universities to study, what to take for a specialty Enter the hotel restaurant business
- Job description of the deputy head of the shop Submits to the head of the shop
- Examples of personal qualities of an employee for a resume
- Business idea: auto parts store
- Profitable business in serbia
- What to write about yourself, how to describe yourself in your resume: example, employee qualities that employers value
- How to start a business in Israel and not screw it up
- Electronic submission of reports: in what case is it obligatory, what can be sent, services and their cost Program for electronic reporting to the tax