How to remove unnecessary report options in 1s. An example of deleting a catalog item Nomenclature
Send this article to my mail
When trying to delete an unnecessary system object (a directory item, document, report variant, etc.), the user will not be able to completely remove it from the 1C database, he can only set a mark for deletion. Therefore, the question arises - How to delete marked objects in 1C 8.3?
This article will walk you through how to complete this process. The removal functionality for many configurations is identical and the described technique is suitable for UT, ERP, Accounting and ZUP.
To completely remove an object from the 1C database, you must start the Deletion of marked objects processing. This was done not to complicate the work of users, but to avoid errors. For example, if you remove the counterparty for which the sale is registered, then the products will be sold to anyone. Therefore, it is impossible to simply remove objects from the system, you must first make sure that it is not used anywhere and its absence will not lead to errors in the program, and it is for this purpose that the Deletion of marked objects processing is provided.
Thus, in 1C, removal is performed in two stages:
Marking for deletion in 1C;
Final removal by processing if the object is not involved in any way in the system.
How to set a mark for deletion in 1C 8.3?
To mark for deletion in 1C, select the required reference / document (you can also select the list of objects at once), in the More menu, select the Mark for deletion / Unmark command (in some logs, the icon of this command is displayed) or press the delete button on your keyboard ... The system will ask you to confirm your intentions and after that a mark will be set.

Please note that if you try to set a mark on an already marked item, the opposite action will be performed - unmarking.
How can I delete marked objects?
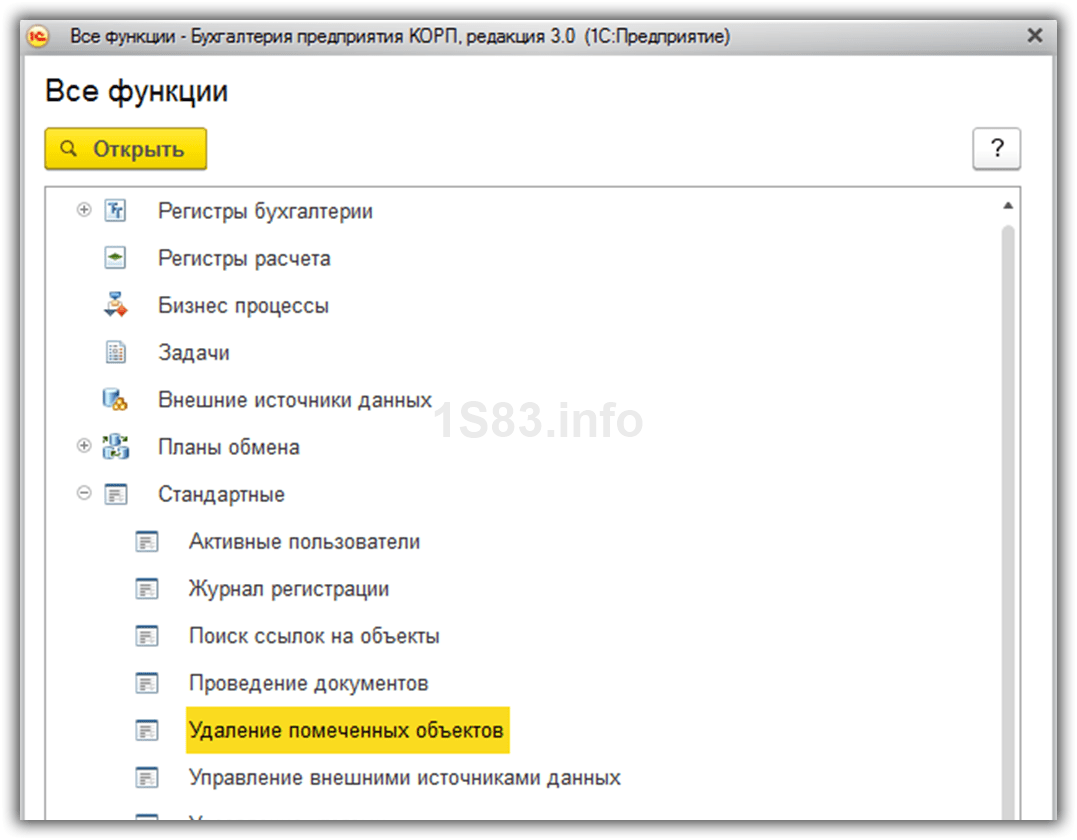
In Accounting and ZUP, processing is available in the Administration section, in UT and ERP in the NSI and Administration → Support and Maintenance section. And if you suddenly forgot in which section to look for the desired system object, you can always use the All functions section.


Processing Deletion of marked objects is controlled by referential integrity, i.e. if the object to be deleted is referenced in other objects, then the deletion procedure will not be performed.
There are two modes of operation with processing, automatic and manual (selective), and you can also set up a scheduled task for automatic deletion according to a specified schedule.
In selective mode, the system will display all items marked for deletion, grouped by type. The checkboxes are used to select objects that need to be permanently removed from the system. You can open the object by double-clicking it. After the choice is made, you need to click Delete and the process of cleaning the database from the marked objects will be launched.
In automatic mode, this process will be launched immediately.
As a result, regardless of the selected mode, processing will attempt to delete all objects marked with the mark. If deletion is not possible, then a list of non-deleted objects with links to their places of use will be displayed.
The options available in this case are:

Mark for deletion and places of use and try deleting again.
Make corrections to places of use. For example, if you want to delete an employee who is in the document Recruitment list, you need to remove him from this document.
Perform the replacement procedure by the Replace command. A list of similar items for replacement will be offered. For example, if you need to replace a characteristic of an item in a document, then a list of characteristics of the same item will be offered.

To automatically execute the procedure using a scheduled task, set the Automatically delete marked objects according to schedule checkbox in processing and configure the schedule.

Do you need a 1C programmer?
Your advantages when working with us!
Free preliminary estimate of the cost of tasks before starting work.
The price of an hour of a programmer's work is 2 times lower than the market.
Priority quick response to urgent tasks - from 5 minutes!
A clear system for setting, tracking and delivering tasks.
We make video instructions on the completed tasks.
We provide warranty support for 3 months on completed tasks.
System 1c enterprise initially does not imply direct deletion of any objects from the database, for example, elements of directories, documents, reports, etc. Of course, you can still configure the user's role in such a way that he immediately deleted from 1s some object without marking for deletion, but this is highly discouraged. We also want to note the fact that even if the user has a role configured for direct deletion of objects (interactive deletion), it is still will not allow him to delete some objects in the enterprise 1c, and this can only be done through mark for deletion.
Why was the mark for deleting objects in 1s made?
Let's answer the question "Why was this mark for deletion made?" remove object from 1s straightaway. This was done for several reasons:
- There is a possibility that the user later changes his mind and wants to return the deleted object, when it is enough to remove the mark, data cannot be recovered during online deletion.
- In 1c, one object, for example a document, can refer to many other objects in the system (directories, constants, other documents, etc.), and at the same time, many other objects can also refer to this object (in our case, a document). If in the 1c system the enterprise were allowed to directly delete objects from the database, then this would lead to dire consequences, since objects with "broken links" would immediately begin to appear, and this is data loss, and not the correct functioning of the database, which sooner or later will lead to the collapse of the database and almost complete loss of your data!
Two types of deletion in 1s, the concept of control of referential integrity in 1s
In a programme 1c objects can be deleted two ways:
- Using interactive delete (direct deletion without referential integrity control)
- Through mark for deletion (deletion with referential integrity control)
Let's take a look at what is referential integrity in 1c. But in order for us to answer this question, we must know what "broken" links in 1c are. For those who do not know, broken links in 1c are links that point to an unused memory area, that is, in fact, they point to nowhere. Now let's take, for example, any document in the 1c enterprise system. It contains many different props. These attributes can be both simple (primitive types such as number, date, boolean), and can also be object (such as links to other system objects, for example, various directories, enumerations, etc.) So control of referential integrity in 1c just means the fact that the object will not be deleted from the 1c system as long as some other objects in the system refer to it. Just marking the deletion of objects 1c allows you to preserve the referential integrity mechanism in 1c, since processing the deletion of marked objects will not allow you to delete an object while other objects refer to it.
How to recover deleted objects in 1s? What happens to objects after they are removed from 1c?
Many people ask us similar questions, and there is only one answer, physical deletion of data from 1c (using the methods described below) leads to the COMPLETE DESTRUCTION OF THE FILE FROM THE DATABASE! Recovering deleted files from the database is not possible.
We are always ready to provide you with timely assistance in updating the 1C 8.3 system.
Interactive deletion in 1s
So we have already discussed with you that interactive deletion in 1s occurs without control of referential integrity, and this is fraught with very bad consequences for the system, it is recommended to use this removal only for debugging purposes. To turn on interactive delete 1s First, we need to go to the configurator, expand the General ---> Roles branch and select the "Full rights" role.

Now press the F9 key, the "FullRights" role is copied and another "FullRights1" will appear. Let's open it with a double click. The role properties window will appear, press the button "Actions" ---> "Set all rights". After that, click OK. Now we will save the database configuration by clicking on the blue barrel in the upper left corner, or by pressing the F7 key. If the keg has become inactive, then the configuration has been saved. We have created a role with rights to interactive removal of objects from 1s .

Now in the configurator, open the Administration ---> Users tab.

A list of users will open, select the user under which you want to enable interactive deletion of 1s objects and press pencil or F2. The user properties window will open, go to the second tab "Other". There, find the role that we copied with you, in my case it is "FullRights1", put a tick and click OK.

After that, start the 1c enterprise, select the user for whom the new role was installed. Now you can delete objects directly, in order to delete an object, select it and press the SHIFT + DEL key combination, the system will ask you if you are sure of deleting, if the answer is yes, the object will be deleted from the system.
Deleting 1s objects through a mark for deletion or how to delete objects in 1s?
Now let's look at the question with you " How to delete objects in 1s?". So, we open the database we need in 1c enterprise. The screenshot shows" Accounting state institution", click on the" Operations "tab in the menu --->" Deleting marked objects".

If you have a controlled interface, as for example in "Enterprise Accounting rev. 3.0", then there you need to go to the "Administration" tab, there you will see the "Service" subgroup, and already in it you need to select " Deleting marked objects".

An alternative way to open the Object Removal Assistant in 1C 8.2 and 1C 8.3
In general, if you cannot find a button in your configuration with which you can call the wizard deleting marked objects 1s, then in 1C 8.2 you can open it in the following way, this method is suitable for any configuration, below in the screenshots you can see what actions need to be performed in 1C 8.2. Open the tree of all processings that are in the system and select " Deleting marked objects".


If you work on the 1C 8.3 platform and you have a configuration with a controlled interface, then you need to enable the "All functions" button, see how to do it.
Start searching for objects marked for deletion in 1s
A window will appear in front of us, which is shown below, it will reflect all objects marked for deletion in the system... We mark the boxes that we want to delete, in general it is advisable to delete all of them, because they are marked for deletion, which means they are no longer needed in the system. After you have marked everything you need, click "Control".

The system will take some time to complete this task, a little later you will see the window shown below. Please note that you can have objects with both green checkmarks and red ones.

Green means that the object can be deleted, red, respectively, that it cannot. The object marked with a red check mark cannot be deleted, since other objects of the system refer to it, in the window below you will see those objects that refer to it, and before deleting the object marked with a red check mark, you need to remove links to this object from other objects. What does this mean in practice?
The need to timely delete objects marked for deletion in 1s. How to remove objects marked with red checkmarks?
Let's consider an example on the "Enterprise Accounting" configuration. We have a document "Acceptance of OS for accounting", it accordingly indicates the main tool (for example, a computer) and many other parameters, but they are not of interest to us at the moment. If we want to remove this OS from our database, then without additional actions nothing will come of it. Our OS (computer) will be marked with a red check mark when trying to uninstall it. Why? But our document "Acceptance of OS for accounting" has a link to the OS that we now want to delete! When we click on it in the list of objects, we will see all the objects that refer to our OS, and before deleting this OS, we first need to go into all these objects and remove the links. In our case, this means that you need to cancel the posting of the document "Acceptance of OS for accounting", and remove this OS from the document, and then write down the document. Now the document no longer refers to our OS, and we can delete it. One rule follows from all this, you need to delete objects marked for deletion in 1s in a timely manner! Otherwise, then getting rid of them can be very, very problematic, due to the fact that there will be a large number of links between objects. By the way, timely removing objects from 1s also has several obvious advantages:
- Increases system performance
- Reduces the likelihood of user errors
- Reducing the size of your database
- There is no "clutter of the interface" when the system has many objects marked for deletion, posted documents, and also not posted.
In our company you will always receive first-class service of the 1C program at very pleasant prices!
Completion of deleting marked objects in 1s
Now let's remove the objects to the end. Click the "Delete" button. The system will delete all objects that have been marked with green checkmarks.

There will remain only those that are marked with red checkmarks, click "Close", this is the process removing objects from 1s completed. If something did not work out for you, we are ready to connect to your 1c remotely and help solve your problems.

1c deleting marked objects, detailed video instruction on deleting objects 1c
- We tell you why you need a mark for deletion in 1s
- We show by example how to delete objects in 1c
- Provides useful practical advice
- We show how to delete objects marked with red checkmarks in 1s
- There is also a lot of other useful information.
We hope that our article about deleting objects marked for deletion in 1s I helped you a lot and answered all your questions.
In the 1C program, almost no object can be physically deleted immediately. This opportunity configurable in roles ("delete" and "interactive delete" rights). Usually, the developer does not allow such actions to be performed in order to avoid disastrous consequences in the future.
Marking for deletion means that the object is out of date for the user. When you set a mark on a document, its posting is automatically canceled.
An example of deleting a catalog item Nomenclature
In our example, we will delete an element, but the process of deleting a document or any other object is no different from the instructions given.
Let's set the mark for deletion directly from the list form of this directory. To do this, select the position we need and press the Del key on the keyboard (or using the context menu).
The program will ask us a question about the need (or removal) of the mark for deletion. We will answer "Yes".

After that, a sign will appear at the selected element of the directory. We remind you that if a configuration object has the rights to delete or interactively delete, then using the Shift + Del combination you can immediately delete it physically.
Now we can proceed to the direct deletion of our directory object. If this functionality is not available to you, it means that you do not have the corresponding rights to it.
Select the "Delete marked objects" item in the "Administration" menu.
This functionality is also available in the All Functions menu.
In the window that opens, the program will ask you to choose whether you want to delete all objects marked for deletion or only some. In our example, we will only delete the item "Edged board 50 * 250 * 300".


For some time, the system will calculate if other objects are not referenced information base to our board. As a result, the program gave us a notification that deletion was impossible.


In order for our nomenclature to be deleted, it is necessary to mark all objects in the table on the right for deletion. Another option is to replace our object with another everywhere.
You shouldn't have any problems with marking for deletion for related objects, so we will choose a replacement.
Click on the "Replace ..." button.

Let's select the nomenclature item, which will be replaced in all related objects. After that, you will again have access to the window for re-deletion. This time everything went well, as the program informed us about.
Automatic deletion of marked objects on a schedule
In newer versions of the 1C program (starting from 8.3), the developers have added a very convenient ability to automatically delete marked objects on a schedule. Let's take a look at how to make this setting.

In the form that opens, go to the "Routine operations" section and set the checkbox in the "Automatically delete marked objects on schedule" item. After that, the "Configure schedule" hyperlink will become active for you. Follow it.

You will see a standard form for setting up a schedule. If necessary, you can change the default values, but so that the start time of this routine operation does not coincide with the working hours of your organization's employees.
We have examined in some detail the settings for reports implemented on the basis of the ACS. Now let's take a look at the finer and more detailed settings of the report options. The window of "advanced" settings of the report variant is called by the command "More" - "Other" - "Change the variant of the report".
The window for changing the report variant is divided into two parts:
1. Structure of the report.
2. Report settings.

The structure section of a report variant is similar to the "Structure" tab of the standard report settings. The purpose and configuration of groupings is discussed in detail in Part 1 of the article.
The table of the structure of the report variant, in addition to the column with groupings itself, contains several additional columns:
The settings section of the report option gives the user ample opportunity to configure the report to suit his needs. It almost completely coincides with the standard report settings discussed in Part 1. Let's consider all the tabs in the section and note the differences.
The settings section consists of the following tabs:
1. Parameters. Contains ACS parameters available to the user.
ACS parameter is some value used to get report data. This can be a condition value for selecting or validating data, or an auxiliary value.

The parameter table is presented in the format "Parameter" - "Value". Parameter values can be changed if necessary. Clicking on the Custom Settings Item Properties button opens the custom settings for the item.

In this window, you can select whether the element will be included in the user settings (i.e. visible to the user when setting up the report), set the element presentation and editing mode (quick access in the report header, normal in the report settings and unavailable).
Customization item properties also have groupable fields, fields, filters, and conditional elements.
2. Custom fields. Contains fields that the user himself forms based on the data selected by the report.

User can add two kinds of fields:
- New selection field ...
- New expression field ...
Select fields allow you to calculate a value based on a given condition. The window for editing the selection field contains the title of the field and the table in which the selection, value and presentation of the field are set. Selection is a condition, depending on which the required value will be substituted.

For example, let's calculate an estimate of the number of sales. We will assume that if less than 10 units of a product are sold, they sold a little, and if more than 10 units, a lot. To do this, we will set 2 values of the calculated field: the first will be with the selection "The number of goods is less than or equal to" 10 "", the second with the selection "The number of goods is greater than" 10 "".
Expression fields allow you to compute a value using arbitrary algorithms. They can use the functions of the query language and the built-in programming language 1C. The expression field edit window contains two fields for detail and summary expressions. Totals records are groupings configured in the "Report Structure" area, in which you must use aggregate functions ("Sum", "Minimum", "Maximum", "Quantity").

For example, let's calculate the average discount percentage. The average discount percentage is calculated using the formula: [Amount of sales without discount] - [Amount of sales with discount] / [Amount of sales without discount]. It must be remembered that the amount of sales without a discount can be zero, so we use the SELECT operator to check. We get the following expressions:
· For detailed notes:
Choice
When [Amount of sales without discount] = 0
Then 0
Otherwise [Amount of sales without discount] - [Amount of sales with discount] / [Amount of sales without discount]
End
· For totals records:
Choice
When Amount ([Amount of sales without discount]) = 0
Then 0
Otherwise Amount ([Amount of sales without discount]) - Amount ([Amount of sales with discount]) / Amount ([Amount of sales without discount])
End
As mentioned earlier, in the expression of totals we use the "Sum" aggregate function.
3. Groupable fields. Contains the fields by which the result of the report variant will be grouped. Grouping fields are configured separately for each of the groupings, but you can specify general grouping fields for a report variant if you select the "Report" root in the structure tree. You can add a field from the report result, a custom field, or select an auto field, then the system will select the fields automatically. Also, this tab allows you to change the order of the grouped fields.

4. Fields. Contains the fields that will be output in the result of the report variant. The fields are configured separately for each of the groupings, but you can set general fields for a report variant if you select the "Report" root in the structure tree. You can add a field from the report result, a custom field, or select an auto field, then the system will select the fields automatically. Also, this tab allows you to change the order of the fields.
Fields can be grouped to logically highlight some part of the report or to define a special arrangement of columns. When adding a group, the "Location" column becomes active and allows you to select one of the location options:
- Auto - the system places the fields automatically;
- Horizontal - fields are arranged horizontally;
- Vertically - fields are arranged vertically;
- In a separate column - fields are located in different columns;
- Together - the fields are arranged in one column.

5. Selection. Contains selections used in the report variant. Setting up selections was discussed in detail in Part 1 of this article. Filters are configured separately for each of the groupings, but you can set general filters for a report variant if you select the "Report" root in the structure tree.

6. Sorting. Contains sort fields used in a variant of the report. Customizing sort fields was covered in detail in Part 1 of this article. Sorting is configured separately for each of the groupings, but you can set general sorting fields for a report variant if you select the "Report" root in the structure tree.

7. Conditional design. Contains conditional styling elements used in a report variant. Setting up conditional appearance was discussed in detail in Part 1 of this article. Conditional appearance is configured separately for each of the groupings, but you can set common conditional appearance elements for a report variant if you select the "Report" root in the structure tree.

8. Additional settings. Contains additional settings report preparation. Allows you to select a common appearance report, the location of fields, groupings, details, resources, totals, set the chart settings, control the output of the title, parameters and selection, determine the position of resources and fix the header and grouping columns of the report option.

In conclusion, I would like to note that the report settings can not only be saved as a report variant, but also uploaded to a file (menu "More" - "Save settings"). To download, you need to select "Load settings" and select the saved file. Thus, we can transfer the settings of the report variant between different bases that have the same configuration.

Based on this, we can summarize that the user can not only independently customize the report to suit his needs, but also save his settings and use them in the future if necessary.
The 1C 8.3 program does not allow you to delete directories and documents in the database immediately, without additional checks. This is done in order to avoid possible mistakes. For example, if you want to delete an item that participates in a document, you cannot do this.
Let's consider how to delete documents and directories marked for deletion in 1c 8.3. Removal in 1C 8.2 is slightly different, but has a similar algorithm.
Removing objects in 1C occurs in two stages:
- Mark for deletion- setting the sign that a document, a reference book is planned to be deleted. Such an element is no different from others, it can also be selected in other objects.
- Direct removal- a special procedure during which the system controls whether there are references to this object in the database. After reference control, 1C decides whether it is possible to delete the object marked for deletion or not.
Let's take a look at these two steps. The instruction is absolutely universal and is suitable for all configurations on 1C 8.3 - Accounting, ZUP, Trade Management, ERP, Management of a small company, and so on.
It is very easy to set a mark for deletion in 1C. It is enough to select the document or reference book of interest to us from the list and press the "delete" button:
Then you need to confirm your intention. A special note can now be seen in the log:

This means that the next time you delete objects through special processing, the system will offer to delete this item.
How to delete objects marked for deletion in 1C 8.3
The second stage is directly deleting what is already marked in the 1C database. This is done using a special service processing "Deleting marked objects". It is located on the "Administration" tab:
Get 267 1C video tutorials for free:

When opening 1C, it will give us two options to choose from - automatic deletion of all objects and selective:

Selective can come in handy to remove a specific object. For example, let's select "Automatic mode" and click "Delete". This will start deleting all objects marked for deletion in the system. At the end of the work, the system will issue conflict situations - objects that are marked for deletion, but participate in the accounting:

Here you need to make a choice. For example, we marked "Board 4000x200x20" for deletion, but it participates in the documents "Operation" and "". If we do not need these documents either, we simply mark them for deletion and click on the "Repeat deletion" button. If documents are needed, it is worth considering whether this item should not be marked for deletion.
In our example, I decided that I did not need these documents in the database either, I set a mark on them. As a result, the system removed both the interfering nomenclature and the unnecessary document:

That's all, now you also know how to remove documents and directories from 1C 8.3.
Automatic deletion of directories and documents
-
 Do I need to annually approve the contingent for the medical examination?
-
 How to release office workers who work only at a personal computer and with office equipment from on-the-job briefings (primary and secondary)?
-
 On the organization of training and verification of knowledge of the labor protection requirements of the organization's personnel
-
 Features of the definition of similar jobs with a special price
Popular
- Named lists of persons subject to medical examinations
- What does the correct protocol for testing knowledge of labor protection requirements look like?
- With changes and additions from
- On approval of the procedure for the formation and work of commissions to test the knowledge of labor protection requirements of training organizations
- Labor protection instructions for administrative personnel and specialists (office workers) Name of labor protection instructions for employees
- Soviet Historical Encyclopedia
- "Roman newspaper": history of the country, history of the magazine
- Mikhail injections A session of public telepathy
- Buy sectional garage doors inexpensively in installments
- Oil production and refining companies