How to insert an account logo in 1s. Printing and signing in the printable layout without the use of transparent images
Currently, in "1C: Accounting 8" (rev. 3.0) with a facsimile, you can print invoices for payment issued to customers, and acts of reconciliation with counterparties. 1C experts told how to use this functionality in the program.
To enable this feature, you need to make the appropriate settings in the form of a lookup element. Organizations(in the organization card), which can be accessed from the section The main thing.
In the organization card, you need to open a collapsible group Logo and seal and, following the instructions, upload graphic images of facsimile signatures of the head and chief accountant. Also, if desired, you can upload the logo and seal of the organization (Fig. 1). Sample invoice form with logo, facsimile signature, seal and additional conditions displayed on the link Preview printed form"Buyer's account".

Rice. 1. Inclusion of a facsimile in the organization card
Now in document Buyer invoice(chapter Sales) when choosing a command Print - Invoice(with seal and signatures) a printed form of the document will be displayed with facsimile signatures of the head and chief accountant and the seal of the organization (Fig. 2).

Rice. 2. Print invoice with facsimile
To print a document The act of reconciliation of settlements with the counterparty(chapter Sales or section Purchases) a facsimile signature of the manager or chief accountant was displayed, then in the field Organization Representative on the bookmark Additionally as responsible person, it is also necessary to indicate either the head or the chief accountant. Then when choosing a command Seal - Reconciliation act(with stamp and signature) a document with a facsimile signature and its transcript will be printed (Fig. 3).

Rice. 3. Printing an act of reconciliation with a facsimile
As for the inclusion of a facsimile when printing acts, invoices and UPDs, such an opportunity is not provided for in 1C: Accounting 8 due to the existing risks for the recipient of these documents.
If the document is sent for the purpose of promptly reflecting it in the account of the counterparty, then it is better to send it by e-mail directly from the program in one of the formats offered by the program (XLS, XML, etc.). Then the counterparty will be able to automatically load the received document into his program, without wasting time on manual entry.
Due to numerous user requests, 1C:Accounting 8 developers are considering adding facsimiles to primary documents in a programme. A discussion of this issue is currently underway in the Ideas Hub. BUKH.1C also decided to ask its readers if adding a facsimile to the primary is useful and why users need this functionality.
We ask you to participate in the survey, as well as opinions and wishes can be written in the comments.
How to add a seal, signature and logo to the printed form of the invoice for payment to the buyer (for 1C: Accounting 8.3, edition 3.0)
2018-07-27T09:42:51+00:00Organizations often ask to embed a logo and signature seal directly on the invoice for payment to the buyer. From this, the account looks more solid and representative. Fax printing on the account is not prohibited regulations and therefore many take advantage of this opportunity.
Today I will tell you how to make a similar setting for 1C: Accounting 8.3 (version 3.0) on your own, without the help of a programmer.
Customize the seal, signature and logo
So, go to the "Main" section and select the "Organizations" item:
Open the card of our organization and open the item "Logo and printing":

Right after that, we will be asked to specify the picture we want to use as our logo. A file with such a picture must be prepared in advance (ordered from a designer) or found something suitable on the Internet.
For our experiments, I took the 1C company logo:
![]()
In general, any picture in formats (png, jpg, bmp) will do.
The logo was substituted in the field and displayed on the form, great!

Let's take care of facsimile printing and signatures. To do this, click on the item "Instruction" How to create a facsimile signature and seal "":

Print and follow the instructions on the printed sheet:

After that, we will have at our disposal 3 pictures in one of the formats (png, jpg, bmp) with a seal and signatures, in my case they look like this:


We see that the pictures with the seal and signatures were substituted and displayed on the form. Click the "Save and close" button in the organization card:

Finally, we go to some invoice for payment to the buyer and press the button "Print"-> "Invoice for payment (with seal and signatures)":

There was a printed form of the invoice with a logo, seal and signatures:

If the print and caption pictures are too small, rescan the sheet at a higher resolution.
We are great, that seems to be all
But what if we want the seal to fit onto the signature?
Not everyone needs this, and apparently that's why 1C by default made a variant with a separate location of the signature and seal.
For those who need to combine them, the instructions are below.
We combine the seal and signature of the head
To do this, go to any account and form the usual printed form (without printing and signatures):

It will turn out like this:

Then we cut off along the thick line at the bottom (before the signatures and seal) and scan the bottom part and save it as a picture on the desktop.
I got it like this (seal and signature are fictitious):
Again we go to the organization card, the section "Logo and printing".
Here we delete the pictures with the signatures of the manager and the accountant, and instead of the old seal picture, we load the just made large picture that combines the seal and signatures:

We press the "Save and close" button in the organization's card, and then we form a printed form of any invoice along with a seal and signatures:

In the printed form that opens, from the "More" item, select the "Change layout ..." command:

In the layout that opens, go almost to the very bottom (about the 90th line) and select the invisible square below the head inscription:

Our task is to drag this square a little higher (determined experimentally) than the inscription head and stretch it to the full width of the printing plate, like this:

Don't change anything else! Click the "Save and close" button, the printed form of the invoice will be regenerated automatically:

Exactly what we wanted happened - the seal got on the signature.
We are great again
By the way, new lessons...
Change in BP version 3.0.64.34
Now, having set up a signature and seal in the organization, we still have to select the "Invoice for payment" item in the invoice, and already in the printed form itself, check the "Signature and seal" checkbox:

You need to set it up once. Its value is saved between print form calls.
Addendum from a site reader. If the invoice form was - the field
with a checkbox will not appear - it is necessary
", which allow sending printed forms of any documents in PDF format to customers (having previously inserted seals and signatures there), programmers have the opportunity to create their own external printing forms and attach them to ALANN processing. What requirements must the external printing forms created for ALANN processing meet, described in the publication... The same publication will discuss how to add images to layouts.
The method that I will describe is called "Method "Layers"". The method that is known to everyone and is more often used (when images with a transparent background are added to the layout), let's call "Transparency method".
Technology, so to speak.
So, for example, let's insert a seal and signatures into a typical invoice for payment (trade management 10.3 configurations). To do this, open the general layout "InvoiceOrder" and find the "InvoiceFooter" area (I have highlighted the areas in which I need to insert a stamp and signatures with translucent red squares)):
Of course, if you now stick pictures with a seal and a signature into the layout, then the text behind them will not be visible. Therefore, we find the following elements on the toolbar: "Direct" and "Text" (in the picture below, red arrows show these elements):

Select the "Text" element and add it to the layout:

- Set the element: text "Head", font size - "10" and bold.
- Specify in the element properties: Line - "No line", BackgroundColor - "Auto" (click on the button "Clear" [X]), Pattern - "No fill":

As a result, in the layout we got two, visually identical, inscriptions "Head":

Now the inscription that we created must be moved so that it completely coincides with the "native" inscription "Head":

And the "native" inscription can be removed.
We do the same with the rest of the inscriptions in the "Account Basement" area.
The mechanism for working with underline lines is similar:
- Adding an element of type "Direct" to the layout
- We completely combine it with the desired line in the layout (for example, the line that underlines the name of the position).
- Then we delete this very "native" line.
In the end, we will have a layout area consisting entirely of elements of the "Text" or "Straight" type, no different from the original area:

Now we add three images to the layout: Print and two signatures. So what happens:

"Well, where is the focus?"- you say. But for focus, do the following:
- call the context menu of one of the images (right-click on the image),
- select "Order -> Send to Back".
And so for each of the images. The result will be:

or, if you look at a ready-made version, then:
If the layout is being prepared for use in conjunction with ALANN processing, you must:
- Give all images in the layout normal names for perception (for example, "Seal of the Organization", "Signature of the Head", etc.).
- Clear images from content, i.e. make pictures blank.
Comparison of the result of the methods "Layers" and "Transparency"
This is what the results look like when using these methods. It seems to me that the picture on the right is more aesthetic:
Attached to the publication is a file containing ready-made basements for standard printed forms (Invoice, TORG-12, Act on the provision of services), in which images (seals and signatures) are inserted using the "Layers" method.
In 1C configurations, there is currently a very convenient service for sending invoices for payment to customers directly from the program, for this you do not need to print a document or save it to external files, you just need to click the send button and specify the recipient's email address. And especially important is the fact that the invoice can be generated immediately with a facsimile signature and seal, as well as add your organization's logo to it. In this article I will talk about how to set up such a convenient function in the 1C program: Enterprise Accounting 8.
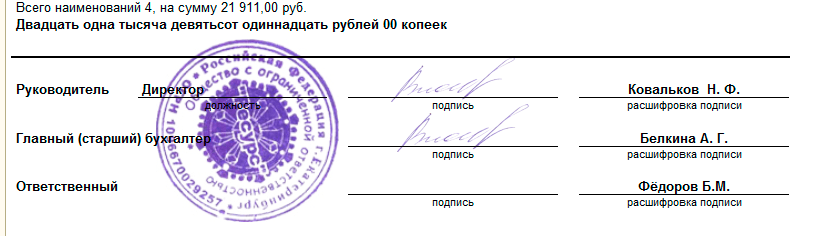
First of all, I want to show you what the finished result of our work should be. In the event that we want to generate an invoice with the signature of the manager and a seal, after completing all the settings, the printed form of the document will look like this:
In order to load information about the signature and seal into the program, go to the "Main" tab and go to the "Organizations" directory

We open desired organization and expand the fields of the "Logo and printing" section. 
First of all, we click on the link "Instruction" How to create a facsimile signature and seal. "The program tells us that it is necessary to print the proposed sheet, substitute signatures and a seal on it and scan it in the form of a picture. After that, open the resulting picture in a graphic editor (I used standard Paint), cut out the desired areas and save as separate files in png format.
Then we load the resulting images into the program using the links "Download print" and "Download signature". 
As you can see, it is also possible to upload the organization's logo to the program, which will also be displayed in the printed form of the invoice. 
Now you can open an account and try to print new form. To do this, go to the "Sales" tab, select the "Invoices to customers" item, find desired document and press the button "Print" - "Invoice for payment (with seal and signatures)". 
If we need to send an invoice by e-mail, then click on the button with the image of an envelope, located to the right of the print button. In this case, the program will also ask what form we want to send. 
Choose the option with a seal and signatures. If necessary, you can open and view the resulting invoice from the send form. If everything is fine, it remains only to specify the recipient and click "Send". 
In the event that you have not previously sent invoices to customers directly from 1C, you must first configure the account settings Email. To do this, go to the "Administration" tab and select the "Organizer" item. 
Then select "Email Accounts". Create a new entry, specify your email address, password and sender name, save the information. Now you can safely use this convenient functionality by sending invoices for payment to customers directly from 1C: Accounting. If you have any questions, you can ask them in the comments to the article.


Popular
- New Year in the work team (corporate)
- GIT check: what is checked and how to prepare
- Maintenance of military records in the organization
- Orthodox photographer - the best in Eurasia!
- We remember and are proud: original ideas for the script for Victory Day
- Is it worth calling the employer after the interview or how to find out the results: how long do they usually report?
- Features of the technique of painting plates, painting ceramic dishes White-blue painting on dishes
- Types of dish painting: Gzhel, Gorodets, Zhostovo, Khokhloma
- Marketer: job responsibilities Job description of an IT company marketer
- Child care center administrator job description