The art of spot painting plates, useful tips for beginners. Types of dish painting: Gzhel, Gorodets, Zhostovo, Khokhloma
Do-it-yourself plate painting is an art that is available for both experienced and novice decorators. After all, the technique is very easy to master, does not require the purchase of expensive materials, waste of time and effort, so you can not be afraid to lose interest in the process. And hand-painting on glass and ceramics can become your permanent hobby, relaxation method, or even a hand-made business on Internet sites like the Crafts Fair or Etsy.
In this material, we will consider the following methods and techniques for painting plates with our own hands, which are suitable for beginners:
- Painting on stencils and patterns;
- Artistic hand-painted plates;
- Stained glass painting.
Master class No. 1: chiseled painting of plates
Dot painting of plates (piqué or point to point) is a technique of drawing and creating contours with dots, thanks to which you can achieve the effect of embossing, inlay with stones, colored rhinestones or beadwork. In the photo below, you can take note of the successful combinations of colors and patterns (scroll the photo to the right).


And here are the ideas for decorating bowls using the pique technique.

For work you will need:
- Cotton pads for degreasing and cotton buds for correcting an unsuccessful pattern;
- Ethyl alcohol, nail polish remover or a special degreaser;
- Contour acrylic paints of the desired colors;
- Aerosol varnish to fix and protect the pattern;
- Needle and paper for cleaning tubes.
Advice:
- If you want to use the plates for their intended purpose, then choose baked acrylics labeled dishwasher ability or dishwasher resistant. Durable contour paints can be found in the Hobby Line brands Kreul, Decola, Marabu and Pebeo Vitrail.
- Paints should not be too thick or too thin. You can check this in the following way: press the tube - if the paint comes out easily, but in a puddle, then the consistency is too liquid, if it is difficult to squeeze out, then it is too thick. Before starting work, you need to test each tube, since different colors of paint of the same type can have different consistency.
- You can draw dots with a small, thin brush, needle, or toothpick using acrylic pottery paints in regular jars if you find tube painting difficult.

Drawing technique
First of all, you need to degrease the surface well with alcohol or a degreaser using a cotton pad, and only then proceed to creativity. Experienced craftsmen can draw immediately on a plate, without using any sketches or markings, inventing patterns right in the process. You, too, can trust the free flight of thoughts and improvise. But if you want to realize a certain artistic idea, then it is better to first draw a sketch, template, stencil or markup, having thought through the color scheme and ornaments.

For painting on glass, it is convenient to use templates that can be glued on the back of the plate.

Tip for beginners: Before painting the plate, practice on paper to put small, medium and large dots at the same distance from each other with the same pressure and pressure on the tube.

- The main rules: there must be points of the same size in one line, and the same distance must be maintained between the points, and it is very important that it (the distance) be minimal, that is, such that the points are “read”, but do not merge into a solid contour ;
- Remember that the larger the points, the greater the distance between them can be. Conversely, the smaller the points, the smaller the distance from each other should be;
- You need to draw according to the principle from the general to the particular, that is, starting with large contours and ending with the drawing of small details.
After work, the paint should dry. You can dry them in three ways:
- In a natural way for 1 day - if you want to use the plate rarely or even use it only as a decor item.
- Dry with a hair dryer, and then leave the paint to harden naturally for 10-12 hours.
- Bake at a temperature of 150-170 degrees for half an hour, and then, without removing it from the oven, let the dishes cool down - in case you want to eat from painted plates. It is advisable not to wash the painted dishes for 20 days after firing - this way the paint will last longer.
After the paint on the decorative plate has dried, you can fix it with varnish.
Master class number 2: painting plates on stencils and patterns
Another way that anyone can master is painting dishes using stencils and patterns.

For work you will need:
- Acrylic paints for glass and ceramics or felt-tip pens for painting dishes, which come in different colors and thicknesses of the rod. In Russia, you can most often find markers from Marabu;
- Artistic synthetic brushes of suitable sizes (if necessary) or sponge for tamping;
- Nail polish remover, alcohol or degreaser and cotton pads for degreasing;
- Everything you need to draw and cut a stencil or template: paper, cutter, pencil.
Drawing technique
First you need to draw yourself or print a ready-made stencil / template, and then cut out the necessary holes with a clerical knife. Perhaps, in this technique, only this stage can be called laborious. Then everything is much simpler: degrease the surface and glue the template to the bottom with adhesive tape.

Then we paint over / stamp the drawing on the stencil. After that, you can place accents on your picture, draw details or contours.


If you painted with acrylics, then you can dry them naturally, with a hair dryer or in the oven, according to the recommendations of the first master class on spot painting plates.
Master class number 3: Art painting by hand with brushes
Painting plates in the traditional way, that is, with brushes and paints, is the best way to paint a real masterpiece.
For work you will need:
- Artistic synthetic brushes of different shapes and sizes;
- Acrylic paints for glass and ceramics or water-based stained glass paints;
- Tip: stained glass paints are more transparent and at the same time brighter, but they are a little more difficult to work with due to their liquid consistency and the ability to spread over the surface, so they are often used in combination with contour paints that hold them back. Also, keep in mind that solvent-based stained glass paints are not suitable for painting plates that will be used for their intended purpose.
- Any degreaser.
Drawing technique
First you need to write an underpainting, that is, draw large parts of the composition, which will be its basis. Next, add volume and depth to the drawing, using dark and light tones. And then start drawing the details. At the end of the work, use the recommendations for fixing the paint from the first master class.

Advice:
- Mix paints and play with halftones to get unusual colors and effects.
- Painting a ceramic plate with matte glaze will be easier than painting on glossy ceramics or glass, as the paint will lay down more densely and evenly.
Here are simple but interesting ideas for painting plates with brushes and acrylics for beginners (scroll to the right).


For those who have the skill and experience of drawing, we offer you to be inspired by the following selection of photos of painted plates.


And here is a great idea for painting saucers and plates from old tea sets.

Master class number 4: painting with markers on ceramics and glass
Drawing with markers and felt-tip pens is familiar to all of us from childhood. With the help of special felt-tip pens for painting dishes with your own hands, you can quickly and easily decorate a ceramic plate with inscriptions, as well as depict a graphic and very detailed picture. We look at examples of such decor in the next selection of photos.


For work you will need:
- Any degreaser and cotton pads;
- Felt pens of different colors and thickness of the rod.
painting technique
- Before you start painting on the dishes, do not forget to degrease the surface.
- The main rule - try to draw lines and outlines of the picture with small, frequent strokes - so you are less likely to make a mistake.
- Also try to draw from the general to the specific.

- Pre-outline the contours of the picture, if necessary, use a template or stencil.
- Most markers dry in 24 hours, do not require firing, and are dishwasher safe.

Video lesson: stained glass painting

And finally, it was the turn of the stained-glass painting of the plates. This is a slightly more complicated technique for painting on dishes due to the paint itself - as already noted, stained glass paints are liquid, and therefore they are often filled with contours. And they are more transparent, glossy and less resistant than acrylic. If you want to use "stained glass" plates, then choose only water-based paints, and at the end of the work, bake the dishes in the oven at a temperature of 170 degrees. If you want to hang a painted dish on the wall, then you can choose paints that are not baked on a solvent basis and, in this case, do not forget to purchase a varnish to fix the picture.
It would seem that artistic painting no longer has a place in the pragmatic 21st century, and now you can admire it only in museums. However, so far in Russia you can find flourishing workshops that have preserved the ancient traditions of a variety of artistic painting and continue to amaze modern inhabitants with their skill.
Zhostovo


origins Zhostovo painting date back to the beginning of the 19th century. At that time, in several neighboring villages of the former Troitsk volost (now the Mytishchi district of the Moscow region), handicraft workshops arose that were engaged in the manufacture of painted decorative products from papier-mâché coated with varnish. Artists painted boxes, cigarette cases, sugar bowls and metal trays. Gradually, the number of trays produced increased, thereby displacing other products.
The main motives of the painting are flower bouquets. At the beginning of the 20th century, with the advent of Soviet power, the villages were united into the Metallopodnos artel, and the craftsmen had a hard time when new plots for drawing were imposed on them, dictated by the then realism trends. However, the artists managed to preserve their originality, and the Zhostovo trays passed from the category of household items into decorative panels, which are valued not only in Russia, but also abroad.
Khokhloma


Khokhloma originated in the 17th century in the vicinity of Nizhny Novgorod. The name of the craft came from the village of Khokhloma, where finished products were brought from nearby villages. The founders of this painting on wood are called the Old Believers, who fled from the new church order. It was they who owned the secrets of the "golden" painting on dishes.
By the way, the basis of the painting is not golden, but silvery tin powder. A special composition is applied on top of it, then it is subjected to heat treatment, and only then they begin to paint. The main motifs of Khokhloma are bunches of mountain ash, berries, leaves and flowers.
gzhel


gzhel called the hallmark of Russia in the field of applied crafts. It is believed that Gzhel dates back to the 14th century. Some argue that the name comes from the river Gzhelka (Gzholka), on which there was a village where the masters lived. Others believe that "Gzhel" is a paraphrase of the word "zhgel", i.e. firing of ceramics. 60 km from Moscow there is a "Gzhel bush", which consists of 27 villages, where they are engaged in firing and painting of ceramic products. They were painted with cobalt blue in two ways: overglaze and underglaze. First, the drawing was applied to wet clay, and then again to the glaze. The craft of Gzhel dishes flourished, because the rich used silverware, and ordinary people used coarse pottery of various sizes. Over time, Gzhel became accessible to all segments of the population, but it did not lose its beauty and demand.
Fedoskino


The village of Fedoskino (Moscow region) is famous for painting with varnishes. In the 18th century, the Lukutinskaya factory for the production of lacquer visors for hats was located near the village. Then she changed direction, and 80 civilian workers took up painting papier-mâché and wood lacquer products. The amazing glow and brilliance of caskets and other miniatures was achieved by “writing through”. This was the name of the technique when, before drawing itself, a thin layer of gold leaf, mother-of-pearl was applied to the surface. The most popular subjects for drawing are connected with the life of the common people.
Mezen painting


Like many other folk crafts, Mezen painting got its name from the area in which it developed - in this case, from the name of the Mezen River, located in the Arkhangelsk region. The technique in which the masters work goes back to the ancient Slavic tribes. The main ornaments are rhombuses, crosses, solar discs, repeated in a certain sequence.
In the Mezen painting on wood, only two colors dominate - black (soot) and reddish (ocher). Basically, ornaments are applied to household items: boxes, spinning wheels, ladles. After painting the utensils, drying oil is applied to it, which protects the drawing from erasure and gives it additional shine.
Many modern artists continue to engage in ancient crafts, while introducing something of their own. So the artist from Izhevsk
Plate painting is one of the oldest occupations that has survived to this day. Previously, shelves in sideboards and walls were decorated with such items. They were passed down from generation to generation. Also relevant today. They will be an excellent decor item for a kitchen or dining room, and you can involve your children in the process of creating a masterpiece.
Technology features
Painting a plate is not such a simple matter. To obtain a real masterpiece, professionals take special courses, where all the subtleties of this skill are revealed. But absolutely everyone can know it. It is only necessary to take into account some of the nuances regarding such a process as painting plates.
The technique of drawing is the correct selection of tools and materials. The most important item here are decorative plates. Painting can decorate ceramics, porcelain, glass, wood. The main thing is that they should not have a factory pattern.
You can create a pattern using the following tools:
- water, acrylic. The latter are the most popular, as they are the most common, and even a child can work with them.
- Felt-tip pens (special indelible).
Brushes are most often used thin. But it all depends on the drawing. Sometimes you need several types of brushes - from the thinnest to the lushest.
In case your drawing doesn't work out, you should have paint remover on hand.
Types of painting

Plate painting is a whole art! There are many types of techniques:
- Tiffany - allows you to achieve the effect of a three-dimensional pattern.
- Khokhloma is a fairly well-known painting. Patterns are made in black-red-gold colors.
- Dot - drawing is created using dots.
- Gzhel - simple lines, drops, nets, flowers. Everything is done in blue tones on a white background.
- Labels are just words, phrases, lines, and so on.
- Geometric patterns - drawings consisting of various lines and shapes.
- Whole composition (landscape, still life).
Of course, that's not all. There are also other types of painting, most of which came from ancient times. But we have listed the most popular ones.
Operating procedure

Regardless of the degree of complexity of the drawing, there is a generally accepted sequence of actions:
- The painted plate is degreased with alcohol or window cleaner.
- A primer is applied so that the paint adheres better to the surface.
- A sketch of the drawing is prepared on plain paper.
- The pattern is transferred to the surface of the plate. How this happens depends on the technique of application and the style of the image.
- Attention is paid to the elaboration of details (for example, the contour is being drawn).
- The plate is dried for 24 hours in the open air or in the oven from 40 to 60 minutes.
simple geometric pattern
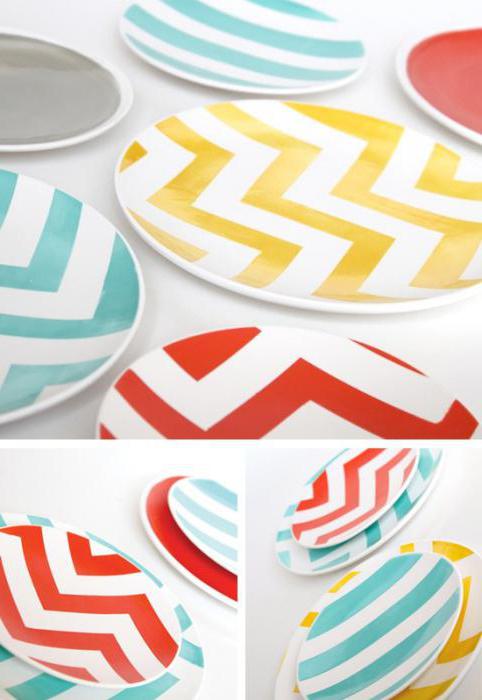
Perhaps the easiest and fastest way to paint a plate is to use paint and masking tape. Thanks to simple manipulations, you can get a bright decor.
So, prepare the plate for painting (clean it and degrease it). Then take masking tape and stick the strips on the surface. Where we have adhesive tape, the plate will not be painted, keep this in mind. Drawing can be varied. Usually zigzags are created in this way.
Now paint over the entire plate with bright paint. For this work, you will need to take a magnificent brush, as it will quickly cope with the task. Let the paint dry a bit and then remove the tape. Now you can dry the plate.
Finger painting with kids

It's a great idea to paint the plate with the kids. To do this, you do not need to look for and come up with special pictures. You can simply immortalize your child's fingerprints.
First, prepare the surface of the plate. Then take brown paint and draw the trunk and branches of the tree. Then take a regular sponge and smear its surface with some kind of paint. Now gently touch the washcloth with your fingertips, and then leave an imprint on the plates. Fingerprints will serve as leaflets.
By the way, in this way you can collect the fingerprints of friends and relatives at the wedding as a keepsake.
Silhouette and ornament

Simply and tastefully decorate the dishes will help painting the plate. You can do this in the following way:
- Prepare your plate for work.
- Take a thin brush and draw the silhouette of an animal at the bottom (for example, a hare, a bear, a dog, and so on). Do not make the outline clear, for this, dilute the paint a little with water on the palette.
- Then take the thinnest brush and draw a pair of arcs from the silhouette. Draw leaves and flowers on them using lines or dots. For plants, choose contrasting colors.
- Dry your work.
In such a simple way, you can create a whole series: on one plate there will be an image of a hare, on the other - a fox, on the third - a wolf, and so on. The whole essence of the work lies in the simplicity of lines and play on contrasts. With the help of small bright details, a playful mood is created, and the overall palette does not strain the eyesight.
Careless forethought

Such work looks like it took five minutes at most, and it is the result of someone's negligence. In fact, the presented painting of plates with paints is also the fruit of the effort and imagination. To work, you will need liquid paints, a brush, an old toothbrush and rubber gloves.
Dip the brush into the paint container and bring it to the plate. Start placing chaotic drops on the prepared surface. No need to build a clear sequence - first smooth and small, then large with wavy edges. Let all the drops be uneven and different in size. Put them in different places. It is worth mentioning here that the paint should drip from the brush on its own, so pick it up without sparing.
Then dip your finger into the paint. Walk them along the edges of the plate, making a border. An old toothbrush will help finish the pattern. Dip it lightly in the paint, and then run your finger along the bristles, pointing your "tool" at the plate. Dry the pattern.
Bitmap without pattern

Dot drawings are quite a fun activity. And at the same time - a long and painstaking work. But the result is always worth the effort.
Plates with acrylic paints can be made using a template and without it. Let's look at the second option first. It is used for simple patterns, while the former is used for more complex and intricate ones.
A bitmap assumes that the picture will be drawn not with lines, but with dots that are located next to each other. You can make such a painting both with paints and a brush with a pointed end, and with markers.
First, as always, you need to prepare the surface of the plate. Then the future drawing is thought out. You can take any picture as a basis, but it’s easier to do it in this technique. Then the paint is applied to a palette or a piece of paper. The material is taken on the brush very carefully. Excess paint must be removed.
Then the magic begins. With a brush, gently touch the surface of the plate. If this is not done, smears will be obtained. A drawing is made up of dots. You need to work slowly, trying to make the drops the same size. Thus, the entire pattern is applied. By the way, you need to work from top to bottom so as not to accidentally smear the drawing.
Depending on the idea, the dots can be of different colors and diameters. But the picture must be clear. Therefore, lines related to one element (for example, the core of a flower) are made in the same shade and with dots of the same diameter.
Bitmap by pattern

From the first time it may seem that making a painting according to a template is very simple. Actually it is not. First you need to prepare this very template. To do this, you can use ready-made pictures or make an illustration yourself. Since the bitmap does not involve painting over, the template on paper is made only in outline (for example, a flower will be depicted only with the help of petals). By the way, in the case of a paper layout, you can only decorate a transparent plate.
So, prepare the surface for work. Then cut out the template along the extreme contour. Now glue the paper to the back of the plate with or tape. Get your paints and brushes ready. Now you can start drawing. Place dots at the top of the outline. Start working, as in the previous case, from above, so that the drawing is not smeared.
When the work is ready, let the plate dry a little. Then carefully remove the template. If desired, the reverse side can be painted over, thereby giving a background to your pattern.
Some more ideas

Do-it-yourself painting of plates is a fascinating activity. In the process of creating one craft, an idea often arises for the next.
Here is just a small part of the possible design of plates:
- With the help of thin wavy lines, you can make not just patterns, but whole drawings. Just draw the inner part of the silhouette not with solid strokes, but with curlicues.
- From the plates you can collect words. Each saucer is one letter. It must be placed in the center. The space around the letter can be decorated with small patterns (for example, floral).
- Original painting - muzzle. It is enough just to draw the eyes, nose, mouth and cheeks. The rest can be covered with some kind of solid pattern.
- Plant motifs are always relevant. Flowers and plants can be drawn in a variety of ways: filling the entire space of the plate or just the outline, strokes, dots, solid color, strokes, and so on.
- You can also make a special painting for each holiday. So, for example, for the New Year, plates with snowmen, Christmas trees and Santa Claus will be appropriate, for Halloween - pumpkins, for Easter - painted eggs, Easter cakes, by March 8 - a branch of mimosa.
A hand-painted mug or plate can be a great gift even for a very demanding recipient. The image needs to be made individual, better - with a commemorative inscription.
Materials for painting at home
Paints can be baked or non-baked. The painting technique depends on what material to choose for painting. Therefore, the list of materials is, in fact, a list of the most common techniques.
It should also be noted that professional ceramic artists, as well as mass production, use more complex dyes. These paints are a type of glaze or enamel. They are bred in water or oil. After that, oil and moisture are evaporated and baked in muffle furnaces at a high temperature (over 400 degrees). Such a painting should cool down together with the oven. That is, sometimes the baking process takes about a day (the higher the baking temperature, the longer the oven and the object cool down). Paints for home use do not require such extreme temperatures, beginners can use them, and these paints usually already have the right consistency.

Painting with a ceramic marker
- Felt pens, pens, markers. Pottery pens or felt-tip pens are sold in needlework stores or artist salons. They come in different sizes and different colors. Depending on the size, they can give a thin line or a thick one.
- Pigments without baking.
- Acrylic.As a rule, acrylic paints are used. They are inexpensive and sold everywhere. As soon as the acrylic paint dries, it is fixed on top with a matte or glossy sealant. Acrylic paints come in a spray, and such paints give interesting effects (ombre, silhouettes).
- Solvent based paints. These are durable paints like oil paintings. They are difficult to remove from brushes. But they don't require baking. They dry completely within 24 hours.
- baked pigments. Professional pigments - in the form of a powder, which artists dilute with oil or water on their own. For home use, already diluted paints are sold, these are ordinary-looking paints like gouache. They should be applied to porcelain. Then air dry, and then bake in the oven for about 30 minutes at a temperature of 350 degrees.
- Enamel. After drying, such paints form a hard and glossy surface. The paints are durable but contain lead, so they should not be used on items that will contain food or drink.

Plate painting options
- Water based paints. The advantage of water-based paint is that you can easily adjust its transparency. By diluting with water, you can achieve a light transparent layer, as well as achieve a watercolor effect (overlapping several transparent shades). Water-based paints are baked in an oven with a gradual increase in temperature and gradual cooling. Before baking, the paint must dry completely so that there are no bubbles. Such paint dries within 3 hours in the air.
- glaze, chandelier. These are also professional paints. But there are also amateur glazes and chandeliers. Glaze is a paint hardening at high temperatures, which acquires gloss and a durable surface. A chandelier - transparent or translucent paint with a shiny or pearly effect. It also needs baking.
- Pure ceramic utensils for painting. Artists call this "linen". In shops for artists and for needlework, you can buy clean white services for painting, as well as ceramic figurines of animals and people. As a rule, such “linen” is matte objects without glaze, which require additional processing. You can't eat or drink from them.
- Sets for painting on dishes at home. These are sets for beginners or for children. They already have a ready-made object for painting (a cup or a ceramic figurine), various sketches, a brush, paints and instructions for use. The convenience of the kits is that you can start painting immediately, without unnecessary preparations. The disadvantage is the high cost, it is more profitable to buy paints separately from dishes.
- Paints on glass. They can also be used on porcelain. But some of them leave high relief, you should be aware of this.
- stencils. Sets of stencils for painting on dishes are sold in needlework stores. This is a handy drawing technique. They have an adhesive surface (like stickers), they are convenient to use. But you can make stencils yourself (from thick paper, thick cellophane or thin plastic).
Ideas for painting

The simplest geometric pattern
- inscriptions. The easiest design is to simply write some kind of inscription on a plate or cup. If a family celebration is planned, you can write on the plates the names of the audience and even a short message to them (“Happy New Year!”, “Happy Holidays!”). The inscriptions can be fantasy and calligraphic, or they can look like lines of a letter.
- The simplest one-color drawing. Peas, stripes, strokes, lines. These are patterns of simple geometric shapes. Done with a brush and paint.
- Vanguard. Colored blots and random strokes can also make an interesting composition for painting on dishes.

Interior decorated with painted plates
- Decorative painting for interior decoration. Decorating walls with beautiful plates is a tradition of many nations. You can make a whole panel on the wall from the plates. If you do not plan to eat from these plates, then you can paint with ordinary acrylic paints with gloss.
- ombre. Gradient staining is achieved if the paint is applied with a sponge. Another professional technique is to apply stripes of liquid paint, and until they are dry with a regular needle, disperse the color border.
- Children's drawings. Children are very fond of painting on dishes, as a practical object remains after creativity. Any children's drawing can become a plot for painting a plate or cup.
There are plenty of ideas for painting. These are paintings and museum exhibits. There are entire collections on the social networks Instagrame or Pinterest, new ideas are published by specialized magazines and websites.
Painting dishes and celebrities

Admirers of painting on dishes: Paris Hilton, David Beckham, Jessica Alba, Sharon Stone
Hollywood celebrities have become a kind of promoter of ceramics. The paparazzi often capture them in ceramics classes with their offspring. The most famous fans of painting on ceramics are Paris Hilton, Mischa Barton, Denise Richards, Nicole Ricci. This made joint classes in painting ceramics together with children fashionable and popular all over the world.

Kate Middleton and Princes William at the Children's Art Center
Photos of Kate Middleton and Prince William became popular when they visited the children's art center and painted dishes with children. The network has a photo of actor Ben Affleck with his daughter Violetta during class, actress Jennifer Garnier, actress Sharon Stone, Christina Aguilera with her son Max, Jessica Alba with her daughter, David Beckham with his sons.
Technique for painting dishes at home with a marker (pen)
- Before you start painting, you should degrease the surface of the cup or plate, this is easy to do with alcohol. During painting, you should hold the object so as not to grab it with your fingers (even clean hands have sebum).
- If a mistake is made, everything can be corrected. The pen or felt-tip pen can be easily wiped off with a napkin and water.

Scratching method
- Painting can be done in several layers. Each of the layers is baked. However, you should be careful, because a large number of baking leads to fading of the first layers. Therefore, you should aim for a maximum of 2-3 layers.
- The professional approach to painting is to use the background, that is, the surface of the dish itself, and not paint over the entire product. It doesn't matter what color the background is, but it should work.
- There is such a technique - "scratching". First, a plate or cup is painted over with a fantasy background, then the paints are dried (but not baked). Then you need to take a toothpick or a needle (needle) and scratch the coloring layer. You will get an interesting effect of white graphics.
- If you plan to multi-color painting in several layers, you should start with the lightest shade.
Hand painting on glass and ceramics is a popular and easy-to-learn type of creativity, accessible even to a novice decorator. This direction of needlework has many subspecies and techniques, a special place among which is occupied by dot painting of plates - an art that can bring a "zest" to any kitchen interior. The principle of designing a pattern is quite simple - to create a bright, and most importantly, a unique masterpiece by applying many dots to the surface of the dishes.
Art painting of dishes with dots is a whole art of compositional decoration with paints of a specially organized space. The pictorial surface differs in structure and forms. A special technique for creating a point-to-point pattern is to apply drops of paint along the contour of the plate. Thanks to the scattering of dots, an ornament is obtained that looks like an image of a mosaic of beads or rhinestones.
To get started, you will need: a plate, paints, a pointed stick or a non-functioning felt-tip pen, degreasing liquid (for example, acetone), stencils, a well-lit workplace.
The main stages of painting on plates are as follows:
- Treat the work surface with an alcohol-containing substance, dry.
- Apply a drawing. On a glass plate, a sketch can be fixed on the reverse side, applied arbitrarily or using stencils on an opaque surface.
- Dot the sketch ornament with dots, frame it with a frame.
- Fix errors with cotton pads pre-moistened with alcohol.
Original painted plates can take a place not only in the kitchen, but also in a specially designated place as an exclusive handmade item. They can also serve as an original gift. The main thing is to approach the process of painting with all responsibility and inspiration.
Degrease the plate

Choose a picture
Transferring the drawing with paint or marker

Painting is better to start from the middle

We choose the right colors and continue to work

Material selection
Before you start applying a dotted ornament to a plate, you need to analyze all the nuances of the work ahead and carefully select the materials. Do-it-yourself artistic painting of dishes requires a special approach. The choice of paint for painting and the need for additional surface treatment directly depend on the material for making the plate.
Plates
In most cases, glass or ceramic surfaces are chosen for painting plates with their own hands. This is due to the fact that such dishes can be used as the main background without additional manipulations. Plain or transparent surfaces are great for ornamenting. They require minimal effort - washing and degreasing. Also, if necessary, you can easily change the background on the dishes. For this you will need:
- Apply a thin layer of primer (special primer).
- Wait until it dries, then use acrylic paint of the tone you like (it is advisable to paint in two stages with intermediate drying).
- To consolidate the result, it is recommended to varnish the finished product twice.
Artistic dot painting on plates with a clay base is performed in several stages. First of all, you need to prepare the surface so that the pattern holds for a long time. Then they select a special contour paint, produced in tubes with an elongated nose.
The technique of working with wood products depends on their background. If the color of the raw, untreated wood is completely satisfied, you can paint the plates directly on the natural surface. If you want to adjust the shade of the base, it is recommended to use wood stain. It will not only give the surface the necessary tone, but also emphasize its natural relief and texture. If the plate is planned to be used in everyday life, and not as a decor item, it is better to fix the ornament with a special furniture varnish at the end of the work.

ceramic plate

Clay

glass

wooden plate
Artistic dot painting of plates involves the use of various types of paints in the process of work. It is preferable to opt for moisture-resistant and light-sensitive varieties, which will significantly increase the service life of the product.
It is recommended to paint metal plates with enamel paints, and contour analogs are suitable for ceramic utensils and earthenware. Options with an oil composition, gouache, watercolor are optimal for painting glass, ceramics. You should choose, focusing on the consistency of the coloring matter - in terms of its density, the paint should resemble low-fat sour cream.
The basis of the composition of the coloring matter can be:
- water - it is washed off at any time;
- organic - removal occurs only with a solvent.
Painting saucers that will come into contact with food is carried out with special baked paints. Drawings are fired in an oven at t 800 degrees. At home, craftswomen use acrylic compositions that harden without firing for two weeks.
By type of paint are divided into:
- overglaze, applied before firing on glazed dishes;
- underglaze, used after firing to achieve an additional effect - gloss and gloss.
It is worth giving preference to a small number of colors, 1-4 shades are enough for work.


For applying and fixing
For painting, you will need additional materials: cotton pads and sticks, napkins, a pin, adhesive tape, paper and scissors. With the help of discs and a degreasing liquid, the top layer of the plate is processed and cleaned. Further, after the creation of the ornament and its complete drying, it is recommended to apply a water-soluble, odorless acrylic varnish twice to fix the painting. The layers must be very thin so that ugly streaks and sagging between the points do not form. Approximately 2 hours should elapse after each application of varnish. For painting with dots, it is better to give preference to original patterns or floral arrangements.
As a result of squeezing out the dots on the nose of the tube, excess paint may form, which can spoil the ornament with an unnecessary blot. Surplus should be removed in time with a napkin.
Before you start drawing with a new color, it is advisable to put a few dots on a draft sheet of paper. Using a pin, you can clean the clogged nozzle of the tube - this is especially true for paints containing sparkles.
It is important to prepare a stencil (template) for applying the pattern. You can draw it yourself on paper, then cut it out and attach it to the surface with tape. Drawings can be borrowed from the Internet or magazines. Ready-made stencils are sold in the store. The more lines in the ornament, the better, since the entire pattern is covered with dots.

Necessary materials

Choose the right stencils

To fix it is worth using acrylic varnish
Drawing process
Simplicity is the main advantage of spot painting plates. If you follow the basic rules, you can get high-quality painting of saucers and any other dishes. To get more information and practice, you can visit a special master class.
The sequence of actions for painting should be as follows:
- Surface preparation - It is important that dust and other contaminants are removed from the product intended for applying the bitmap. Also, the surface must be degreased with an alcohol-containing solution.
- Creating a background - using paints (acrylic, stained glass, gouache, and so on) you can give the surface the desired shade.
- Blanks - work out a pre-designed sketch or prepare special stencils (ready-made schemes) for drawing a picture.
- Markup - draw the outline of the ornament.
- Creating a painting in compliance with the rules of precedence. First, large dots are drawn, then, after drying the large elements, they begin to apply them to the smaller components of the picture.
- To complete the pattern, draw the smallest details that are close to each other.
- If baked paints were used in the process, the plate must be placed in the oven at 150-170 degrees and kept there for the amount of time prescribed in the instructions.
- After the paints have dried, the product is covered with acrylic varnish.
Another way of painting is to first apply dots in the central part of the plate, and then gradually move towards its edges.
At any time, you can correct the result: a dry point can be easily removed with a cotton swab, a dried one - with a sharp object.

Preparing the plate

Select the desired sketch

Markup should be done starting from the middle

Draw straight lines

Then we apply the rest of the shapes from the sketch

You need to start from the middle of the plate

We continue to work from the center to the edges (in circles)
You can make beautiful strokes with a toothpick

The subject of the drawings
It is very important to ideally develop an ornament for painting with dots. Using different styles will give an ordinary saucer a certain theme. Oriental-style ornaments are very popular: dragons, mythical beasts, birds, Turkish cucumber, world tree. They will create a special atmosphere in the interior of the house.
The motive of the picture in its content may be different. Geometric ornaments are well suited for painting plates. The dots can be located at different intervals, differ in size, color combination. Symmetry and proportionality are the main criteria for drawing a picture. A variety of abstract forms, fragments of architecture, weapons, floral arrangements, elements that imitate animals also look stylish.
In a flower arrangement, even a simple drawing from a single plant pleases the eye with its natural beauty. More complex ornaments contain more artistic elements. The right combination of colors is the key to successful work. Harmoniously combine yellow and orange, red and orange, blue and purple, gold and brown, white and pink, blue and green.
Oriental images differ in different countries. So, in India, flower garlands, animals, birds are common, and in China - dragons, peaches, peonies, butterflies.


The point-to-point technique refers to a type of creativity that requires accuracy in the execution of work. The final result and the presentability of the finished product will depend on this. All types of painting dishes must be carried out in compliance with certain rules. Expert advice:
- For the correct drawing of a point on a sketch, the contour should be placed vertically, you should not take it to the side. Upon completion, in the same position, it should be taken away from the surface to be decorated.
- If you want to change the background, it is recommended to use acrylic primer, which will give the effect of a cloudy white tint.
- During work, you should not switch to another shade until all actions with one color are completed.
- It is better to varnish the surface of the painting, this will make the product brighter and more interesting.
- Symmetry should be observed: for this, a series of actions are sequentially performed, moving from a simple element to a more complex ornament.
- Be sure to gradually dry the finished parts of the work. This will avoid spreading of paint (especially when painting on clay, ceramics), and will also extend the life of the finished product.
The drawing process is not as complicated as it might seem at first glance. If you are interested in point technique, you should be patient - accuracy, a sequence of logical actions and creative inspiration will help you create a real masterpiece.

Acrylic primer is perfect for creating a plate background

Switching from one color to another in the process of work is not worth it.

Start with simple elements
Video
Photo


-
 Transportation of a sliding wardrobe on your own or with the help of specialists
-
 On the approach to assessing a company's risk appetite based on a formalized assessment of its financial condition Determination and monitoring of risk appetite
-
 Building risk management systems Evaluation of the effectiveness of risk management is carried out on the basis of
-
 Golden rules for describing business processes
Popular
- Determining the amount of accumulated wear Accumulated wear determined by the multiplicative method
- Responsibilities of the financial director
- International Financial Reporting Standards year
- Job description of financial director
- Legal aspects and issues of demand for project financing Features of project financing of commercial banks
- Organization of budgeting at the enterprise
- Well drilling rates
- Variable frequency asynchronous electric drive - a course of lectures Automated electric drive a course of lectures
- Variable frequency asynchronous electric drive - course of lectures
- Operating instructions for the stand for