How to photograph the night sky with a DSLR. How to photograph the night starry sky
The second part of the article by Anton Yankovy "All about night photography and photography of the starry sky".
Within the framework of night photography, there are 2 main approaches to photographing stars:
1) Shooting static stars when in the final picture we see the stars the same as our eye perceives them (in the form of many dots in the sky);
2) Shooting tracks- photography using very slow shutter speeds, in which the photograph captures the trajectory of the movement of stars across the sky around the South / North Pole of the World
So let's take a closer look at each of these types of photography ...
Shooting static stars
In astrophotography for imaging static stars, star clusters, galaxies, nebulae, etc. use such a device as a parallax mount with the possibility of guiding.
A parallax mount is such a mount, one of the axes of which can be installed parallel to the axis of the world, which is directed to the north pole.
Guiding is the process of controlling and correcting the camera/telescope tracking of the movement of celestial objects (as a rule, as a result of the daily rotation of the sky) during the exposure.
This, of course, is all very interesting, but for some reason it seems to me that most ordinary photographers do not have such specials. fixtures. Therefore, in this article we will consider photography only using a simple tripod, and those who are interested in astrophotography can easily find a lot of information on this topic on the Internet.

Nepal, Sagarmatha National Park (Everest), Kongde Ri (6187 m), ~3900 m | 30 sec, f/4, ISO 400, 24mm FR, full moon (Canon EOS 5D + Canon EF 24-105mm f/4 L IS USM)
So, what do we need to know in order to take a picture with a static (without tracks) starry sky?
The most important thing to remember is the simple "600" rule, which is this: if you divide 600 by the focal length of your lens (35mm equivalent), you get the fastest shutter speed at which the stars look like dots (not dashes). ) in the sky.
So for 15 mm the maximum shutter speed for shooting static stars will be 600/15=40 sec, and for 50 mm 600/50=12 sec.

Based on this rule, we set the resulting shutter speed in the camera and, if possible, set the maximum open aperture, which would give an acceptable picture quality.
Now it remains for us to choose only the ISO value at which we will get a balanced-exposed image.
Note. Mirror blocking can significantly improve sharpness for exposures comparable in duration to mirror positioning time (~1/30 to 2 seconds). On the other hand, mirror shake is negligible for shutter speeds that are much longer; as a result, in most cases, KB is not critical for night photography.
Shooting tracks
Shooting the rotation of the starry sky requires the longest exposures - from 10 minutes to several hours, depending on the focal length and how long the trajectories you want to get in the picture.
The exact value of exposure is difficult to somehow calculate, it can only be determined based on your personal experience and preferences in the length of the tracks.
For example, I know that at 50 mm for beautiful tracks (according to my taste) an exposure of 20-40 minutes is needed, for 24 mm somewhere around 90-120 minutes, etc.
Nepal, Annapurna National Park, dizzying Himalayas, 2010 | 1 h 43 min (199 fps x 30 sec), f/1.8, 24mm (Canon EOS 5D Mark II + Canon EF 24mm f/1.4 II L USM)
There are 2 main approaches when shooting such scenes:
1)
Shooting "one frame";
2)
Shooting a continuous series of images with their subsequent stitching in specialized software.
Until recently, almost all photographers who wanted to capture the circular rotation of the stars in the picture used the first “single frame” method.
So, the disadvantages of shooting "one frame":
- The difficulty of calculating the correct exposure pair at which the picture would be balanced worked out both in the shadows and in the highlights.
It is sad to find an overexposed or underexposed image even after a half-hour exposure, not to mention several hours of exposure; - When using even the most modern digital technology at ultra-long exposures, strong, sometimes simply unbearable digital noise appears in the pictures (even at relatively low ISO values);
- High risk of movement with such long exposures;
- If we didn’t notice in time how our front lens fogged up, “write goodbye”.
 Nepal, Annapurna National Park, Annapurna South (7219 m), 2010 | 3461 sec (single frame), f/4, ISO 100, 100mm AF (Canon EOS 5D Mark II + Canon EF 70-200mm f/2.8 L USM)
 The advantages of taking a series of shots with relatively fast shutter speeds and then combining them into one frame:
- Ease of calculating exposure pairs for shots with a short shutter speed (usually no more than 30-60 seconds), of which our series will consist;
- The possibility of overexposure / underexposure is excluded;
- Relatively imperceptible digital noise in the pictures, which after stitching all the frames becomes even more uniform, if not completely indistinguishable;
- When selecting frames for final stitching, you can simply exclude frames with movement, or stitch together only the number of shots that was before / after the camera shift. Thus, we are completely insured against this problem;
- Ability to control the length of star tracks. If we don't like the excessive length of the trajectories of the stars in the final image, we can simply exclude some of the images from the series, thereby changing the length of the tracks;
- As a result, we get not only one final frame with star tracks, but also a large number of shots with a static starry sky, some of which can be very successful;
- If during the shooting of the series we did not notice how the front lens fogged up, then we can use only successful frames when stitching, excluding defective ones;
- Possibility of using a series of obtained photographs for editing videos with the rapid movement of stars across the sky
Note. When shooting a series of night shots, do not forget to uncheck the "Long Exposure Noise Reduction" in the camera settings, otherwise the shutter speed you set will be doubled (the second half of the shutter speed will be noise reduction, subtracting the noise map from the picture you took).
As we can see from this comparison, the advantages of the second approach are much greater. It remains only to make out a few nuances of shooting such series.
To begin with, it is worth noting that it is desirable to shoot all series in RAW format with duplication in JPG of low quality (in order to later make it easier and faster to experiment with stitching different numbers of frames without their preliminary scrupulous conversion).
If we talk about the duration of exposures, then I personally advise using shutter speeds calculated according to the “600” rule for shooting a series of night shots.
Next, we set all other exposure parameters (ISO and aperture), connect the programmable cable release to the camera, which was already described earlier, set the minimum interval between shots (1 sec) and the number of shots in the series (if set to 0, then shooting will continue indefinitely, until the battery in the camera or in the cable itself is exhausted).
That's all! We press the start button and get comfortable for the next "n" hours.
Finding the poles
If you need to get pronounced circles of rotation in the picture, then the lens should be directed to the North Star (in the northern hemisphere) or Sigma Octant (in the southern hemisphere).
For shooting landscapes with a starry sky, it is good to have basic knowledge of astronomy, in particular, to be able to determine the direction of rotation of the Earth relative to the starry sky.
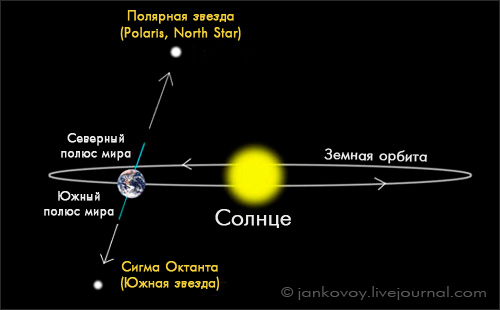
North Pole of the World
Since the majority of the Russian-speaking population lives and travels mainly in the northern hemisphere, let's look at it first.
Due to the rotation of the Earth around its axis, it seems to us that it is the starry sky that is rotating.
In the northern hemisphere, this rotation occurs counterclockwise around a point called the north celestial pole. And next to this point is the North Star.

Everyone knows that the Earth rotates around its axis with a rotation period of ~24 hours. The Earth rotates about 0.25 degrees per minute.
Therefore, in one hour, a 15-degree arc for each star comes out. The arc is longer if the star is at a greater distance from the polar one.
The North Star is a supergiant, but finding it is not always easy, since its distance from Earth is 472 light years.
Therefore, in order to find the North Star, you must first find a characteristic configuration of seven bright stars of the constellation Ursa Major, resembling a ladle (asterism Big Dipper), then through two stars of the "wall" of the ladle, opposite the "handle", mentally draw a line on which to lay five times the distance between these extreme stars.
Approximately at the end of this line is the North Star, which is also the brightest star in the constellation Ursa Minor, which also looks like a kind of bucket, not so pronounced and noticeable in the sky.

The North Star is always located above the northern point of the horizon in the Northern Hemisphere, which makes it possible to use it for orientation on the ground, and by height above the horizon we can determine at what geographical latitude we are.

Do you want to compare the Polar with the Sun? So Polar:
- Heavier than the Sun 6 times;
- More than the Sun 120 times;
- Radiates heat and light 10,000 times more than the Sun;
- The color is yellow - the same as that of the sun
But a ray of light from the Sun reaches the Earth in just 8 minutes, and from the Polar - in 472 years, which means that at the present time we see the star as it was in the time of Columbus.
South Pole of the World
In the southern hemisphere, the only star that points to the south celestial pole is Sigma Octanta.
But it is also barely distinguishable and does not stand out among the other stars at all - it is absolutely impossible to use it for navigational purposes, as the North Star is used in the constellation Ursa Minor.
You can find the position of a star only with the help of a pointer - the constellation Southern Cross, whose long crossbar points to the South Pole of the World (a line drawn through the stars? and? The Southern Cross approximately passes through the South Pole of the World at a distance of 4.5 times farther than the distance between stars).

The Southern Cross (lat. Crux) is the most famous constellation in the southern hemisphere and at the same time the smallest constellation in the sky in terms of area. It borders the constellations Centaurus and Mukha. Four bright stars form an easily recognizable asterism. The constellation is easy to find in the sky, as it is located near the Coal Sack Nebula, which is visible to the naked eye as a dark spot against the background of the Milky Way.

Useful programs
 Screenshot of "Startrails Version 1.1." In action
 If you know of any other programs that could be useful for a night photographer, send their names in the comments with an accompanying description and I will add information about them to this article.
Work examples
For inspiration, in addition to my work, I will give as an example another 10 best photos of stars that I managed to find on the Internet. Links to good star photos and your first experiences after reading this article are also welcome.
Experiment and you will succeed! 😉
 © Samuel Bitton | 32 min, f/5.6, ISO 800, 20mm AF (Canon 1Ds Mark III + Canon EF 17-40 mm f/4 L USM)
  © Yuri Matte | 3 hours, f/5.6, ISO 200 (medium format film camera)
  © Chris Gray | Photo - winner of the National Geographic Photo Contest 2009
  © Tom Lowe | Photo Winner Astronomy Photographer of the Year 2010 | 32 sec, f/3.2, ISO 3200, 16mm AF (Canon 5D Mark II + Canon EF 16-35 mm f/2.8 L USM)
  © Brad Goldpaint
  © Ben Canales
  © Dima Shatrov | 15 sec, f/2.8, ISO 6400, 14mm FR (Nikkor 14-24mm f/2.8)
  © Mark Adamus, the brightest point is the planet Jupiter | 45 sec, f/2.8, ISO 3200, 16mm FR (Canon 1Ds Mark III + Canon EF 16-35 mm f/2.8 L USM)
  © Ben Canales
 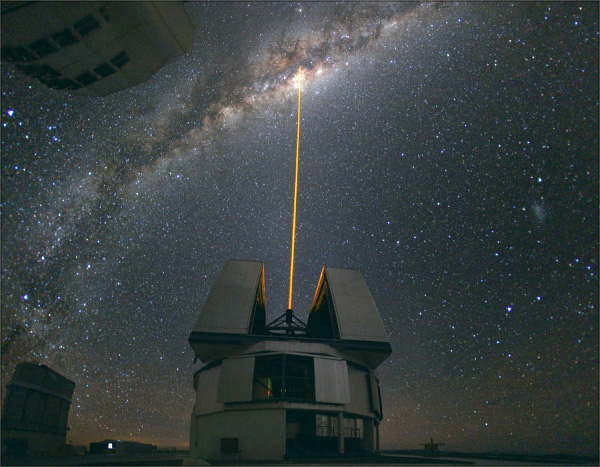 © Yuri Beletsky | A laser beam from the dome of the Very Large Telescope (VLT) in Chile. A laser beam creates an artificial star in the sky, which is how astronomers try to measure the distortion caused by Earth's turbulent atmosphere.
 Conclusion
OK it's all over Now! Now you know what stars are and what they eat with how to shoot them.
I will be glad to any questions and comments.
In conclusion, I would like to say that in addition to the fact that night is a great time for photography, night is also an amazing, mystical time when you can be alone with yourself, get away from everyday life and worldly fuss, plunge into the dark abyss of the night, so that rethink your life values, and just look at your life from the outside 🙂
light pollution
The thing is that for a good photograph of the stars in the night sky, you need to move away from light sources.
After all, a small number of lampposts is enough to get light pollution in a wide range of the atmosphere. Cities all the more need to be avoided, leaving them for kilometers.
This is the most important rule when photographing the night sky.. Therefore, every photo shoot at night is an exciting trip that will give wonderful impressions.

The best locations for shooting the night sky are mountains or places where civilization has not yet arrived. Gorgeous pictures are taken by our guys in the Caucasus Mountains on Bermamyt, in the Elbrus region and in the Crimea. Be sure to read my report about . Many have seen a wonderful timelapse video shot on the slopes of the Teide volcano or pictures from Nepal.
But it is not necessary to rush to the other end of the world, for example, to shoot the Perseid stream, it is enough to leave in August in the suburbs, to the country house or to the field.
The darker the location, the better the celestial bodies will be visible in the picture!
So, remember that the main thing in night photography is the shoot place.

Tripod
Everything is simple here. Without a good camera fixation, you will not get sharp pictures, but blur. I use Manfrotto, but you can choose any with stable legs and wind-proof. I recommend that there is a level on the tripod, with it there will be less chance of filling up the horizon in the dark. =)
For additional stability, you can attach a briefcase or equipment bag to the tripod.
wide angle lens
Not required, but highly recommended: the shorter the focal length, the more time to fix the stars.
For example, for 16 mm, you can set the shutter speed to 30 seconds on a full-frame camera, and on a 50 mm lens, after 15 seconds, the stars will turn into tracks (star trails) and will be blurry. I will provide focal length tables at the end of my guide to photographing the night sky.
For a beginner, the whale lens that came with your DSLR, for example, the Nikkor 18-55 or 18-105, is enough.
The ideal lens for shooting stars and the night sky is a wide-angle lens with good aperture: for Nikon it can be Nikkor 16-35 or Nikkor 14-24, and for Canon EF 14mm f/2.8 L USM. Personally, I now shoot at 16-35 and don't worry about the fact that I can only open the aperture to f4;).

Why is luminosity needed?
The more you open the aperture on the lens, the more light the matrix will receive per unit of time, which means it will be able to well expose a frame with stars or the Milky Way.
A small aperture can be replaced by a high ISO or vice versa. Do not shoot with lenses with a long focal length, the longer the focal length, the slower the shutter speed you can use so as not to get blurry.
The lens is number three in shooting stars.
Camera Light Sensitivity - ISO
A simple rule - the more the better, but do not forget about the noise!
Each camera has its own ISO value at which you can take high-quality pictures. For full-frame cameras, ISO can be driven much higher than for non-full-frame amateur cameras.
For example, on a Nikon D800 or Canon Mark III, you can safely set the ISO value to 6400. And for cameras like the Nikon D90 or Canon 7D, it’s better not to raise the ISO above 1250.

To get an exposed photo of the night sky and stars, you need to increase the ISO sensitivity of the matrix in addition to shutter speed.
The higher the ISO value, the better the stars are visible and the more noise in the photo.
I hope you shoot in RAW, then you can remove the noise a little in graphic editors like Adobe Lightroom.

Excerpt
How to determine the exposure time so as not to get the movement of stars in the frame. Everything is simple.
Use the 600 rule. Divide 600 by the number of your focal length and you will get the exposure time that you should set when taking a picture. For example, 600/18=33 seconds. For a non-full-frame camera, the number still needs to be divided by the crop factor of the matrix - 1.6. For example, 600/18/1.6=20 seconds. I recommend subtracting an additional 1 second from the resulting value.
Moon in the sky!
Remember the important rule that if you want to photograph the stars in the night sky, the Moon will get in the way. The solution is simple - avoid the full moon and the average values of the moon. The best shots are obtained when the month is very small or is over the horizon.

Sometimes the moon can be in place, and sometimes not at all. The light from it does not allow us to see the stars =(
But get to the point!
You're at the place! We chose a location and a shooting point. I recommend arriving before dark, because at dusk it is quite possible to twist your leg or neck, which means that the instinct of self-preservation will not allow you to find the most delicious locations and angles.

A short step-by-step guide to shooting stars at night
- After installing the camera on a tripod, put it in manual mode - M.
- If you haven't shot in RAW yet, now is the time to start!
- Open the aperture as wide as possible, such as f2.8 or f4, depending on your lens.
- Focus at infinity or a far-off lit subject for autofocus to work. In general, it is good to have a small sticker on the lens, with the focus point marked at infinity, then there will be no problems when trying to focus on the stars in the sky (the standard mark on the lenses is a bit of a lie).
- After focusing at infinity, switch the lens to manual mode. In this way, you will solve the problem of focusing on the entire shooting.
- Raise the ISO to the maximum value in the camera. This will make it possible not to take extra frames with long shutter speeds to compose the composition. After finding the composition, lower the ISO to get enough light in the frame, usually around 800-1250 on non-full frame cameras or 3200-6400 on full frame cameras.
- Set your shutter speed to the 600 rule to get a shot of the stars without movement. Divide 600 by the focal length of the lens (and for non-full/crop sensors by another 1.6). For example, for 16mm at full frame, I use a shutter speed of about 30-35 seconds. Below I will give the values for the main focal lengths.
- If the shutter speed is more than 30 seconds, then you need to switch to BULB mode, install the cable release and set the shutter speed through it.
- After taking several shots with different white balance, choose the WB at which the photo is more in line with the ideas.
- To illuminate the foreground and the surrounding landscape - use a flashlight with a red filter.
- Take several shots with slight changes in ISO and shutter speed until the result is satisfactory. (don't forget the composition!)
- At home, process the image in a photo editor such as Adobe Lightroom or Photoshop, removing noise and increasing brightness. I will cover this in more detail in future posts.
- Show the photo to your friends, collect likes, and of course share my guide to shooting stars in the night sky =). Don't be greedy.
And now I will give 10 great tips that you will not find elsewhere. Following the tips, you will significantly increase the quality of night photos! So, attention, like and read the secret knowledge:
- Be sure to shoot in RAW. Then you can make the photo brighter and remove the noise!
- Don't forget to take a couple of spare batteries as they run out pretty quickly.
- Do not forget about the composition and landscape elements in the frame. Light up with a red light.
- To avoid blur and camera shake when you press the shutter release, I recommend using a cable, and if not, then simply put the camera in timer shooting mode. So you can safely press the button and take your hands away from it =).
- Don't forget to dress warmly, pour tea into a thermos and take a couple of sandwiches =) The night will be long.
- To know in advance which stars and constellations you want to capture, where they will be located, and also what time the Moon will leave the firmament, use applications for phones and tablets. I recommend Photopills and Star Walk.
- Be sure to bring a bright flashlight with you so as not to break your legs.
- Don't forget to pick up your phone to read these tips again while shooting!
- If you want to get tracks of stars in the night sky, then set a slow shutter speed, for example, 2-5-15-30 minutes. But for this you need a remote control or a cable, since it costs mere pennies, up to 10 bucks on eBay. I will tell you more about shooting tracks.
- Don't delay for tomorrow! Go shoot today!
For the coolest night sky shots: get higher above sea level, shoot after rain and no moon, close to the equator and no clouds! =)

Please share this guide to shooting stars and the Milky Way in the night sky on social media! This will encourage me to share some more great how-to scenarios.
I look forward to your photos and observations in the comments! Ask questions, don't be shy! Share the post with your friends on social networks.
In one of the following posts, I will tell you how to properly shoot star tracks - star trails and take epic pictures with the movement of the Earth. Don't get lost!
Interview with photographer Yuri Zvezdny about how to photograph the starry sky. What is needed for this and what obstacles exist.
We continue a series of interviews with interesting people who share their knowledge in various fields. Last time we talked with Sergey Kovtun about how. And today we will talk with a professional photographer who fixed his eyes on the sky. So, the guest of our issue - Yuri Star.
 Carina Nebula, NGC 3372
 Mikhail Roskin: Good afternoon, Yuri. Tell me something about yourself. Where did the interest in the starry sky and photography come from?
Yuri Star: Hello. Love for the starry sky was born in me a very long time ago. At the age of eight. A lot of time has passed since then, but the memories are alive, as if it were yesterday. It was hot summer weather. I was sitting on a bed in a country house. The sun pierced through the curtains and illuminated the dust flying around the room. Before me lay the book "Earth and Sky" by Alexander Volkov (the same one who wrote "The Wizard of the Emerald City", he also wrote popular science books). This book changed my life. From it, I learned that the world is actually much larger than I had imagined before. It was not limited to my city and country. It turned out that we all live on a stone ball, which rotates at great speed in outer space around a flaming star called the Sun. But the Sun is only one of the countless stars that fill the Cosmos. These stars cluster together and form galaxies, which are more than grains of sand on all the beaches of our planet.
My mind collided with infinity and changed forever. Since then, I have been unusually strongly drawn to the sky, to the stars. By the time I read the book, it was already August. It got cold. I went out of the house, wrapped myself in a fur coat and looked at the stars. Sometimes lingering until dawn. I looked at the stars and now I saw not just twinkling dots, I saw entire worlds. Worlds similar to ours and completely unlike it. I saw inhabitants of other planets. Perhaps even one of them is now looking at our star, just as I look at his star. Maybe he even has a mind? Maybe even much bigger than mine? What is he thinking about? Maybe the same thing as me?
Where are you, brother in mind? Maybe on bright Arcturus? Or at the Diamond Chapel? Or maybe on that completely nondescript star, barely visible to the eye? She doesn't even have her own name. Why not? This could be true...
I fell head over heels in love with the Cosmos. And at an older age, a passion for independent travel and a desire to explore our wonderful planet appeared. This passion was shared by my wife. Therefore, we saved up some money, took sleeping bags with a tent and went to travel to South America for 5 months. Love for space and travel are perfectly combined. It's always dark in the wilderness. It is enough to get out of the tent an hour and a half after sunset and you can see something completely new.
For example, the ruins of the ancient city of the Incas in the jungle against the backdrop of the Milky Way

Or a star waterfall in the forests of Patagonia:

It's almost like being on another planet.
The remarkable thing is that modern cameras can see at night much better than our eyes. It is thanks to the sensitivity of their sensors and long exposure that such photographs can be obtained. And there is no big secret and special difficulties in getting such a photo. It is available to everyone.
 Dust and reflection nebulae IC 4603 and IC 4604
 Mikhail Roskin: Tell me how to photograph the starry sky? How is star photography done? What is needed for this? What technique, what weather? What does a beginner need to do to get the first photos?
Yuri Star: Astrophotography is divided into three areas: night landscape, deep space and the solar system. All three areas differ significantly in approaches to the equipment used, methods of shooting and photo processing.

Astrophotography of deep space and the solar system requires significant material costs, a telescope and astronomical patience to figure it all out. The genre of the night landscape is the simplest and most accessible for beginners. All you need for the first photos of the starry sky is a camera, a tripod, a flashlight (so as not to get lost in the dark), as well as a burning desire to photograph the starry sky, which will drive you out of a warm sleeping bag / house on a cold and dark night.
Here simple instructions on how to take the first shots of the starry sky:
First, your camera must be able to take long exposures up to 30 seconds. It is in this shooting mode that it needs to be transferred. Now almost all cameras can do this. ISO values should be set higher, for example 1600 or 3200.
Secondly, it is desirable to use the widest possible lens. For many lenses, this value is on the order of 18mm. The aperture should be as wide as possible to let as much light as possible into the lens. It is very good if the lens allows you to set the aperture value to 2.8 or even 2.0. Now we set the camera on a tripod and adjust the focus, because we need sharp pictures. But autofocus works very poorly at night - it does not have enough light. Therefore, you have to switch the lens to manual mode and adjust the sharpness manually.
You can focus in different ways: on a bright star, on the moon, or on the lights of cell towers. But if there is none of this, and the stars are poorly visible, then you can simply take the included flashlight 30 meters from the camera and focus on it. Now it's time to select a frame and point the camera at the starry sky. More stars will be visible in the southern part of the sky. It is there that the Milky Way is located, which is clearly visible at the end of summer and autumn in our latitudes, and in winter in the south there are some of the most beautiful and bright constellations: Orion, Taurus, Gemini, Charioteer and others.
For planning filming, planetarium programs are well suited, which show a realistic view of the star on any given date from anywhere on the planet. The most famous such program is Stellarium. In addition, it is completely free and available for mobile devices. Then it remains only to point the camera at the selected area of the sky and press the shutter button. You need to press the button carefully and smoothly so that the images of the stars are not blurred from camera shake. Better yet, set the shutter release delay to 2, 10, or whatever number of seconds your camera allows. This will eliminate vibration and get clearer pictures.
And you need to take into account one more thing - the starry sky is moving, because our planet is rotating! Therefore, during the shooting of one frame (about 30 seconds), the stars will stretch into dashes, but this is not scary and almost not noticeable, especially if the picture is reduced. But if the stars still stretch too much into lines in the picture, then this means that the shutter speed needs to be reduced and the stars will again become like dots. This is quite enough to take the first steps in night photography.
 Lonely pine tree on the Demerdzhi plateau, Crimea
 Mikhail Roskin: What are the most common challenges you face while filming? Do people interfere? Or just the weather?
Yuri Star: Difficulties arise, let's say, not a few. Most often, the mood of astrophotographers is spoiled by the weather (although in landscape night photography, clouds can fit very favorably into the frame).
Secondly, it is artificial illumination. Any large city produces what is known as light pollution. Lamps for night lighting of cities emit so much light that they create huge domes of illumination around cities, inside which it is almost impossible to shoot.
For example, from Moscow you need to drive about 200-250 kilometers to see a really dark sky. Although, it is worth saying that lunar-planetary photography is not afraid of flare. The moon and planets are so bright that they are not afraid of any metropolis.
And, of course, at night you need to be as careful as possible. When traveling to a dark place behind the stars, you need to follow safety precautions. First of all, it concerns people. The local population may not be very happy about your presence. Therefore, it is better to choose places that are not visible from the roads and are located away from cities and villages. And of course you need to take into account the factor of wild animals. For many of them, the night is a time of activity, so no one is safe from a chance meeting. I have repeatedly met moose, wild boars, foxes and smaller animals. As a rule, animals avoid such meetings, but a lot depends on you. You should not stop where there are traces of animal activity. For example, pitted earth with many boar tracks. It is very likely that they will return to this place at night and most likely will not be happy with your company.

Mikhail Roskin: What equipment can be used to shoot the starry sky? What is needed for this? Is an ordinary soap dish enough or is it necessary to have a cool SLR?
Yuri Star: With the development of digital technologies, photographing the starry sky is becoming more accessible and popular. Someone even manages to photograph space on a smartphone. Now, even entry-level cameras often have all the features you need to take good photos of the night sky.
Of course, the “cooler” the camera, the more opportunities it has, and an advanced DSLR or mirrorless camera will be able to see more than simple “soap dishes”. But this is far from the limit. Enthusiastic astrophotographers use specialized astronomical cameras. These are very heavy, complex and bulky instruments, sometimes costing tens of thousands of dollars. Moreover, when we talk about photographs of deep space and planets, then an ordinary photographic lens is no longer enough. Here you need a full-fledged telescope, special devices - mounts - that smoothly turn the telescope after the stars, and much more. This is a big and complex science. But there is nothing supernatural here. Astrophotography is available to everyone. With due diligence, you can get world-class results even on very modest equipment. The key here is patience and consistency.

Mikhail Roskin: In what programs does the processing take place and what do they do with the pictures? How many shots do you need for one high-quality frame of the starry sky?
Yuri Star A: Again, it depends on the genre of shooting. If we are talking about a night landscape, then one frame is enough. It can be processed in any graphics editor, such as Photoshop, by slightly increasing the contrast and saturation. Although some photographers are fond of processing and from their pen come out completely surreal images that are very distantly related to photography.
Deep space imaging requires more advanced techniques. Here one frame is not enough, because objects in space are very dim and they are very poorly worked out in the pictures, they are simply not visible behind the noise. In addition, the camera sensor during the exposure unfortunately registers a lot of side and unwanted signals and noise. As a result, almost nothing is visible on single frames. Therefore, to obtain one frame with some kind of nebula or galaxy, you have to take dozens of frames of the object and hundreds of so-called calibration frames. These frames are then used in image processing to calculate and eliminate the noise and defects that are present on the original material. All this is done in special programs such as PixInsight, DeepDkyStacker, Iris and others. This process is quite long, especially considering our weather. It can take weeks or even months from the moment you start shooting to the moment you publish your photo.
With lunar-planetary shooting it is easier. Video technology is used to take photographs of the Moon and planets. Simply put, a video camera is attached to the telescope and a video is shot with the planet, for example, with Jupiter. Then the frames of this video are sorted by quality in special programs (for example, such as RegiStax or Autostakkert!). Blurry frames are discarded, while sharp frames remain. From these sharp frames, the final image of the planet is then formed with a large number of details and small details.
 Two Universes. Alpine plateau Lago-Naki, not far from Mount Oshten.
 Mikhail Roskin: Are there any professional secrets of photographing the starry sky in the mountains?
Yuri Star: Yes, but these are not even secrets, but rather an experience. At night, everything is different: the famous path will be lost in the dark, something, where it is located in the camera menu, will be forgotten, the lens cap will fall into the gap between the stones, a strange sound will be heard somewhere behind ... and with all this, fingers and toes will freeze . And you need to focus on shooting.
In general, everything that can be prepared in advance must be prepared in advance: what to shoot, where to shoot, when to shoot. It is better to bring the camera control in the dark to automaticity, so that the hands themselves know where, which buttons. You need to dress warmly, not warmly according to the weather, you can put heating pads in gloves. In the mountains, you should be as careful as possible, not take risks. Health and life are more important than the frame. It is better to go not alone, but in the company of someone. In general, accuracy and maximum advance preparation.

Mikhail Roskin: Were there any unusual, funny or scary cases?
Yuri Star A: Something always happens. In addition to photo frames and the romance of the starry sky, the night gives a lot of memorable events and adrenaline. Once during a night shoot in Chile in the Atacama Desert, I lay down to take a nap. I climbed into the sleeping bag on the street, without a tent, and fell asleep. When I woke up, I found next to me, right in front of my face, a poisonous scorpion. Everything ended well, the scorpion did not show much interest in me, but still my heart skipped a beat.
Another case - I was returning to the tent at night after filming on the ruins of the Inca city of Choquequirao in the mountains of Peru. I walked along a narrow path: a steep cliff on the left, a cliff on the right. Suddenly I hear, or rather feel, that a clatter is approaching me, the earth is shaking. Instinctively, I press myself against the rocks on the left. A herd of horses runs past me to meet me. That's the meeting!
And one day, having pitched a tent at night on the Crimean coast, in the morning my wife and I discovered that we were not far from a military facility - a radar station. The military looked with curiosity at our faces poking out of the tent. They must have been as surprised as we are.
In addition, at night you can implement all sorts of strange creative ideas. For example, I have long had a desire to take an astro selfie with a guitar in a snowy field at night under the moonlight. Well, you know, sometimes you want something like this) And most recently I took this photo:

Mikhail Roskin: Can astrophotography make money? And if so, what is the price range?
Yuri Star: There is a fundamental possibility for this. Selling photographs, such as spherical panoramas, can generate some income. But still, astrophotography is a passion. It's not something you should do for money. Rather, on the contrary, astrophotography is usually done by those people who already have money. But now the situation is changing. More and more people are learning about astrophotography and getting to know the Cosmos through it. There is photographic equipment available. There are enthusiasts. Astrophotography is another thread that connects us to the Cosmos. It's great that it is becoming more and more popular and accessible.
![]()
Mikhail Roskin: What is your advice to those who are just starting their journey in astrophotography?
Yuri Star: It is difficult to give specific advice to a beginner astrophotographer. Astrophotography takes a lot of skill. You need to be a bit of an engineer to build and set up an astrograph, you need to be a bit of a physicist to get good sources, and you need to be a bit of an artist to process them well. This takes time and patience.
Mikhail Roskin: Thanks a lot! It was very interesting and informative. I even roughly understood how to photograph the starry sky!
Interested in hot tours?
See what options are available for your dates. The site monitors offers from 120 firms. There is a convenient system for searching and filtering offers. All prices are final. Flight and accommodation are already included. Prices start from 6,000 rubles per person.
For readers of the LHTravel website, there is .
With a sky full of thousands of stars, I immediately wanted to learn how to shoot the same way. I took the camera, went out into the street ... and, of course, nothing worked out for me the first time. I had to read a little, practice. But it turned out to be much easier than I thought. In my article I will give some simple tips that will help happy owners of DSLRs to understand the issue. I must say right away that shooting other galaxies and spectacular nebulae will not be described here: the technique of such shooting is too complicated.
What will be needed?
We will start, by the way, not with technology. For me, it is not an end in itself to capture some piece of the night sky. This is an occupation for an astronomer, not a photographer. Stars for me are a spectacular way to decorate the landscape. And landscape photography always begins with choosing a place and time. Over time, everything is very simple: you need a cloudless night. Summer or winter outside - the difference is not so great. Of course, in cold weather, the matrix heats up less at slow shutter speeds, there is less noise in the photographs. But the photographer freezes at the same time too quickly. As a result, I would not give priority to either summer or winter.
The place should not only look impressive, but also be as far as possible from the villages and cities illuminated by lanterns. They give a light in the sky, against which the stars are simply not visible. So it is best to take such shootings somewhere in the country in the suburbs, and ideally - to leave a hundred kilometers from civilization.


Now we come to the question of technology. Better if you have a SLR. But even with a mirrorless camera, you can achieve good results, you just have to face the problems of focusing in the dark. Optics are most often needed wide-angle. I often use 14mm and 16mm lenses full frame. But the kit lens that comes with your amateur camera is also quite suitable. One thing you definitely can't do without is a tripod. The shutter speeds will be long and the camera needs to be securely fixed. A trigger cable will also be useful. Although the first time will be able to do without it. It is enough to use a shutter delay so that the vibrations of the camera from touch have time to calm down by the time the shutter opens. Don't forget to dress for the weather, and also get a flashlight - the more powerful the better. We charge the batteries and set off into the night ...
exposure parameters
This is where newbies have the most questions. Let's start with the simplest case - shooting a landscape on a cloudless moonlit night. We put the camera on a tripod, lower the ISO to 200 units (most often this is just enough). Try to close the aperture not too much, not more than f / 4-f / 5.6. And select the shutter speed in manual mode experimentally so that the brightness of the photo matches your creative idea. Attention: the shutter speed may be too long! If your camera cannot work out such a slow shutter speed in manual mode (in some models, the shutter speed is limited to 30 s), carefully increase the ISO.

Focusing
The next problem is focus. At night, it is not possible to automatically focus on dark skies. And in the viewfinder, most likely, nothing is visible at all. We do this: we find distant lights on the horizon (they are almost always and everywhere) and try to manually focus on them. You can take a few control shots and, if necessary, correct the focusing. If the foreground appears in the frame (and what kind of landscape is without a foreground?), then it makes sense to focus on it, after illuminating it with a flashlight.
She's spinning!
In the stream of endless affairs and everyday worries, we often forget about such simple things as the rotation of the earth. The stars in the sky never stand in one place. They are constantly moving relative to the ground. Although there are exceptions to every rule. The North Star still moves the least during the day. And approximately we can say that it stands still. Everything else revolves around her. This is not visible at short exposures, but at long exposures it is perfectly noticeable! If you want to get star-points in the picture, then try to shoot at relatively fast shutter speeds. If you want dashes instead of dots, increase the shutter speed.


"Six Hundred Rule"
There is a rule of thumb that allows you to determine the shutter speed at which the stars in the frame, due to the rotation of the earth, begin to turn from dots into dashes. It's called the six hundred rule. Divide 600 by the equivalent focal length of your lens and you'll get the corresponding shutter speed in seconds. For a 16mm fisheye, for example, shutter speeds up to 37s can be used. And for a kit lens with a wide angle of 18 mm, it is better not to exceed the value of 20 s.
When it's completely dark
In some cases, we manage to get so far away from civilization that the light of its cities is not visible at all in the sky. In this case, we have a chance to capture the spectacular Milky Way. Feel free to set the maximum allowable shutter speed, open the aperture a little wider and try increasing the ISO. Where the human eye saw just a dark sky, the camera sees much more!

Adding Light
Have you forgotten about the flashlight yet? With it you can highlight the details of the foreground. You can use color filters to achieve multi-colored highlights.
star tracks
A little higher, I wrote that at a slow shutter speed you can capture the movement of stars. What if the shutter speed is too long? In fact, many problems will arise in this case: from overheating of the matrix to the need to close the aperture strongly. And if you want to shoot the movement of stars across the sky, it is better to take several dozen frames from one place with a shutter speed of about 15-30 seconds, and then glue them automatically into one picture using the simple and free Startrails program.


Hey! I'm in touch with you, Timur Mustaev. I often see images of stars in the sky from professional photographers. They are taken in different ways and from different angles, in different places, but they are certainly beautiful: a landscape against the backdrop of many stellar objects, the Milky Way or a real starfall created by the movement of luminous celestial bodies. Would you like to have such shots in your portfolio? My article is at your service.
Photographer's focus
The main question: how to photograph the starry sky? How to convey exactly the splendor that we see or how we wanted it to look? In Photoshop, we can work wonders, but it will not be so valuable, because there will be no documentary and real reality in the photo.
Therefore, I advise you to be fully armed at the time of the photo shoot and try to get an almost perfect shot. To do this, you need to consider the following factors:
- Composition. Contrary to the possible idea that shooting a sky with stars is only stellar bodies and the sky, it is worth concentrating on the surroundings as well. As in any kind of photography, you need to think about what objects will be included in the picture. For example, trees of an unusual shape, mountains, valleys, interesting natural objects, beautiful architectural structures - take your pick.
- Time. It is clear that you will have to take pictures at night, but when - when the stars are clearly visible and represented in the maximum number. The night should be without clouds. It is advisable to follow the phase of the moon: how bright it is and where exactly in the sky it will be at a particular moment. The time of year doesn't really matter.
- terrain. Firstly, you should choose a location that is more or less picturesque, since you will probably want to take pictures of the landscape, at least partially. Secondly, going out into nature is useful not only in search of beauty, but also in order to avoid getting into the frame of light from the lights of the city. Artificial lighting illuminates the sky, it, in principle, will be superfluous in the picture.
- Technics. And here are two points: the camera itself + optics. Of course, it's good to have a high-quality camera that allows you to shoot in high resolution, take clear pictures, and it would not hurt if there was a separate noise reduction function. But do not be upset if you do not have a very advanced and modern camera. Even on Nikon d3100 you can take a good photo.
Pay more attention to the chosen lens. If you plan to increase the illumination of the photo due to the open one and play with the f indicator, then you can’t go anywhere without high-aperture optics. Also, the device must be wide-angle, for example, 16, 24 mm, etc. With such data, you can cover a very large part of the sky and the rest of the landscape.
- Additional accessories. Any of your illuminators will come in handy, even an elementary flashlight or flash, which in capable hands is capable of much. Light is most likely needed to illuminate nearby objects, which could be more easily focused. You can also remember about color at this point to make the original backlight.
But more important when shooting the sky at night is something else - good. It should be high enough and stable. It is he who will fix the camera when you set the long one. Why did I mention endurance? Find out below, where we will talk about the settings.

How the professionals do it
This, of course, will focus on the camera settings.
- Manual control. The camera can be almost anything, any brand (for example, Canon or Nikon). But what he definitely should have is a manual mode, with which you can maximally adapt to rather difficult external conditions.
- Low ISO. Perhaps, beginners may be surprised: we are shooting in almost absolute darkness, without high sensitivity we will get only a black picture at all! This is not so: the photosensitivity should be no more than 200, so as not to create noise. When shooting the sky and stars, the emphasis should be on shutter speed. And read more about it.
- Diaphragm. You shouldn't open it too much, because we need the largest one, since we want to capture the entire landscape. A large aperture, by the way, in such circumstances, in any case, will not give a noticeable increase in illumination.
- Excerpt- is of paramount importance. It is on her that all lighting depends, and how the stars will turn out, that is, either clear (short shutter speed) or blurry, in motion (long). It is better to choose a specific value yourself, already at the place of filming. Remember that the earth rotates, therefore, with the set average time intervals, the stars can also be fuzzy. Keep in mind that in many low and mid-range cameras, 30 seconds is the longest. This is enough to show stellar movement, but in a small range. Thus, a slow shutter speed will both lighten the photo and turn dot stars into dash stars.
- Focus. The most difficult thing with him: what to focus on in the dark? Turn off auto mode immediately, it just won't help you at all. With sleight of hand and a natural eye, we will have to adjust the focus. You won't see much in the viewfinder, so it's worth finding at least some lights and focusing on them. There is an option to highlight the foreground of the scene, for example, with a lantern, and focus on it.

When photographing with an amateur type camera or a professional expensive camera, in any case, the image of the starry sky will have to be retouched to a certain extent. So don't worry if something goes wrong, but don't get carried away with post-processing either! Count on yourself and actively use the acquired knowledge.
If you want to get to know your DSLR better than what it is capable of, then a video course will become your assistant. Why these courses? Everything is simple. They are designed for beginner photographers. Everything is told and shown in them in a very simple language, which will become clear from the first viewing. Many beginners, after viewing the course, talk with their SLR on you!
Digital SLR for beginners 2.0- who has NIKON.

My first MIRROR- who has CANON.

Till! Look for something new, set goals, grow, and above all, above yourself! Don't forget to visit my blog - the blog of your faithful guide to the world of photography!
All the best to you, Timur Mustaev.


Popular
- New Year in the work team (corporate)
- GIT check: what is checked and how to prepare
- Maintenance of military records in the organization
- Orthodox photographer - the best in Eurasia!
- We remember and are proud: original ideas for the script for Victory Day
- Is it worth calling the employer after the interview or how to find out the results: how long do they usually report?
- Features of the technique of painting plates, painting ceramic dishes White-blue painting on dishes
- Types of dish painting: Gzhel, Gorodets, Zhostovo, Khokhloma
- Marketer: job responsibilities Job description of an IT company marketer
- Child care center administrator job description