Do-it-yourself welding for band saws. How band saws are welded
For the normal functioning of the band saw, it is subjected to welding. The method by which this process is performed is selected individually, in accordance with the characteristics of the operation of this material. About the equipment for welding band saws, we will consider further.
Band saw: device and principle of operation
There are a large number of different saws that have individual application features and a peculiar design. Some use a disc as a cutting tool, while others use a tape.
The installation of the saw band is carried out on the pulleys of the leading and driven directions. To pull it, great efforts should be made, only in this case, the cutting line will be uniform.

The main features of this design are separate blocks that are complemented and built up independently. On a simple device, the material for cutting into which is fed manually, additional mechanisms are installed, such as an electronic system for monitoring the device's performance, thanks to which it works without outside human intervention.
Among the main structural elements of a band saw, we note the presence of:
- a frame on which there are guides with which the tape moves;
- in order to tension the tape, a mechanism is used that has a spring, mechanical and hydraulic drive;
- cutting tape holder;
- screw-type lifting mechanism, which is installed near the belt;
- belt-type transmission, on which the wedges are located;
- an electric motor with a power of about fifteen kilowatts or a gasoline-based motor with the same power;
- eccentrics with which the log is fixed on the frame;
- a water tank and a tap that wets the part during the sawing process;
- rail strip on which the structure moves.

Also, each saw has individual structural elements, such as guardrail covers, and thrust mechanisms, which increase safety. In order to regulate and adjust the work on the working surface there are strips on which markings are applied.
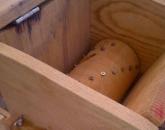
The principle of operation of the mechanism is based on laying a log between two guides and its rigid fixation. To determine the thickness of the board, it should be raised using a special mechanism.
Do-it-yourself welding of band saws with your own hands
In order to connect the two ends of the band saw, they must be welded. This process is carried out using special equipment for welding band saws. Resistance welding of a band saw consists in the fact that electricity passes through the two connected ends of the saw, which leads to their overheating and melting of the edges on the blade. For current supply, electrodes connected to the clamps are used.
There are a huge number of welding machines with which contact welding is performed. Some advanced options are capable of automating the welding and annealing cycle. Therefore, errors due to excessive welding or incorrect timing during which the impulse is transmitted are eliminated. In simpler machinery, feed control of annealing and welding is carried out by an operator.

Self-welding a band saw is possible only if you have experience with this kind of equipment. Among the main design features of the machine for welding band saws, we note the presence of:
- body part;
- welding type transformer;
- clamping mechanisms on which there are electrodes and clamping levers;
- start button;
- clamps: movable and fixed.

The main function of the movable clamp is free play, with the help of which the draft is carried out. In the process of how the ends of the saw move towards each other, a welding bead is formed. In order for the ends of the saw to be pressed against each other, a special spring is used to create pressure.
Do-it-yourself welding of band saws consists of the following steps:
- performing saw cutting;
- cleaning of its end sections;
- installation of the fabric in the design of the welding machine, determining the operating mode: stroke and shrinkage;
- welding of cloths;
- performing annealing;
- seam cleaning.

The first stage - cutting, involves determining the size of the saw. Use a guillotine shear or cut-off wheel to cut off the desired section of the canvas. When using a canvas that has previously been welded, about five centimeters are cut off on each side.
In this situation, when performing cutting, a number of rules should be considered:
- the place where the blades are connected to each other should be located between the upper parts of the teeth;
- in the process of cutting, a little allowance should be left to compensate for the shrinkage of the metal, the optimal allowance is one and a half millimeters on each side;
- try to make the cut line as even as possible, the quality of further welding depends on it.
Only in this case, the canvases will have a straight line on the bend.
A fairly simple way to perform cutting is to lay the saw in a certain position, trim and strip each of the ends separately. In this case, even if there is a cut line that is not perpendicular, its end sections will still be joined. In this case, the fabric after welding will be distinguished by an even seam.

Further actions are related to the stripping of the canvas. These areas should be cleaned of dirt, degreased with acetone or alcohol. Use an abrasive to clean the edges. As a result, you should get perfectly even and smooth areas.
Next is the installation of the canvas on the surface of the device. The prepared saw should be installed inside the clamping mechanism. At the same time, one part of it remains mobile, and the second does not. In the central part, the saw edges are connected to each other. Edge alignment must be perfect.
With the help of the control knobs on the device, the force, stroke, shrinkage, and mode of operation of the device are regulated. These parameters for each saw are selected individually and depend on its size, steel thickness, operating features, etc. With an increase in the cross section of the saw, the current required for welding increases.
In order to more accurately determine these parameters, use the instructions for the device. It should contain a table according to which the operating mode of the equipment should be determined. In some devices, it is enough to select only the welding mode, without indicating the current strength and voltage for operation. In order to weld the saw, the lever must be set in a certain position.
Band saw welding is done by pressing a button or turning a lever. After that, the current is supplied to each clamp, and from them it is transmitted to the saw. Thus, the metal in the zone of joining of the two sections is melted and connected to each other.

The spring acts on the surface of the movable clamp, which is displaced towards the fixed clamp, on the draft. At the same time, in the butt zone, the formation of a welded bead occurs, with the help of which the saw is connected.
When determining the welding parameters, one should choose the time during which the current pulses are applied. Welding machines with an automatic mode of operation turn off the current after a few seconds from the moment they are applied. However, if this parameter on the welding machine is adjusted manually, then it is necessary to monitor it.
In the process of welding, certain difficulties arise associated with the material from which the saw is made. In accordance with this parameter, the operating mode of the welding machine is determined. In some cases, it is very difficult to determine this parameter without experience. If in the end welding did not satisfy you, then you should experiment, choosing the necessary mode on an unnecessary trim of the canvas. After selecting the optimal operating mode, write down its parameters in order to apply it in the future.
Please note that the electrodes that come into contact with the saw must be clean. Foreign matter or dirt on their surface adversely affects the welding quality of the saw.
Further actions are related to the implementation of annealing, which helps the metal, which has become brittle and rather hard during welding, to acquire strength, toughness and ductility. For annealing, the same clamps are used as in the welding process. However, a different mode of current supply is used for operation.

The optimum temperature at which annealing is performed is about six hundred degrees. At the same time, the cooling of the device should be maintained at a slow pace, for this the current supply button should be held, pressed and released at a certain time. In order for the metal to cool gradually, the annealing current button should be pressed periodically.
If there is no pyrometer on the welding machine, then the temperature is controlled by the external characteristics of the metal surface. During the firing process, the steel acquires a red-cherry hue. In no case do not heat the metal to orange or even more saturated red. The process of gradual cooling of the metal takes no more than five minutes. Some blades will require two cycles of annealing. In some cases, welding and annealing are performed in the same process. In this situation, the time for cooling the seams is increased by periodically supplying current to the metal.
After welding, the blades should be cleaned from the influx formed on the weld. Almost any tool with abrasive characteristics is suitable for cleaning seams. The main condition for high-quality cleaning is to obtain a flat and smooth surface.
We suggest that you familiarize yourself with the main errors that occur during the welding process:
1. Offset of welded edges - in this case, the sheets are in different planes. This problem occurs when there is insufficient current strength during the welding process or when there is a very large draft.
2. The melt on the web is observed in the process of supplying a very high current.
3. Wet spots are formed if the pressure supplied to the system is too low.

The minimum value of the protrusion of the seam on a well-welded plate is about one and a half millimeters.
To check the quality of annealing, the fabric is bent within a radius of twenty centimeters and inspected. If the arc resembles a standard circle and the seam remains intact, then the welding quality is at the proper level.
Welding band saws price and soldering features
The cost of welding band saws is determined primarily by their size, steel thickness and operating features. However, there is another way to connect the saw - this is soldering. This option is easier to do at home than welding.
First of all, the blade should be prepared; for this, the saw edges are cleaned of dirt and degreased. The ends of the web are connected in a butt position, however, the edges must be beveled.
In order to give the edges a bevel shape, use an abrasive wheel. The optimal bevel size is from eight to twelve centimeters. Beveled sections should be connected to each other as evenly as possible.
In order to solder the saw, you will need solders, the best option is silver pSR45 or pSR65. Solders with a lower silver content are not recommended.

As a flux, it is preferable to use a paste that is used in the process of soldering metal. This version of the flux is easy to use. In the absence of this substance, it is possible to make it yourself. For this, ammonium chloride is combined with borax in a ratio of one to ten. With the help of water, the consistency of the composition is regulated, which should become pasty.
A gas burner is used to heat the saw during the soldering process. The heating temperature is determined by the type of solder, the optimal value is from 650 to 600 degrees. Do not overheat the metal, so as not to disturb its structure. With the help of a special device, the ends of the saw are connected to each other. The soldering process is as follows. First of all, flux should be applied to the surface of the edges. Try to apply the paste only on beveled areas.
Further, the joints are heated to a certain temperature and the solder is fed to the junction of the ends of the saw. After that, a strip appears on the surface, indicating that the soldering is done correctly. Solder melting is performed not under the influence of a burner, but from a previously heated metal. After a few minutes, the metal cools down, only after that, the saw is removed from the mechanism. In the presence of small influxes, the seam is cleaned with any abrasive material.
Band saw welding video:
In the woodworking industry, saws are widely used, the main feature of which is a continuous cutting surface. It is a ring of ribbon with metal teeth.
Welding of band saws is the basis of their manufacture, since they are obtained by joining a pre-prepared band into a ring. This process is also used in their repair. This article will talk about the main features of welding such devices.
Welding of band saws is divided into several stages. At each technological stage, it is necessary to strictly adhere to the methodology in order to achieve the best result.
There are several types of devices that allow the connection process to take place. They usually function as follows: the edges of the ends of the saw are connected by joining them and passing current through them.
Resistance welding machines are one of the types of equipment that allows you to reliably connect the ends of the cutting tool. They are low cost, but their performance is low.
Such equipment is perfect for small volumes of work, it will be especially effective in repairing saws of industrial sawmills.

Drawing of the connection of band saws.
This method assumes a high quality of preparation of the joint and electrodes, as well as the correct choice of modes. Devices operating on the principle of reflow offer higher performance. In addition, they are able to work with all types of canvases. Such devices belong to the middle class.
The method also requires good surface preparation, the correct choice of modes and accounting for metal consumption.
Automatic reflow devices require only the installation of quality materials from the machine operator, as well as their removal after processing is completed. This tool is widely used in professional workshops and service centers.
The saw welding process, as noted above, is divided into stages, each of which will be described below.
cutting
In addition to the saw welding machine, some other tools will be required. These include guillotine shears used to cut the web. If there is no such device, then you can use a chisel or cutting machine.
If the connection is made in a previously used area, five millimeters should be cut off on each side. The cut must be strictly perpendicular between the teeth. Leave a 5mm allowance on each side.
Cleanup

Band saw welding.
The next step is to clean the saw blade. To this end, it is necessary to thoroughly clean the surface of the tool. Acetone or alcohol can be used as solvents.
In addition to dirt, burrs and bumps must be removed. The easiest way to do this is on a grinding machine.
Installation
After preparing the web in accordance with the steps listed above, the web is installed in the equipment for welding. The edges of the product must match each other.
Equipment parameters such as force, mode and course of precipitation are set based on the material selected for the web. The necessary modes are contained in the tables given in the documentation for the equipment.
Welding
If professional equipment is used, then butt welding of band saws is started by turning the corresponding knobs or pressing a button. The current is supplied to the electrodes, passes through the joint, heats the metal to the melting point and connects the ends of the web to each other.
One of the essential parameters is the time of current supply. In automatic equipment, it is one to two seconds. If welding is done by hand, then the time is set by the master.
In case of an unsuccessful connection, the modes are changed to more suitable ones and recorded. In the future, these values can be used in the case of welding the same blades.
Annealing

Band saw preparation processes.
Immediately after making the connection, the saw is unusable. To prepare the tool for use, you need to perform a few more operations with the blade.
The welding machine makes the material of the saw brittle. It becomes impossible to use it at work. Annealing solves this problem. This process is carried out by passing a smaller current through the product. As a result, the seam is heated and then cooled.
The annealing temperature can be controlled using a pyrometer. In case of its absence, control is carried out visually by the color of the metal. The most optimal is cherry red, but orange or yellow indicate overheating.
Cleanup
The final stage is the cleaning of the joint from the accumulated metal. It is also necessary to derive the correct shape of the cavity between the teeth. For this purpose, any abrasive can be used. However, as mentioned earlier, a sharpening machine is best.
Band saw soldering
Band saw soldering is also a valid way to join the edges of the saw blade. If you perform this process in accordance with all the rules, then in the end you will be able to get a high-quality and durable saw that can be safely used in a band saw or, for example, in a wood machine.
This method is most preferred for home use.
Training

Features of welding band saws.
Soldering a bandsaw at home is a cheap and affordable way to make a cutting tool. The first thing to do before joining is to clean the edges of the web from any contamination.
Connect the ends of the canvas should be butt. It is important that they are bevelled. You can get the edges of the required shape on the abrasive wheel. The shape of the bevel is a right triangle, the length of one of the legs of which is determined by the thickness of the metal.
Beveled surfaces should be as even as possible and fit perfectly to each other. Do not forget about the pitch of the teeth. When forming a bevel, you need to make sure that the step is preserved.
Equipment
There are many ways to heat the metal to the desired temperature. However, the most common and common is the use of a gas burner. Its flame, if possible, should be slightly deoxygenated or neutral.
Depending on the brand of the selected solder, the temperature is set. It is important not to overdo it with heat. At certain temperatures, undesirable structural and phase transformations can occur in the product.
It is important to have at your disposal a device for welding band saws, which allows you to place the ends of the blade butt. Such a device can be made independently according to one of the drawings available on the Internet.
soldering process

Welding machine for welding band saw.
By and large, the soldering of this tool is very similar to the same process for working with high-temperature solders of other products.
The beveled edges of the web are coated with flux and clamped in the machine so that the edges fit snugly together. It is important to make sure that the flux only covers the edges of the tool. If this procedure is done poorly, then the flux will flow to where it is not needed. In the future, you will have to spend extra time on its removal.
Then the connection is heated by a burner to the required temperature. Solder is applied to the joint. Due to the action of capillary forces, the solder flows between the edges. As a result, a strip appears around the entire perimeter of the joint.
It is very important that the solder melts not from the flame of the burner, but from the temperature transmitted from the heated metal.
The product should be allowed a few minutes to cool down and only then removed from the machine. In the case of the correct execution of the entire sequence of actions, solder flows should be absent. If they are, then the excess must be carefully removed.
This method is great for home use, for example, when creating a homemade tool and using it as a wood saw.
Outcome
Band cutting tools are widely used in various woodworking fields. These include furniture production, sawmills, band saws, carpentry, etc.
In each of the listed areas of application of saws, there is a need for their repair, which is often associated with welding or soldering. These procedures can be performed both using modern welding equipment and using gas burners.
Band saw welding is one of the most effective ways to join these products. Such tools are indispensable in modern woodworking, which has long been recognized as perhaps the most profitable business. In the process of processing the forest, band saws are subjected to significant loads, leading to a violation of the integrity of the blades. This occurs for various reasons - from the mismatch of the parameters of the band saw to the type of material being processed to the untimely maintenance of the tool. In any case, soldering or welding must be used to restore the saw to working capacity.
A band saw is a multi-blade cutting tool used in band saws.
Process complexity
The main purpose of welding is to obtain a seam that is equal in strength to the base metal. In the case of band saws, this result is very difficult to achieve for the following reasons:
- band saws for wood or metal, as a rule, are made of materials that are difficult to weld;
- in contact welding, the tape is a detail of a developed section;
- the operation of band saws causes extreme loads on the weld;
- a very high accuracy of geometry in the weld is required. Otherwise, the load during operation will be unevenly distributed, which will lead to a significant reduction in tool life.
Equipment and methods of welding

Resistance welding of band saws, apart from soldering, is the only way to obtain a quality joint. A welded joint can be obtained by two main methods:
- resistance welding;
- flash welding.
The use of one method or another has its advantages and disadvantages, so the final choice always remains with the process engineer.
Resistance welding consists in the fact that an electric current is passed through the joined ends of the saw, compressed with a certain force. Under its influence, the end edges of the web are heated and welded under pressure. An apparatus for welding band saws with resistance will cost much less than an analogue operating on the principle of reflow. Both methods require the following equipment:
- machine for welding (fusion or resistance);
- guillotine shears, abrasive wheel or cutting chisel;
- acetone or alcohol solution;
- unnecessary trimming of the canvas for the selection of modes.
Band saw welding process

Manual guillotine shears are used for cutting metal with a sheet width of up to 2.08 meters and a thickness of up to 1.5 mm and a tensile strength of 500 MPa.
The welding procedure is the same for both methods and consists of several stages:
- Saw cutting.
- Edge cleaning.
- Selection of the welding mode and installation of the blade in the welding machine.
- Actually saw welding.
- Annealing.
- Seam cleaning.
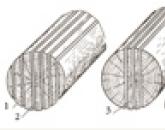
It is better to cut the canvas with guillotine shears, but you can also use more archaic tools like a cutting wheel or a chisel. If the strip is re-welded, approximately 5 mm must be cut off from each end (weld heat-affected zone). Docking should be carried out between the tops of the teeth. It is necessary to leave about 1.5 mm allowance for each end of the tape (for draft). The position shown in the following figure (fig. 1) will ensure optimal web evenness.
For high-quality welding, the saw edges must be completely free of burrs. In addition, they must be cleaned of dirt, dust and industrial debris, as well as degreased with an alcohol solution or acetone.
At the installation stage, it is necessary to install the prepared edges in the clamping mechanism, consisting of a movable and fixed clamps, and set them so that they completely match in height. The choice of welding mode in this case is best done experimentally on unnecessary scraps of the tape, since there is a huge variety of sizes of saws and materials for their manufacture. There are often cases when the necessary combination is not in the instructions. Having chosen the optimal mode, it is better to record its performance in case it is necessary to re-weld similar products.

Figure 1. Tape location.
After installing the ends in the clamps and setting the mode, you need to start the welding process with a special button or handle. Under the action of current, the edges of the product will begin to melt. At the same time, the movable clamp will move towards the fixed clamp at a distance equal to the course of the draft. After that, a weld is formed at the ends of the saw, which will connect them.
In the process of welding, hardening structures are formed in the metal, as a result of which it becomes harder and more brittle. To level stresses and deformations during welding, annealing is used to a temperature of 600 °C. Expensive welders have a built-in annealing and slow cooling function, and in the case of cheaper models, you will need an annealing furnace and oil to slow down the cooling of the metal.
During welding, an influx is formed, which is a stress concentrator. It must be removed with any abrasive tool.
The final surface should not protrude above the weld.
Checking the quality of the welded joint
The simplest and most proven quality control method is visual inspection. The following signs indicate a poor connection:
- the welded edges of the product do not match in height. The defect occurs due to insufficient current or excessive draft;
- drops of molten metal on the surface of the tape. Occurs when the welding current is too high;
- unfinished areas. Occurs due to insufficient current or too low pressure.
The reinforcement of the weld (the difference between the thickness of the deposited and the base metal) should not be less than 1.5 mm. Otherwise, the useful section of the weld will be insufficient to work in a band saw.
The complexity of connecting the ends of band saws is due to the difference in the parameters of different saws (in size and material) and the difficult conditions in which the tool operates, experiencing repeated cyclic tensile and bending loads. Ideally, the joint should be as strong as the whole canvas, but this is not easy to achieve.
There are two main ways to connect band saws: flash butt welding on special welding machines and soldering.
Welding of band saws on special welding machines
The essence of butt welding of band saws is that through the ends of the saw connected butt-jointed and compressed with a certain force, an electric current is passed, leading to heating, melting and welding of the end edges of the blade. Current is applied through electrodes connected to the clamps.A large number of models of machines for contact welding of band saws are produced. The most advanced of them provide an automated welding and annealing cycle, eliminating the possibility of operator error in maintaining the time of the electric pulse during welding and annealing. In the most simple devices, the welding and annealing times are controlled by the operator.
The simplest apparatus for welding band saws is shown in the photo below. It consists of a housing (1), a welding transformer (2), a clamping mechanism with electrodes and clamping levers (3), a start button (4). The clamping mechanism, in turn, consists of fixed (5) and movable (6) clamps. The latter has a free play necessary for the implementation of the draft - the movement of the ends of the saw towards each other with the formation of a welding bead. Under the action of a spring that creates upsetting pressure, the ends of the saw are pressed against each other with a certain force.


The process of welding band saws includes the following operations:
- saw cutting;
- cleaning of the connected ends;
- installation of the blade in the welding machine, selection of the current mode, setting the necessary force and the course of precipitation;
- fabric welding;
- saw annealing;
- seam cleaning.
cutting. Blade cutting is best done with guillotine shears, but can be cut with a cutting wheel or chiseled. If the blade has already been welded before, cut off about 5 mm from each end when re-welding.
In any case, when cutting, the following conditions must be met:
- the connection point should be located between the tops of the teeth;
- when cutting, allowance for draft should be left (approximately 1.5 mm for each end of the tape);
- The cutting line should be straight, perpendicular to the back of the saw.
The latter is necessary so that the welded saw blade does not have a bend at the junction (along the back line).
There is a fairly simple way to accurately cut the tape sheets to be welded. It consists in laying the saw as shown in the figure below (middle image) and cutting or deburring both ends of the blade at the same time (assembly). With this processing of the ends, even if the cut line is not perpendicular to the back of the saw, its ends will still fit together as expected, and evenness of the blade after welding will be ensured.

Cleanup. The ends of the saw are cleaned of dirt and degreased with acetone or alcohol. The joined edges are cleaned with an abrasive. They should be even, without burrs.
Installing the canvas in the machine. The prepared saw is installed in the clamping mechanism (one end in a fixed clamp, the other in a movable one) so that its edges meet in the middle of the free space between the clamps. In this case, their complete coincidence must be ensured.
The corresponding control knobs set the force and stroke of the draft, the welding mode. All these parameters depend on the dimensions of the saws to be welded. The larger the cross section of the saw, the greater the required welding current and the higher the upsetting force.
The instructions for the welding machines contain tables containing all the necessary settings depending on the size of the saw to be welded. Often, welding modes are set without specifying a specific value of welding current and voltage. To weld a specific saw, you simply need to set the control handle to a specific position (I, II or III, for example).
Welding. The welding process is activated by pressing a button or turning the handle. In this case, current is supplied to the clamps, and from them to the ends of the saw, as a result of which the metal is melted in the joint zone. Under the action of the spring, the movable clamp begins to shift towards the stationary one by the amount of the draft stroke, as a result of which a welded bead is formed in the joint zone, connecting the ends of the saw.

In addition to the value of the current strength, the most important parameter is the time of the current pulse. Welders with automatic welding mode turn off the current supply after a certain time (usually 1-2 seconds). When working on machines that do not have an automatic mode, the welding time must be controlled by the operator.
The whole complexity of welding band saws lies in the difference in the size of their blades and the materials from which they are made. Therefore, often after the first welding, which ended unsatisfactorily, the welder is forced to experimentally select suitable modes. This is best done on unnecessary scraps of the canvas. Once the optimal mode has been selected, it is advisable to write down its parameters so that the correct mode can be applied to all saws with the same parameters.
It is very important to keep the surfaces of the electrodes in contact with the saw clean. The presence of foreign substances between the sheet and the electrodes increases the resistance of the circuit and disrupts the welding mode.
Annealing. Annealing is necessary so that the metal, which has acquired increased hardness and brittleness as a result of welding, returns its original (or close to it) structure, i.e. again became plastic and viscous. Annealing is carried out in the same clamps as welding, but in the absence of upsetting force and in a different current mode.
Heating up to the annealing temperature (about 600°C) and slow cooling is sometimes carried out by pressing, holding and releasing the button that applies the annealing current to the electrodes, while the button for applying the annealing current is periodically pressed to slow down the cooling. If the apparatus is not equipped with a pyrometer, the temperature is controlled by the color of the metal - when it reaches the annealing temperature, it should be cherry red. Do not reheat to orange or yellow, indicating a higher temperature. Gradual cooling during annealing can take about 3-5 minutes. Some canvases require two annealing cycles. Sometimes welding and annealing are combined into one process, increasing the cooling time of the seam after welding by periodically switching on the heating current.
Stripping the canvas. When stripping, the influx in the weld zone must be removed from the blade and the correct geometry of the interdental cavity at the junction must be given. It can be cleaned with almost any abrasive tool. The main thing is that the treated surface is smooth and flush with neighboring areas. When stripping, the circle must be directed along the seam, and not across it.


Quality control of welding and annealing. When welding band saws, the following defects may occur.
- The welded edges of the web are displaced relative to each other (the surfaces of the ends of the web are not in the same plane). This happens when the precipitation is too large or the current is insufficient.
- Ejection of the melt onto the surface of the sheet. Occurs when the current is too high.
- Lack of penetration. Occur due to low pressure and low stroke stroke or too little current.
In well-welded saws, the weld should protrude above the surface of the blade by at least 1.5 mm.
The quality of annealing can be checked in the following way - bend the sheet around the circumference with a bending radius of 20-25 cm and look at its behavior. If the bending arc is close in shape to a circle, and the seam does not crack, then welding and annealing have been carried out well. If the bent blade takes a V-shape, then the metal in the weld zone is too soft due to excessive annealing. The occurrence of cracks in the welding zone indicates insufficient annealing (too rapid cooling).
High-temperature brazing of band saws is also an acceptable method of joining, providing sufficient strength of the blade, provided that it is of good quality. And for home use, soldering is the most affordable way to join a torn bandsaw together.Web preparation. Before soldering, the joined edges of the web must be cleaned of dirt.
The ends of the saw are joined end-to-end along the beveled edges obtained by sharpening on an abrasive wheel. The shape of the bevel is shown in the figure below, its value (c) varies depending on the width of the web and ranges from 8 to 12 mm, but often the bevel is made much smaller. It is very important that the beveled surfaces are flat and that they fit snugly together. It is also necessary to ensure that the tooth pitch in the connection zone is characteristic for this saw.

Solders. Silver solders (PSr-45, and even better - PSr-65) are considered the best solders for soldering band saws. You should not use silver solders with a lower silver content, for example, PSR-25 is not suitable.
Fluxes. It is best to purchase some special paste flux designed for brazing alloy steels. The paste form of the flux is the most convenient for this job.
If there is no special flux, you can prepare a pasty composition yourself. Take 10 parts of borax and mix them with one part of ammonium chloride. Water is added to the resulting mixture until a paste becomes thick.
In principle, one borax can be used as a flux, but it is inconvenient to apply it to the joint.

Equipment and fixtures. Heating during soldering can be carried out in various ways, but the most common is heating with various gas burners. The flame of a gas burner should be either slightly deficient in oxygen (if possible) or neutral.
The soldering temperature depends on the brand of solder. If PSR-45 solder is used, which has a melting range of 660-725°C, then a heating temperature of about 800°C will be sufficient. The joint should not be excessively overheated to avoid unwanted structural changes in the metal.
It is necessary to have a device in which you can clamp the ends of the saw in the desired position, precisely aligning the blades along the bevel and back of the blade. A drawing of one of the possible options for such a device is shown in the figure below.

A device for soldering band saws: 1 - a recess that provides access to the burner flame.
But simpler DIY options are possible.

The beveled edges are flux coated and the ends of the saw are clamped in the fixture so that the edges fit snugly together and the backs of the ends of the blade are pressed against the ledge in the fixture. When applying the flux, care should be taken not to cover any other surfaces of the saw other than the bevels themselves. This will prevent the solder from flowing onto those planes where it is not needed, and from where it will have to be removed after soldering.
 a piece of solder is pre-placed on the connection)
The joint is heated with a burner to the required temperature and solder is supplied to the butt of the joint. The melted solder spontaneously, due to capillary forces, is drawn into the joint between the sheets, as evidenced by the appearance of its strip along the entire perimeter of the joint. Very little solder is required, so there is no need to melt excess solder.
The solder should melt not from the flame of the burner, but from the heat of the heated joint.


It is necessary to allow time for the connection to cool for several minutes, and only then remove the saw from the fixture. If everything is done correctly, then the influx of solder on the canvas should be practically absent. If they are, they must be removed with a careful cleaning.


When using the content of this site, you need to put active links to this site, visible to users and search robots.
Band saw welding is a popular procedure. Band saw cutting technology has long been used in many woodworking industries, furniture factories and many other related enterprises.
Their widespread use has gained popularity in various sawmills, tape and tape dividing equipment. The band saw itself is a familiar continuous cutting surface, which has the appearance of a circle, with pointed teeth around the entire perimeter. The manufacturing process of such a saw is as follows:
- Already finished tape with teeth give the shape of a circle.
- Next, a welding process is carried out to join the ends.
Of course, it is the welding process that is of particular importance, since not only the quality of work and serviceability of the machine, but also the safety of employees will depend on how well the saws are fixed.
Welding technology and blade preparation for band saws

This technology is divided into several stages, such as:
- Training.
- Sharpening.
- Welding.
- Divorce of the teeth of the resulting saw.
After each of the stages, it is necessary to carry out a quality control, which will help to eliminate all the shortcomings and shortcomings at the production stage. Before welding saws, they must be carefully prepared so that the saw meets all the stated requirements and can last a long time and efficiently. This process, in turn, is divided into such operations as:
- Cutting the saw blade. It is necessary to cut off the desired area of the web for further processing, as a rule, guillotine shears are used for this. In the event that such a machine is not available, it is possible to cut the web using a standard cutting machine. If an already welded fabric is used and in the future it is supposed to repeat the welding process at this place, then in this case it is necessary to cut off 5 extra millimeters from the place of the previous seam. In this case, it is necessary to take into account such a nuance as the cut line, which should run strictly perpendicular to the back of the saw. The process of cutting the web is carried out between the tops of the teeth. From each border of the object, it is necessary to skip a small distance of one and a half millimeters.
- End cleaning. In order for the welding of band saws to be as productive as possible, it is necessary to thoroughly clean them. To do this, clean out all the dirt and unnecessary residues, if necessary, use acetone or alcohol. After the canvas has been cleaned, it should be treated with an abrasive material. Further processing is carried out to remove all irregularities, roughness and burrs. In order to get rid of these shortcomings, you can use a sharpening machine.
Back to index
Welding

This is followed by welding of the saw, but first it is necessary to install it in the apparatus. In order to properly install the saw, you need to make sure that it is tightly fixed with a clamping mechanism. This mechanism is located in the apparatus for welding band saws. In this case, it is very important that the edges of the web coincide and be located at an equal distance between the clamps. Before choosing the mode and course of shrinkage, it is necessary to read the instructions for using the apparatus, which describes which parameters to select for each type of metal. In order to set the desired mode, you need to repeat using the control knobs.
Tape web welding. To activate the device, you will need to press the appropriate button and turn the knife switch. After that, the current begins to feed the electrodes, which are brought to the melting temperature of the metal. The movable clamp serves to form a welding bead in place of the seam. The worker standing on the machine must select the welding mode, automatic or manual. If automatic is selected, then the current supply time will be about two seconds, in the second case it will be regulated by the worker himself.
If welding did not give the proper result or was performed poorly, it is necessary to write down all the settings in a journal and henceforth not use them for welding saw blades from this type of metal. It is very important to check that the electrodes are in good condition before starting the machine. To do this, make sure they are clean. If there are any materials on them, this will lead to poor contact of the electrode with the material, which, in turn, will worsen the welding process itself.
Back to index
Band saw welding equipment

In a standard apparatus, saw welding is carried out in the following order: first, the blade is installed in the apparatus, then it is fixed with clamps, and then it is precisely supplied to the electrodes through which the current passes. This process allows you to melt and weld the ends of both objects. It is also worth knowing that the current passes through the electrodes, which, in turn, are fixed with clips. To date, there are many brands and models of such devices, but conditionally they are classified into three types.
- Equipment for welding with resistance. The main advantages of this equipment are relatively low cost and small dimensions. At the same time, their productivity is low, and it is designed only for a small amount of work and the production of a small batch of saws.
- Flash welding equipment. Its performance is noticeably higher than that of previous devices, but the cost and dimensions have also become larger. Apparatus belonging to the middle class can be used for any type of canvas. It is very important that they can melt even bimetallic sheets, which are often used for such products.
- Automated flash welding equipment. This kind of equipment is installed in large workshops and factories or in service centers. Its productivity is very high, while the process is fully automated. The operator of the machine only needs to install the saws in the equipment and remove them after the welding process has been completed.

Popular
- How to choose a CNC milling machine (milling cutter) for wood with your own hands
- The easiest way to transfer any image to fabric or wood How to paint on plywood with acrylic paints
- Order on the provision of one free day from work per week to prepare for writing a thesis
- CNC milling machine for the manufacture of straight and curved facades
- Underground greenhouse - a new trend or a forgotten technology
- Decoupage of caskets: master classes and ideas for decoration Decorating wooden caskets with your own hands
- How band saws are welded
- When and how did the first zoos appear?
- Organization and holding of the graduation party
- Winter patterns on glass painted with frost What are the names of patterns on windows in winter