Master class: Painting blanks from plywood. The easiest way to transfer any image to fabric or wood How to paint on plywood with acrylic paints
Lesson #39
If you aspiring artist perhaps these adviсe will be useful to you.
How can you make the basis for your future painting yourself?
The very first question is “why?”.
If you are just learning to draw, then you are most likely working at a rather slow pace. After finishing work on the first painting, you can go to any art store and simply buy the base you need for the next painting.
But if you draw constantly, then buying the basics can result in a fairly large amount.
Paintings are sold slowly, therefore, it is impossible to calculate this way: I will sell a painting, take money for it and immediately buy materials in advance.
The artist has to spend some time just investing money to be creative, creating his masterpieces. Therefore, the question of saving is not in last place. Today I will tell you how you can make the basis for drawing yourself.
One of the advantages of homemade foundations is the ability to choose the sizes yourself. Purchased basics for drawing are always made according to the standard. And you can first come up with a size that is suitable for your picture, and then make exactly what you need.
What is the base made from?
The first thing you can pay attention to is what is stored in your home. For example, thick cardboard.
Of course, the cardboard is quite thin, it can warp if paint is applied directly to it, so the cardboard must be glued. For this, ordinary PVA glue is well suited.
The disadvantage of cardboard is that a picture drawn on such a basis can deteriorate over time, because you do not know what exactly this cardboard is made of. (Sometimes it may contain acid, which will affect the quality of the picture).
To prevent this from happening, a special material is glued onto the cardboard.
If you are working with acrylic, then the base can not even be primed, because this paint will not damage the base.
In addition to solid cardboard, plywood or fiberboard is well suited for the base.

What are the advantages of these materials? Of course it's pretty cheap. Suppose you bought a whole sheet of plywood. The most important thing is to somehow bring or bring it home. Then you can calculate how many pictures will fit on this sheet. You get quite a lot.
You will just need to draw on a piece of paper so that you can cut it correctly later, or right on this plywood with suitable sizes, and then carefully cut everything.
It is easier to cut fiberboard into small pieces, because chipping is always obtained on plywood. Then they will not be visible, because a fabric is glued over the plywood.
You can not even stick the fabric on the fiberboard base, the pictures are painted not on the rough, but on the smooth side. Alcohol is used for degreasing. But it is best to apply PVA glue or acrylic emulsion to a smooth surface. Then the natural color will be preserved. If you need a white base, then use acrylic primer.
For a sheet of plywood, you need fabric.
Where can I get this kind of fabric? Stores that sell fabrics. Any fabric will not work. You need to find a natural base, not synthetics, because the paints will begin to interact with synthetic materials, which will ruin your picture.
Linen, linen, coarse canvas or muslin are well suited for these purposes. Muslin is cotton. The most important thing is that the fabric is of natural origin. Now we have to look for such a fabric, because only synthetics are sold.
The fabric can be white or gray, it doesn't matter.

How to prepare our basis for drawing?
Let's assume that you have already prepared a sheet of plywood. Choose the thickness of such a sheet at your discretion. The thinner the sheet, the more likely it is to warp. To prevent this from happening, you can then nail small slats on the reverse side.
If you choose a thick sheet of plywood, then the picture will turn out to be heavy. If it is inserted into the frame, then the weight will be added. And the picture usually hangs on the wall, we must also take this into account.
You need to first cut out one piece of the right size and start working with it. What will we do next?
It is necessary to cut exactly the same size from a piece of fabric, only make it a few centimeters larger, because the fabric will have to be folded to the back.
When you're done with that, prepare the table you'll be working on. Put down newspapers or paper because everything around can get dirty.
We put plywood on the table, carefully place a piece of fabric on the plywood, taking into account the size of the fold.
At this stage, you will need PVA glue and a regular brush.
Not a paint brush, but a flat paint brush.

The fabric must be laid so that there are no distortions in the thread pattern. If from below the threads are directed parallel to the edge, then from above they should also be parallel to the edge of the plywood sheet.
We take a paint brush, lower it into a jar of glue and begin to apply glue. We do this from the middle to the edges, and not vice versa. You can first pour a little glue into a smaller base for ease of use.
This way we get a primed base. When you glue the fabric on one side, turn the base over, you can put it on some box without a lid, then carefully glue the fabric that remains on the hem. Particular attention should be paid to the corners.
Then the base should dry well.
If you don't like the color of the plywood on the back, you can cover it with white paper.
Try not to spread too much glue so that the plywood does not warp after drying.
In this way, you can make as many bases for drawing as you like, it will be much cheaper than buying a ready-made base each time in a store.
If you draw a lot, then these basics can save you money. If you rarely paint, just go to an artist store and buy ready-made canvases.
If you need a stretched canvas on a stretcher, it's easier to buy it at an artist's store.
For acrylic, liquid paint for tinting can be applied to such a canvas and not glued.
Decide for yourself whether to buy or make your own basics for drawing. It depends not only on your financial capabilities, but also on the technique in which you work.
Today I wrote some useful tips for budding artists. I hope that they will definitely be useful to you at a certain stage of your work.
In this tutorial, I will show you 5 different ways to print on wood. These are great methods to allow you to create custom designs such as signs, plaques, gifts, or simply brand your creations.
Step 1: Collect materials
Materials:
- pine board
- Liquitex gel medium
Step 2: Setting up
I tested 4 methods for transferring a drawing from paper to wood and one method using a technique. I used the same image on each board, which had my logo with a large block of text, an image, and normal sized text, so for each application you can see how well the wood responds to different applications.
All pictures were printed on my laser printer (not inkjet). I also mirrored the image so that it displays correctly on the tree.
Step 3: Method 1 - Acetone


The first method is to use acetone to transfer the toner to the wood. All you need is acetone, paper tissue, nitrile gloves to protect your hands, you can also use an old plastic card. When working with acetone, be careful and read the safety instructions.
I put the mirrored picture on the plywood and wrapped it around for a more secure fit. Then I dipped a tissue paper in acetone and applied it to the picture, pressing it firmly on top.
After several repetitions, the toner was transferred to the wood, and the paper lagged behind the wood.
Pros: very fast, decent image quality, clean process
Cons: Image quality is average, acetone is a strong chemical
Step 4: Method 2 - ironing


The next method is to use a regular iron. All you need to do is iron the paper. As in the previous step, I wrapped the paper around the piece of wood, and then ironed it, being careful not to move the sheet relative to the wood. I tried to press hard on the iron, and the iron itself was set to a high temperature, but it seems to me that the temperature was not high enough.
The picture came out so-so, and it seems to me that this was due to the fact that the iron did not heat the paper to a sufficient temperature. I have heard that using wax paper can improve the situation, and some craftsmen transfer the image using a soldering iron with a special tip for branding.
Pros: the cheapest method, done fairly quickly
Cons: poor image quality, the possibility of burning yourself, charring wood or paper
Step 5: Method 3 - Polyurethane Lacquer


The third method is based on the use of water-based polyurethane. I used Polycrylic (this is just the name of the manufacturing company, so you can buy any analogue). You need varnish, an acid brush, a hard toothbrush, and water.
I applied the polycrylic with a small brush, trying to create a thin film that was wet but not puddle. I then pressed the paper directly onto the wet polycril and pressed the paper from the center outwards, removing any air trapped under the paper, and then moved the piece of wood to the side, where it dried for about an hour.
After the blank was dry, I moistened it with water, and then peeled as much paper as I could remove with my hands. Next, I took a toothbrush and brushed it gently over the surface until all the remaining paper was scraped off.
The quality turned out to be excellent! Everything except a small defect on the letter "F" looked very good. I was really surprised by this way of printing on wood.
Pros: excellent image quality, safe water-based coating
Cons: Removing paper is messy, takes an hour to dry
Step 6: Method 4 - Liquitex Gel Thinner


The fourth method was the gel solvent. I used Liquitex gloss, a foam brush, an old plastic card, a toothbrush and water.
The process is similar to the one that used varnish, the only difference is that we have a gel in our hands, not a liquid. It is better to work with the gel with foam, because the brush leaves a lot of tubercles and stripes.
I pressed the picture into the gel and removed the air that got under the paper, first with my fingers, and then with a plastic card. Then I left the blank to dry for 90 minutes, and then scraped off the paper with a toothbrush.
This option also looked great, but there were a few pieces of paper left on the tree that could not be scraped off with a brush.
Pros: excellent image quality, safe water-based gel
Cons: harder to remove than polycryl, the surface becomes rough, takes a long time to dry
Step 7: Method 5 - CNC Laser


So, now let's try the technological method. I had access to a Full Spectrum Laser Hobby 20x12 device and used it to render the same image. Setting up the device is very simple.
Image quality, as expected, was good. The only problem area was the photograph, which proved difficult for the laser to copy. But the text and logo, completely black in the photo, look great.
Pros: excellent text and logo detail, set up and the machine will do everything for you
Cons: Expensive to buy, hard to find to rent, doesn't do well with photography
Step 8: Applying the Finish Coat and Final Opinion


I decided to apply a lacquer finish to the finished work to see how the appearance of the products would change, and this procedure slightly changed my opinion about each of the methods I tested.
The acetone got very dark after varnishing and I liked the final look much more, so I place this result higher than the gel sample.
The option with an iron ... remained of poor quality.
Polycrilic darkened even more and began to look even better. This is a definite favorite in my ranking.
The gel also darkened, but the surface of the wood did not even out, and the pieces of paper that I could not remove were sticking out noticeably. To achieve a result similar to polycrylic, I had to spend a lot more time.
The version on the laser CNC almost did not darken, but became a little more like a scorched tree, the detailing was still excellent.
When you have made a craft, and you do not want to varnish it, then try to paint the craft with paints, because it is so beautiful. In this section, I will tell you how to properly and beautifully paint crafts with different colors.
In order to paint or paint crafts, you will need: brushes of various softness and thickness, as well as a roller for covering large surfaces with paint. And you can use different colors.
Painting with acrylic paints:
Acrylic paints are the most convenient paints for painting plywood products. The paints are bright, durable and require no special solvents. In order for the paint to lay well on the plywood, it is necessary to prime it with acrylic varnish and clean it with fine sandpaper.
For painting use watercolor brushes. They can imitate the brushstroke characteristic of folk paintings by moving the brush forward and at the same time around its axis at different speeds.
Don't dip the brush too deep into the dye - the base of the hair should remain dry.
If you type two or three colors on the brush at the same time, you can get shades and color overflows.
Large solid surfaces can be easily painted with a roller or a large molar brush. Rinse brushes and roller with water after finishing work.
Acrylic paints dry in 6-8 hours. The air temperature should be less than +5 degrees. after the paints have dried, cover the product with acrylic varnish.
Gouache painting:
It is convenient to paint crafts with gouache. To do this, gouache paints are diluted with water to the density of sour cream and a little PVA glue is added to them - for better surface coverage. After painting with gouache, the product must be varnished.
Watercolor painting:
To begin with, the plywood surface must be well, in several layers, primed with white water-based paint. Then go over this surface with a fine sandpaper. Only then can you paint the craft. Try not to draw too much water on the brush. Use gouache as whitewash. This technique is good for painting small boxes.
Cover the finished work with several layers of varnish and polish to a mirror finish. The piece will look perfect.
Painting with oil paints:
For oil painting, you will need a thinner and stiff bristle brushes.
Dilute the paint on the palette to the desired density and - paint.
Oil paints dry for a long time - 2-3 days. So get ready for it. Oil paint does not need to be varnished.
Little trick: if you did not finish the work one day and are going to continue it tomorrow - put the brushes overnight in a jar of water. Then the paint will not dry on them.
Painting with aniline dyes:
And here is a simple folk way of painting a tree using ink and aniline dyes for fabric.
The product treated with sandpaper is primed three times with starch paste, carefully rubbing it into the wood. each layer is dried and lightly smoothed with a stiff cloth. The contour of the drawing is applied to the primed surface with ordinary waterproof drawing ink using a pen.
For painting, an aqueous solution of aniline dyes for wool is taken. Dilute paints in non-food dishes and be careful not to get them in your mouth. And one more thing - try not to spill these paints on the floor, otherwise it will be very difficult to clean the floor later.
Paint products with a soft kolinsky or squirrel brush. It will be more convenient if you have a separate brush for each color.
Of the three colors of aniline paint - scarlet, yellow and blue - you can get a fairly rich color range. And without it, bright and saturated, these colors, superimposed on one another, on a light background will give the brightest pink, crimson and green colors. Burning goes well with painting with aniline dyes. After finishing work, when the paints are dry, cover the product with several layers of varnish.
That's all the varieties of coating crafts with paints.
What is plywood carving? This question, perhaps, arose among many novice masters. Plywood carving is an arts and crafts.There are several types of slotted plywood carving:
- openwork;
- cutting out an image on a painted plywood sheet;
- sawing;
- combination (for example, openwork method + sawing).
Where to begin
- A plywood sheet is used as a blank, on the surface of which there should not be any defects. As a rule, first-class and second-class sheets of glued wood veneer are used for these purposes.
- In order to carry out carving with a jigsaw on plywood, use a material whose thickness is in the range of 3-12 millimeters. The size of the glued veneer sheet depends on the image that should be applied to it.
It is important to know! Cut a sheet of glued veneer along the grain, not across. Therefore, the base must be cut in such a way that the lines of the picture are located along the outer layer.

- Before painting the workpiece, it is necessary to clean the plywood with a file. This process should take place along the edge. Otherwise, sheets of glued veneer will begin to crumble.
- With the help of sandpaper (fine-grained and coarse-grained are used), the surface of the sheet is polished, on which the picture will be cut. Begin to process with a fine-grained knife. The result is a smooth surface. After grinding, the base should be wiped with a damp cloth (thus eliminating working dust).
- Dark colors are used for painting: blue, gray, black. To do this, you can use ordinary paints: gouache or watercolor. However, over time, such paints fade, so it is recommended to use nitro paint. Such a coloring composition fits well. This composition dries for about half an hour.
Important point! Nitro paint, acrylic dyes and gouache are only suitable for contouring. To apply a shadow picture, it is necessary to cover the base with an aqueous solution.
- After the pattern is cut out, its edges should be carefully sanded with sandpaper.
In order to carry out high-quality carving on plywood, you need to think about the drawings in advance. The selected drawing can be printed on a printer or drawn with your own hands immediately on a plywood sheet. They also make carving with a jigsaw on plywood according to a template.

You can also use calque. Through it, a picture is transferred, which is applied to the workpiece. This method is considered the simplest.
Important! Every novice craftsman must remember that the process of creating plywood carvings with a jigsaw begins with drawings. Carving on plywood with a jigsaw, the drawings and templates of which will correspond to what was planned, will turn out to be the most attractive.
Necessary tools for work
First of all, it is worth noting that the tool for cutting material should be selected from steel. Steel cutters are considered more durable. Drills, pieces of wire, needle files or reamers will do.
It is also worth paying attention to sharpening. The tool must be well sharpened, otherwise the plywood will become unusable.
First, you should make a small hole into which the chips will fall in the process of cutting the material.

To carry out slotted carving on plywood with a jigsaw / laser carving on plywood, you will need flat, semicircular and triangular cutters.
Important! The tool must be set at a 45 degree angle.
So, for work you will need:
- sandpaper (coarse-grained and fine-grained);
- file, brace, jigsaw;
- coloring composition, varnish;
- incisors and swab.
How to make a blank
Before proceeding with the manufacture of the workpiece, it is necessary to prepare the workplace. The table on which the workpiece will be made must be durable. If during the work the table accidentally moves or staggers, then all the work will go to the mark. Lighting must be good.
Stages:
- Clamp the cutter with one hand, hold the blade with the other. In this case, the handle of the tool should rest against the palm of your hand. The little finger on the second hand controls the angle of the blade.
- When cutting curved lines, the slope is not done. The pressure exerted on the tool must be controlled. This is necessary so that all lines are the same width.
- After the image has been applied, varnish should be applied in several layers. However, the second coat of bark needs to be applied only after the first coat has completely dried.
If the cut carving on plywood with a jigsaw corresponds to the drawings, then the master did everything right.

Openwork way
Work process:
- The drawing is applied using a pre-prepared template.
- Carry out sawing. Then mark the guide holes.
- Carry out cutting along the inner contour.
- Using sandpaper, the cut elements are polished.
- Fix the workpiece securely. Then mark the places where you need to make holes. To do this, use a rotator. If you need to make small holes, use an awl.
- After the work done, the picture is sawed off along the contour. Then the product is cleaned and polished.
- Sawing is carried out using an electric or conventional jigsaw.

Sawing
It is worth noting that the work process is practically no different from the previous methods. However, many believe that this method is the simplest and most understandable. Sawing is carried out using a conventional jigsaw or electric.
It is worth noting that at the factories, cutting out elements is performed using a laser.
In order for the cutting to turn out attractive, you must be able to work with a jigsaw.
Process:
- The selected image is applied to the plywood sheet. A novice master first needs to choose something simpler, where it will not be necessary to cut out internal holes with smooth lines.
- The workpiece is securely fixed with clamps. If they are not, then you can do without them.
- The saw should be perpendicular to the plane of the base. You need to cut evenly. The hand should move in the direction of the contour being cut.
- Using sandpaper, the product is polished. You should also take care of the edges.
- The product is painted or varnished.

Why is plywood used to create carvings
Currently, such material is actively used not only in the manufacture of decorative elements, it is also used in the manufacture of furniture, subfloor, wall decoration, ceiling and more.
This material is chosen for many reasons:
- not afraid of moisture;
- temperature fluctuations do not have a negative impact on plywood;
- low cost (unlike solid wood, the price of a plywood sheet is much lower);
- ease of use;
- light weight.
It is also worth noting that for the manufacture of crafts and furniture, where carving will be present, it is necessary to choose first-class or second-rate plywood. The remaining varieties (3.4) are not suitable for such creativity, since there are cracks, chips, knots on the surface.

Finally
If plywood was carved strictly following the instructions, while taking into account all the features of cutting and material, then the result will be a product that will deserve everyone's attention. With the help of such crafts, you can not only decorate the interior, but also present it as a gift.
However, in addition to the fact that as a result you can get a beautiful product, the process itself is very interesting and exciting.
Cutting a pattern out of plywood


Also, a good result can be obtained using the following method. On paper, the contours of the image are pricked with a needle. Then the sheet with holes is fixed on the plywood base. Take a small piece of cotton wool and lightly moisten it in ordinary sunflower or other vegetable oil. Run a cotton swab over the ink side of the carbon paper. It will become shiny from the dye. After that, the sheet with punctures is wiped with cotton two or three times with pressure.

Modern technologies
- blank;
- laser printer;
- a computer;
- solvent;
- PVA glue;
After the specified time has elapsed, you can proceed to remove the paper. To do this, fingers are moistened in clean cool water and begin to rub the sheet.
Plywood carving: cutting patterns on painted material, openwork carving and sawing
Then you need to wait a few hours again for the workpiece to dry. Perhaps the sketch will appear vague and hazy. But by making a drawing with paints or a burner, the craft will look bright and colorful.
LUT transfer method
A piece of soft cloth is moistened in acetone and they begin to drive it over the paper. It is important to thoroughly moisten the entire sheet completely, or at least the outline of the picture. When the surface becomes completely wet and almost transparent, streaks will begin to appear on it. Remove the paper carrier and dry the workpiece in a well-ventilated area. This method guarantees high quality of the sketch and maximum accuracy of all contours. The proposed video will help you learn more about other methods for transferring drawings.
How to transfer a drawing to plywood?
In school years, at labor lessons, girls and boys often worked together, for example, in artistic sawing. Some patterns were cut out on plywood with a jigsaw, but before that, the drawing itself was transferred to it using a carbon paper. The teacher of labor always brought an old carbon copy to the lesson, the new one is very dirty and leaves bold lines. The copy sheet was superimposed face down on plywood, a drawing was placed on top of it so that the sheet with the drawing did not move - everything was fastened with buttons. They circled the pattern with a sharply sharpened hard pencil, if there were a lot of straight lines in it, they were drawn with a ruler. Instead of a pencil, you can use a ballpoint pen with no paste.

You can draw a pattern, an ornament yourself immediately on plywood, but this method is for those who draw beautifully.
Currently, you can buy self-adhesive paper with a finished pattern. The sheet is glued to the plywood, then the ornament is cut out with a jigsaw, at the end the paper remaining on the plywood is easily removed.
Transferring a design onto a sheet of plywood is a very simple matter and those who work with plywood know how this process is done. There are several ways to transfer:
First, on a sheet of plywood, you need to put a sheet of carbon paper (carbon paper to plywood) on the carbon paper, smooth out all the sheets and attach the corners with buttons so that the sheets do not suddenly shift during translation.
The second way: if the drawings are large, then they should be transferred through the tracing paper simply by strongly and gently pushing the tracing paper onto the plywood along the lines of the drawing.
We translate the image into a tree
The third way: we take a drawing on tissue paper and simply stick it on plywood; it is better to glue it on starch or cook a flour paste - only a very thin layer is needed and the work is very accurate. We let it dry and cut it right according to the drawing. When the product is ready, when grinding, the paper itself will be removed or slightly wetted with water, then it is quite easy to remove it. 
More questions about your topic:
leave a comment
Builder's vocabulary:: Repair questions:: Calculators:: Special equipment:: Miscellaneous
2006 — 2017 © user agreement:: communication with the site administration max@remotn.ru
Plywood - design technology

In this article, we would like to talk about plywood furniture design.
Attempts to use raw plywood in design have not been developed. The fact is that, for plywood, peeled veneer is used. Unlike planed, the latter does not have a beautiful, pronounced texture. As a rule, for furniture, plywood is always faced with: sliced veneer, plastic, etc.
 Technologies and materials, plywood furniture design
 Technologies and materials, plywood furniture design
 Technologies and materials, plywood furniture design
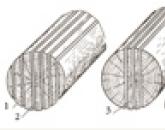
Another design has been developed, when the front, visible part of the furniture is not the plywood plane, but its end. The design is based on the following features:
Cross section at a right angle. At the end, we get "strips", the width of which corresponds to the thickness of the veneer. For standard plywood - 2.5-3mm. But, if we change the angle of the cut, the thickness of the "strip" will increase. The smaller the cutting angle, the wider the strip of veneer. This transition is especially clearly visible for radius, curved surfaces.
 Technologies and materials, plywood furniture design
 Technologies and materials, plywood furniture design
Plywood, unlike bent glued products, consists of veneer layers glued together by alternating longitudinal and transverse layers. Transverse and longitudinal sections differ in color by 1-2 tones. This property is especially pronounced after tinting. The transverse and longitudinal layers absorb the dye differently. As a result, on the cut, we get alternating strips of different colors.
 Technologies and materials, plywood furniture design
 Technologies and materials, plywood furniture design
By cutting out the details of a certain configuration and gluing them together in layers, we can get a product of the most complex shape. Array simulation. In this case, "size does not matter."
 Technologies and materials, plywood furniture design
 Technologies and materials, plywood furniture design
 Technologies and materials, plywood furniture design
 Technologies and materials, plywood furniture design
 Technologies and materials, plywood furniture design
 Technologies and materials, plywood furniture design
 Technologies and materials, plywood furniture design
 Technologies and materials, plywood furniture design
 Technologies and materials, plywood furniture design
By pre-painting each plywood cut in its own color, we can get interesting color combinations. There are technological features. Sometimes you have to paint the veneer, and then press the package. However, the end justifies the means...
Technologies and materials, plywood furniture design
 Technologies and materials, plywood furniture design
 Technologies and materials, plywood furniture design
 Technologies and materials, plywood furniture design
But that is not all. If we change the cut angle along the length, we get a “strip” of variable width. And this already allows you to get a complex, beautiful drawing. By the way, it is this property that is incorporated in the Fine-Line veneer technology.
 Technologies and materials, plywood furniture design
 Technologies and materials, plywood furniture design
 Technologies and materials, plywood furniture design
 Technologies and materials, plywood furniture design
Below is an example of making a bench - step by step technology. Example taken from here:
http://www.sense-life.com/hands/skameika_massivnaya_iz_faneri.php
There are also videos, a detailed description, recommendations for software for 3-D modeling, grinding wheels for volumetric grinding, etc. We only have pictures.
 Technologies and materials, plywood furniture design
 Technologies and materials, plywood furniture design
 Technologies and materials, plywood furniture design
 Technologies and materials, plywood furniture design
 Technologies and materials, plywood furniture design
 Technologies and materials, plywood furniture design
 Technologies and materials, plywood furniture design
 Technologies and materials, plywood furniture design
 Technologies and materials, plywood furniture design
 Technologies and materials, plywood furniture design
 Technologies and materials, plywood furniture design
 Technologies and materials, plywood furniture design
 Technologies and materials, plywood furniture design
 Technologies and materials, plywood furniture design
 Technologies and materials, plywood furniture design
 Technologies and materials, plywood furniture design
 Technologies and materials, plywood furniture design
For those who have read to the end and are interested in technology - a small bonus.
Please note that a beautiful pattern is obtained with wide stripes of variable width. This occurs at small cutting angles. The entire pattern "fits" into the thickness of one sheet of plywood. Thus, it is possible to obtain a spectacular pattern on one sheet of plywood, without gluing. In fact, 3-D milling on a plane is needed.
Drawings on plywood: preparation, modern techniques for transferring to wood
We can talk about the manufacture of facades. At the same time, the technology is simplified to a minimum. No gluing of contour details and subsequent manual grinding is required. I will not "chew" further. For those who understand, there is more than information ... For the rest - "do you need it"?
How to transfer drawings to plywood
Plywood is a practical and durable material. However, products from it do not always look attractive. We will tell you how to decorate such furniture. Almost anyone can decorate it with their own hands. The easiest way is to make ornaments and patterns with paints, pencils, a burner. But how to transfer the picture you like to the surface?
Transferring a sketch using carbon paper

Cutting a pattern out of plywood
For decorating plywood products, ready-made illustrations from newspapers, magazines, and books are often used. Therefore, it is necessary to learn how to transfer the image to plywood. A regular carbon paper will help to transfer the drawing to plywood. You can buy it at any office supply store.

Complex color image on plywood
In order not to spoil the magazine or book, you need to make a copy of the page with the picture. This can be done using any transparent tracing paper, glassine or transparent plastic wrap. To prevent the paper from accidentally moving from its place during translation, its edges should be folded under the sheets of the book and attached with paper clips.

Before copying, the surface of the workpiece must be carefully cleaned of dust, dirt and small grains of wood. Then it is wiped with a cloth dipped in white spirit and dried naturally. The carbon paper is then carefully placed on the plywood and evenly attached with pins or adhesive tape.

A sheet with the selected image is placed on top, and the contours of the pattern or ornament are outlined. It has been noticed that it is better to translate a sketch through carbon paper not with pencils, but with some kind of pointed stick. It can be plastic or wooden, made of durable wood, such as oak or beech.

However, this method also has an important drawback. It is only suitable if the drawings for burning out are of the right size. But to reduce or enlarge the image, you will have to resort to other methods.
Transferring a pattern to plywood or wood with a needle

Also, a good result can be obtained using the following method. On paper, the contours of the image are pricked with a needle. Then the sheet with holes is fixed on the plywood base. Take a small piece of cotton wool and lightly moisten it in ordinary sunflower or other vegetable oil. Run a cotton swab over the ink side of the carbon paper. It will become shiny from the dye. After that, the sheet with punctures is rubbed with cotton two or three times with pressure.

The paint, seeping through the holes, will mark the contours of the illustration on the workpiece with dots. So you can transfer the ornament to any light surface. This method is very convenient when you need to prepare several identical templates. Having made a sketch of the intended picture, clean sheets are placed under it, and then the image is pierced with a needle onto the entire stack of paper.
Modern technologies
But what if you want to make a drawing on plywood with a vignetting tool, paints or pencils, and the desired image is in digital format? A laser printer will help to transfer it to the workpiece. The process is quite simple and after several attempts even a beginner will cope with this task. For work you will need the following materials:
- blank;
- laser printer;
- a computer;
- solvent;
- fine-grained sandpaper;
- PVA glue;
- high-quality varnish (you can use ordinary hairspray).
Before starting the process, the selected picture should be processed in any photo editor. You need to make it a little lighter and rotate it in a mirror image. After that, it can be printed on a laser printer.
Plywood is lightly sanded and degreased with a prepared solvent.
On the front side of the sheet with a sketch, you need to apply a layer of PVA glue. The pattern is glued to the surface of the product in such a way that air bubbles do not form, and the adhesive is evenly distributed. After that, the workpiece should be left for at least a day.
After the specified time has elapsed, you can proceed to remove the paper. To do this, fingers are moistened in clean cool water and begin to rub the sheet. Then you need to wait a few hours again for the workpiece to dry.
How to draw on plywood?
Perhaps the sketch will appear vague and hazy. But by making a drawing with paints or a burner, the craft will look bright and colorful.
LUT transfer method
This method is widely used for DIY PCB manufacturing. Its main advantages are high accuracy and simplicity of the process. Drawings, as in the previous method, are printed on a laser printer. Then put face down on the plywood blank and carefully ironed with a hot iron.
With this method, it is recommended to choose a picture with saturated colors, since the colors will become faded during the transfer process. It is desirable to take paper glossy or coated. Sometimes it happens that the patterns on the surface of the plywood look too pale. To avoid this, experienced craftsmen advise pre-sanding the surface of the workpiece with an emery cloth, and then applying a thin layer of hairspray. However, using this method, you may encounter the fact that the material begins to deform from exposure to heat.
Solvent Transfer
Using acetone, you can transfer drawings very high quality and accurately. The method is quite simple and does not require a large number of tools or complex preparatory work. By means of a laser printer, the composition you like is printed. The image is applied to plywood and fixed with buttons or tape.
A piece of soft cloth is moistened in acetone and they begin to drive it over the paper. It is important to thoroughly moisten the entire sheet completely, or at least the outline of the picture. When the surface becomes completely wet and almost transparent, streaks will begin to appear on it. Remove the paper carrier and dry the workpiece in a well-ventilated area. This method guarantees high quality of the sketch and maximum accuracy of all contours. The proposed will help to learn more about other methods of transferring pictures.
http://thefanera.ru
How to transfer drawings to plywood
AMBALLAGE
consumables for product packaging (paper, plywood, ropes, etc.)
the roughest calico with an embossed pattern in one color; heel on paper fabric
PLUGING
a pattern made of another material that is pasted onto something
BURNING
a way to draw patterns on wood with a heated metal tip
drawing patterns on wood
designation on the fabric of a pattern for embroidery
EMBROIDERY
creating patterns on clothes, fabrics from threads
complex, whimsical pattern on fabrics
pattern on fabric
creative fabric pattern
groove pattern on the window frame
Guilloche
engraving on a special, so-called. guilloche machine drawing in the form of a pattern of various combinations of lines
These words were also found by the following queries.

Popular
- How to choose a CNC milling machine (milling cutter) for wood with your own hands
- The easiest way to transfer any image to fabric or wood How to paint on plywood with acrylic paints
- Order on the provision of one free day from work per week to prepare for writing a thesis
- CNC milling machine for the manufacture of straight and curved facades
- Underground greenhouse - a new trend or a forgotten technology
- Decoupage of caskets: master classes and ideas for decoration Decorating wooden caskets with your own hands
- How band saws are welded
- When and how did the first zoos appear?
- Organization and holding of the graduation party
- Winter patterns on glass painted with frost What are the names of patterns on windows in winter