Original ideas for decorating the box with your own hands. Decoupage of caskets: master classes and ideas for decoration Decorating wooden caskets with your own hands
To protect the surface of a carved box or other wooden object, it must be varnished. A transparent polyurethane varnish will emphasize the texture of the wood, make the surface shiny and protect it from moisture, dust and wear.
1. Before varnishing, the surface must be prepared: cleaned of dust and other contaminants, if necessary, degreased.
2. We put the box on a pre-spread piece of wallpaper upside down.
3. From a distance of 20-25 cm, apply a thin layer of varnish, after 3-5 minutes - another layer.
5. When the bottom of the box dries, it must be turned over and varnished from above and from the sides, and if desired, from the inside. Varnish also in thin layers with an interval of 3-5 minutes.
ADDITION
In the same way, you can varnish any new wooden products, as well as restore furniture. For varnishing hard-to-reach places, a special tube is supplied with a can of Bosny polyurethane varnish.
ATTENTION:
1. Lacquer should be applied at room temperature in a room with good ventilation.
2. Shake the can well before use.
3. After use, turn the can upside down and press the spray button until clean air comes out. After that, the can with the remaining paint can be stored until the next time - the sprayer will not have a dried coating that would clog the sprayer valve and prevent reuse.
4. It is recommended to use objects painted with polyurethane varnish not earlier than in a day, when the coating is completely dry.
Many women have been keeping old things for years, which they can’t even throw away, and they are no longer suitable for everyday use. For example, painted wooden boxes. But any junk can be easily given a second life! If your jewelry and jewelry are stored in many different boxes, then the grandmother's jewelry box can become the center of unity of gizmos dear to the heart. Of course, after a thorough alteration of its external and internal content. A little patience and time, minimum costs and maximum pleasure will be provided!
Materials for work:
1. Wooden box - 1 piece;
2. Beads - in quantity along the perimeter of the bottom and lid of the inside of the box;
3. Velvet paper - 2 sheets;
4. Craquelure varnish - 1 jar;
5. Printing paper color - to cover the side and top of the box;
6. PVA glue - 1 pencil;
7. Thinner, sandpaper, brush, scissors, paints, skewer for spot painting, paper knife, eye shadow in the color of the printout, plasticine spatula, liquid nails glue.
Stages of work:
The first stage: we remove the former beauty from the surface.
To facilitate the removal of the painted pattern, it is necessary to remove the upper lacquer fixing layer with a solvent. We moisten a cotton swab with any solvent and carefully wipe the entire box with it.

After the solvent dries, remove the remnants of the former luxury with sandpaper. We clean until the surface is smooth.

The second stage: preparing the base.
When using dark tones for the base, they can be applied in their pure form. If the base is light, then using a pure white color will lead to a dirty tint after applying the varnish. Therefore, we dissolve whiteness in a drop of “ocher” color.

We apply a couple of layers of gouache paints to the entire surface of the box.

Let each layer dry thoroughly.

Third stage: imitate.
In the absence of a suitable beauty of decoupage napkins, you can use a color printout of your favorite drawings. In the presented version, colored borders are used for the background of the side parts of the box, and a combined frame and pattern are used for the front side.

We cut off unnecessary moments from printouts.

We combine the frame and the picture.

We apply a thick layer of PVA glue on the back side.

We press firmly to the surface of the box, carefully smoothing every millimeter of the pattern.

We close the box tightly and fasten the printed borders to the sides.

Carefully use a paper knife to cut through the junction of the lid with the box.


So that the printout does not look like a separately existing spot, we tint the places of the box free from the pattern with green eyeshadow.

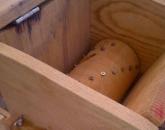
The fourth stage: we imitate dot painting.
On the parts of the box that are not covered with printouts, we apply a “golden mesh” with a plasticine spatula. To do this, we slightly touch the surface of the “golden” paint and press the spatula against the box, drawing curved lines, first in one direction, then in the other. The mesh in some places turns out to be crooked, but decoupage varnish will mask this drawback.


With a skewer for applying dot painting, we put dots at the joints of oblique golden lines. In the absence of a special skewer, you can use the back of a thin brush or a sushi stick.


Fifth stage: multiple varnishing.
We cover the entire surface of the box with acrylic colorless varnish in several layers. At this stage of work, you will have to patiently apply varnish on each side of the box separately to avoid the formation of smudges. Dry each layer of varnish thoroughly. Layers must be at least 2.

After the last layer of acrylic varnish has dried, we apply a thick layer of craquelure varnish (for beginners: craquelure varnish is sold in art stores, for the formation of rough and large cracks it is better to use a craquelure pair, applied with movements in one direction, brushing over the place of application only once). We dry.

For a clearer selection of cracks, they can be gently wiped by dipping your finger in paint (ocher) and gently running it over the surface in both directions.


After the paint has dried in the cracks, soak a cotton pad with water and remove excess paint.


We varnish the entire box with acrylic varnish.

The sixth stage: paint the inner side parts.
We apply gouache paints on the sides of the inner surface of the box.

We paint the outer sides, imitating a bitmap. At the same time, we “mask” the convex part of the fastener with “golden” strokes.


We shade the inner sides with “gold”, applying arbitrary brush strokes.

The seventh stage: we give the surfaces a velvety touch.
From velvet paper, cut out the details according to the size of the bottom and lid of the inside of the box. From the remnants of the printed borders, we select several motifs, cut them out.

On that part of the velvet paper, which we will attach to the lid, we impose the cut-out motifs of the borders, forming their location.

We turn over the motives, draw around the contour.
Despite the fact that shop windows offer a large number of jewelry boxes made of various materials, the desire to make it with your own hands does not disappear. After all, this is not only a tribute to one's talent and skill, but also the desire to have an original thing that no one else can find. In addition, it is of great importance that a hand-made box will have exactly the size that is so necessary to place all the jewelry.

The box is made by hand in two stages:
1) Creation of the box itself from improvised materials;
The material for it can be scotch rings, wooden blocks or baguette trimmings, old newspapers, shoe boxes, and other improvised materials.
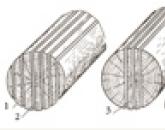
Tape reel box
Tape reel box
If a small box is enough for jewelry, then you can make it from a paper tape reel. The size of the finished product will correspond to its diameter and height.
For work you will need:
reel freed from adhesive tape; thick cardboard; pencil; scissors; glue (preferably PVA).
For the bottom and lid of the future box, you need to make cardboard blanks. It is enough to attach the reel to a sheet of cardboard and circle with a pencil. We circle the resulting circles with another circle, the diameter of which is 3-4 centimeters larger than the previous one. These are the future rays with which the circles will be glued to the bobbin. Don't make them too wide. The narrower they are, the more accurately the bottom will stick. The end result looks like this:
Before gluing the bottom to the bobbin, it is necessary to draw along the fold line with a non-sharp object, you can use the edge of tweezers or a metal ruler. This will help to gently bend them. To hide the petals on the side, you need to stick a cardboard tape over them, corresponding in length and width to the side of the reel.
For the lid, you will need to cut a strip, slightly longer than the volume of the reel and half its height wide. In order for the lid to fit well, not to be too large, you need to wrap the future box with a strip and glue its edges. When the side of the lid is dry, you need to glue the top to it in the same way as was done with the reel.
To strengthen the rigidity of the bottom and the lid, you can glue one more layer of cardboard inside, cut along the inner diameter of the reel. The finished box is decorated with your own hands using the decoupage technique, it can be painted with acrylic paints and varnished or glued over the entire surface of a self-adhesive film with a pattern that imitates natural material: wood, stone.
DIY wooden jewelry box
The manufacture of such a box is more laborious than in the previous version, but it will also serve much longer than paper. For work you will need:
pencil, ruler;
a long plank 10 millimeters thick, 10 centimeters wide, made of soft wood: pine, alder, linden; a plate for the bottom and lid, its width is equal to the width of the finished product; hand saw with fine teeth or electric jigsaw; knife; sandpaper; PVA glue (it is better to take construction) or carpentry "Moment".
Having decided on the size of the box, you need to cut out two blanks from the plank, equal to its length and width. At the end of each, it is necessary to make a 45-degree bevel with a knife so that the walls fit nicely. The depth of the bevel is equal to the width of the plank.
Before gluing the side parts, you need to make sure that the bevels fit snugly, without gaps. Otherwise, they must be adjusted with coarse sandpaper. The sides are glued together gradually. After each subsequent gluing, it is necessary to check the internal angle between them. It must be equal to 90. Otherwise, the result may be any shape, but not an even rectangle.
There are two bottom options:
if the finished product will be pasted over with paper or cloth, then the blank for the bottom is taken equal to the size of the box and glued so that its side parts are visible;
Wooden box covered with paper
if a jewelry box with your own hands is covered only with varnish or paint, then it will look more beautiful when the bottom is hidden inside it. For this, a blank is taken, in length and width smaller than the size of the box by two thicknesses of the plank. For example: with a box size of 10x10 cm and a wall thickness of 1 cm, the bottom should be taken 8x8 cm.
Lacquered wooden box
The manufacture of the cover can also be in two versions:
cut the workpiece and install it on the hinges. The best option for attaching the lid is a piece of piano loop, the length of which is a couple of centimeters shorter than the length of the box. All ends of the boards visible on the finished product must be carefully processed with sandpaper;
glue the lid to the box and, after drying, carefully cut it off with an electric jigsaw, retreating down the body by one and a half to two centimeters.
A wooden jewelry box is decorated with all known methods: varnishing, painting, decoupage, pasting with oracal, fabric, leather.
Do-it-yourself box from a baguette
Luxurious baguette box
Boxes made of a baguette, a material for picture frames, look chic and rich. It is made of wood or plastic. Plastic is soft, can be cut and processed no worse than wood. You can buy a baguette in art salons, having previously determined how long the blank is needed. The principle of manufacturing such caskets is identical to working with wooden blanks.
DIY jewelry box made of papier-mâché
Papier-mâché box
What is papier-mâché, how to work with it, we know from the school bench. The advantage of this material lies in the variety of forms of the finished product. It is enough just to find the original blank of the required shape to create an original box.
For work you will need:
newspapers or thin office paper; vaseline or any cream; scissors, brushes; PVA glue or wallpaper.
Do-it-yourself papier-mâché box
The base must be covered with petroleum jelly or cream, so that later you can easily remove the papier-mâché. The first layer of thinly torn paper must be wetted and covered with the entire surface of the base. Paper for the second and each subsequent layer is carefully smeared with glue. You need to make sure that there are no missed sections. It is convenient to alternate, for example, layers of newspaper and white paper. The better the paper is impregnated with glue, the stronger the papier-mâché will turn out. The number of layers is optional. After complete drying, the blank of the box must be removed from the mold and prepared for decoration. If it is a painting with paints, then it must be coated with an acrylic primer. In addition to painting, a do-it-yourself box can be decorated with beads, ribbons, buttons, figurines made of plastic or salt dough.
Chinese papier-mâché box
If the basis for papier-mâché was a round object, the lid was created together with the box, then it is necessary to remove it carefully, having previously drawn a cut line with a pencil. If the layout was created without a lid, then after removing it from the base, you need to align the edges with scissors. The lid is attached to the box before being treated with a primer. Holes for the connecting cord can be made with a paper punch.
Decorated box with their own hands is opened with varnish. It is better to use an acrylic-based varnish purchased at an art salon. Artists cover their canvases with this varnish to avoid contamination and fading of paint.
DIY box from a bamboo napkin
For work you will need:
bamboo napkin; thread with a needle, PVA glue; scissors, cardboard, finishing cloth; magnetic fastener.
Cut out the sides of the future box of arbitrary shape from cardboard.
Sew or glue decorative fabric to them on both sides, leaving a small allowance for the seams. A bamboo napkin can also be decorated with a fabric on the side that will be inside the box. The sides can be sewn or glued to the napkin, leaving some part free.
The clasp can be made in the form of an eyelet and a button, or you can purchase a magnetic clasp at an accessories store.

So that the jewelry box does not get dirty and has a neat appearance for a long time, it is better to open it with acrylic varnish.
Several ways to decorate boxes
Below are photos of jewelry boxes made using different decoration techniques.
For lovers of rigor and minimalism in everything, it is enough to make the box monophonic, covering it with paint and protective varnish.
Decoupage decoration technique has recently become fashionable, but has already become very popular. A large assortment of illustrations for decoupage, up to images of paintings by great artists, is produced on special napkins. You can use regular napkins, magazine illustrations, and even wrapping paper. You will also need sharp scissors, a few brushes, PVA glue, paints, acrylic varnish. Before starting work, the surface must be primed with acrylic paint or glue. Carefully smooth each element of the image with a brush dipped in glue until it is completely glued to the surface and air bubbles come out from under it.
Proportions for salt dough: 1 part flour (the cheapest without additives) to 3 parts salt, mix and add water until the consistency of soft plasticine. Decor elements from dough, unlike putty, are first made and then glued to the surface.
After drying, the decor must be covered with two layers of white acrylic paint. Painting is also best done with acrylic. After drying, apply one or two coats of varnish.
Below are photos of jewelry boxes decorated with beads, seashells, fabric and ribbons:
Jewelry box decorated with beads
A handmade box will not only decorate your interior, giving it a personality, but can also be a great gift for any celebration. And the material for its manufacture will be any household item or donated by nature. The main thing is a little imagination and perseverance.
Every woman and girl has a personal box in which she keeps jewelry, cosmetics or other things. You can buy a box in the store or create a unique item with your own hands. To do this is not so difficult. The main thing is to choose the most appropriate way of decorating.

Handmade jewelry box in classic style

Shabby chic style is gaining more and more popularity every year.
You can decorate the boxes with anything. Buttons, paper flowers, beautiful napkins, lace fabric, clay, beads, beads, colored glass, coins and so on are useful for decoration. The uniqueness of the jewelry is limited only by the imagination of the master. Of course, the set of tools and materials will largely depend on the decoration technique.
In most cases, the caskets are made of wood. To get a well-executed creation, special attention will need to be paid to the initial stage of preparation:

Light motifs of nature on a box in the style of Provence

Stylish box made from improvised means
The most popular is the decoupage technique, known to masters for several centuries. Napkins, beautiful pictures, pieces of fabric are useful for decoration. Both a professional and a novice master can decorate a box using decoupage technique.
You can create a relief cover of the box with your own hands. In this case, come in handy: relief paste or modeling gels, stones, shells, beads and other volumetric elements.
If you have at least minimal artistic skills, then the box can be painted. There are many styles: Khokhloma, Gzhel, Gorodets painting. You can draw your own unique composition.

Mohair fabric inside the box

Chic vintage jewelry box created using decoupage technique

Such a box will perfectly complement the interior.
Decoupage
To work, you will need the following materials:
- napkins, magazine clippings or scraps of fabric;
- PVA glue;
- acrylic paint;
- brushes;
- scissors;
- sandpaper.
At the first stage, the box is prepared for decoration. The surface must be perfectly smooth, as subsequently all defects may become more noticeable. When the product is prepared and dried, you can proceed to the design:
- Cut and try on elements of the composition from napkins or fabric.
- Attach the cutout to the surface and carefully apply the glue, smoothing the paper from the center to the edges. If fabric is used in the decoupage technique, then glue will not work, it is better to take a stapler and attach the fabric to the inner lining of the box.
- Dry the product.
- Coat with varnish (if using fabric, this step is not necessary).
Using the decoupage technique, the box can be decorated both outside and inside.
Advice! For decoupage, you can use various photos. But first it is better to remove the bottom layer so that the paper is thinner.

Stylish vintage never goes out of style

A box with mohair fabric will be both practical and a wonderful decor for the interior.
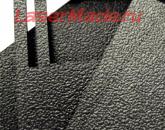
Vinyl wallpapers
For the decoration of boxes, you can use the remnants of vinyl wallpaper. Thanks to simple actions, you can make a unique object with a "metal" coating. For this you will need:
- wallpaper;
- PVA glue;
- towel (preferably disposable paper ones);
- acrylic paints of several colors (black, bronze, scarlet, silver, green, gold);
You can decorate both the entire box as a whole, and certain elements. To perform the work, take the following steps:
- Cut out pieces from the wallpaper, taking into account the allowances for the sides.
- To glue the surface in an even layer, glue is applied to the back of the paper. Glue can be slightly diluted with water. The base should be very well saturated with the resulting solution.
- The paper needs to lie down a little, and then it is pressed tightly against the box with a sponge.
Important! It is imperative to ensure that bubbles do not appear.

This handmade box will be an unusual gift for family and friends.

Classic box in vintage style

Vintage box made in the technique of craquelure
After the described actions, the product should dry out and then really give the box a metal look.
Attention! The paint is applied with wet towels, it should lie unevenly.
- Initially, black acrylic paint is applied as a base. You can use a dark color in a spray can.
- With the help of towels, the box is covered in red and dried.
- The next layer is silver, and then bronze.
- After that (in a small amount!) Black and red colors are repeated
- Now carefully, using a damp towel, cover the entire box in green.
- The last layer is gold.
After the box dries, it is varnished.

Exquisite jewelry box decorated using decoupage and craquelure technique

Box in Provence style, made in different colors
painting
To paint a product, it is not necessary to have the talent of an artist. In addition, stencils can be used to decorate the box. You can choose absolutely any image, it all depends on your imagination and preferences. For work you will need:
- box or box;
- primer;
- acrylic paints;
- brushes;
- stencil (you can make it yourself or buy it in a specialized store);
- masking tape;
- sandpaper.
Advice! It is better to pre-treat the box with sandpaper and varnish.

One of the features of the shabby chic style is floral motifs.

Standard mustard-colored box with ribbons - simple and beautiful

Stylish box made using decoupage technique
The work includes several stages:
- Primer coating.
- Sanding.
- Tape the bottom corners.
- Finished with light acrylic paint.
Important! Acrylic is applied evenly.
- After drying, the surface is treated with sandpaper and a layer of paint is applied a tone darker. This layer should be liquid so that you can then wet it with a sponge, giving the surface a texture.
- Fix the base with varnish.
- Masking tape covers the parts of the box that will not be decorated.
- The selected stencil is fixed.
- The drawing is carefully painted over. The paint should be thick, water is used in a minimal amount.
Perhaps, after drying, the drawing will have to be repainted, since the first time the color is likely to be pale. If the stencil is a small element of the composition, then the action will have to be repeated several times. After the painting has dried, the box is varnished.
This master class allows you to create a product whose surface looks like fabric. This is achieved due to the fact that between the main layers the box is varnished, and the paint does not impregnate the wood.

The box decorated with beads and leaves looks very beautiful

This type of decoration of the box will be an excellent addition to the interior or an original gift.
Volumetric decor
The next master class is devoted to creating volumetric decor with your own hands. Here again the decoupage technique will be used. For work you will need:
- casket;
- printout of the picture in two copies (on glossy and matte photo paper);
- acrylic paints (it is better to choose glossy);
- putty;
- palette knife;
- sandpaper;
- acrylic paints of different colors;
- brushes of different numbers (No. 1 - a must!);
- felt on an adhesive basis;
- lace, ribbons;
- thick glue;
- scissors;
- primer;
- masking tape;
- transparent, quick-drying and reliable glue (you can use "Moment").
The surface is pre-prepared with sandpaper. At this stage, it is worth considering that the paint will give a certain thickness to the walls and the lid may not close tightly. Therefore, at the junction, it is necessary to sand the tree especially carefully. After that, the surface is primed.

Shabby chic style combines a large number of details

Decorating the box with beads will make it brighter and more presentable.

Provence blue box
Registration is carried out in several stages:

Advice! If folds cannot be avoided, then you can drive them away to different leaves or flower petals, and then “hide” them behind the drawing.
- The dried surface is fixed with varnish.
- To create volume, putty or structural paste is applied to certain elements of the pattern. The layer should not exceed three millimeters. Leave an indent from the edge.
- The bulges are treated with sandpaper.
- From the second drawing, images are cut out along the contour, which should be three-dimensional and glued to the lid.
- After drying, the contours are drawn with acrylic paints.
- The rest of the product is decorated and varnished.
Thanks to the master class, you can easily make an original box with a three-dimensional pattern with your own hands.
Video: DIY box decor
There are situations when there is a desire to please loved ones with an unusual gift. I want to find something interesting, some exclusive little thing. Sometimes you need to go around more than one store for this. And you can make a bright and unusual gift with your own hands. For example, decoupage a box and give it as a gift.
Decoupage often turns into a permanent hobby, and people who have decorated any item themselves at least once simply cannot stop. This technique is used to decorate not only caskets, but also bottles, jars, antique chests of drawers.

If you decide to try the decoupage technique for the first time and don’t know where to start, you can get ideas from the Internet. Having chosen the thing you like and having prepared all the necessary tools, you can get to work.


What is needed for decoupage
Before you start decorating the box, you should prepare all the equipment you need for work. Get in advance: napkins, sandpaper, decoupage glue, paints, a wax candle, adhesive tape and other raw materials for decoration, a screwdriver.

The list of required materials may vary depending on the chosen style. Be sure, before starting the decoupage process, you need to prepare the working surface of the wooden box.


Decoupage technique
After preparing all the necessary equipment, you can begin work on the box. Consider step-by-step instructions on how to decoupage the box with your own hands. Wood is considered to be the most ideal raw material for decoupage. It is the easiest to process and decorate.

Execution steps
The first and main step is the preliminary preparation of the working area of the box. Since we are talking about wood, the entire surface of the box must be thoroughly cleaned with sandpaper. The quality of the treated area affects the quality of decor application.

The second step is the removal of all elements from the metal. You can use a screwdriver to complete this task. After removing these parts, the working area must be completely covered with acrylic paints, the so-called toning must be performed.

The third step requires accuracy in execution. It is necessary to transfer the selected image to the treated area. In shops for creativity, a wide range of napkins for decoupage is presented.


In a set with them, there is usually an instruction for beginners. It correctly describes how to carefully separate the part with the image from the rest of the napkin.

The next step is to fix the transferred image on the working area. To do this, use specialized glue for decoupage. Before moving on, you need to wait for it to dry completely.

The final step will be varnishing the box. To improve its appearance, varnish is applied in several layers. After the varnish has completely dried, you can start decorating the box. We attach all the metal elements to where they were originally.

The decor of the box is influenced by the decoupage style, which was chosen at the very beginning. According to him, there are situations when you do not need to add decoration elements. Or vice versa, when decorating the box, they add different details and replace the accessories.

Styles in which decoupage is performed
If, when choosing a gift, the choice fell on the execution of a decoupage box, then you need to figure out what varieties it is.

Depending on the technique of decoupage, there are several varieties of it:
Execution of the box in vintage style. This is a well-known technique for decorating a wooden box. Its essence lies in special aging. There are many master classes on making a box in this decoupage style. But the meaning of all of them comes down to one thing: the paint is applied in several layers and with excellent shades.

The darkest shades of the selected paint are used under the base, then we treat the working area with varnish and leave it to dry. When the varnish dries, covers the area with candle wax. This manipulation will slightly erase the varnish and help achieve the desired effect.

The next step is to cover the entire working area with paint of a lighter shade. We are waiting for complete drying and process the areas with wax with sandpaper. We clean everything down to a darker layer of paint. We thoroughly wipe the box from working dust and leave to dry completely.

To emphasize the antiquity of the box, it is possible to process the corners on the box with a sponge. You need to do this with a dark shade of paint. The image that is applied to the box can be picked up on the Internet or in a store.


Provence variety. It is characterized by the use of light paint. More often, this technique performs the transformation of rounded caskets.

A variety of shabby chic in terms of execution technique does not differ from vintage and provence. A distinctive feature is the use of light shades, floral themes. This style is used when decorating different surfaces, and not just boxes.

To create a more complete picture of the distinctive features of all styles, you need to consider photos of decoupage boxes. There are many of them on the Internet.

Photo decoupage boxes


Popular
- How to choose a CNC milling machine (milling cutter) for wood with your own hands
- The easiest way to transfer any image to fabric or wood How to paint on plywood with acrylic paints
- Order on the provision of one free day from work per week to prepare for writing a thesis
- CNC milling machine for the manufacture of straight and curved facades
- Underground greenhouse - a new trend or a forgotten technology
- Decoupage of caskets: master classes and ideas for decoration Decorating wooden caskets with your own hands
- How band saws are welded
- When and how did the first zoos appear?
- Organization and holding of the graduation party
- Winter patterns on glass painted with frost What are the names of patterns on windows in winter