Crafts from faceted glass cups with your own hands. Do-it-yourself glass painting for beginners and experienced decorators
decoupage of glasses with cloth
In this master class lesson, let's work with the most common faceted glasses (although, to be honest, it is more difficult with faceted glasses), decorate with a cloth, after that they should turn out to be such pretty vases:
We need to work:
1. The simplest glass
2. PVA glue (preferably thick)
3. You will laugh ... yes, ordinary women's tights, the greater the thickness and density, the better
4. Plastic, salty tight dough or ready-made decoration (we have angels)
5. Primer, paints, gel
6. Foam rubber or paint brushes
7. All sorts of little things - sparkles, pearls, beads, etc. everything at hand
| cup | paints | glue and pantyhose |

| 
|
|


|
|

And now we begin.
Wash the glass thoroughly, degrease and dry. We cut off the tights one and a half times longer than a glass.
If the glass is 20 cm, then you can cut off the pantyhose 28-30 cm ... if it is longer, then there will be a lot of folds.
They cut it off, soaked it - we pull it onto a glass and fasten it on the side by twisting the tourniquet, and from below, at the bottom, pin it with a pin.
We form a beautiful drapery and dry for a couple of days

While we have 2 days everything dries out of plastic or tight salted dough, we make angels. You can see how to make salt dough for modeling. If desired, you can replace the angels with something else from the store.

We paint the angels in angel colors and leave to rest

When the folds on the glasses dry, we begin to paint, first we coat each fold with soil, dry it, and prime it again.
This and the color of the tights will allow you to paint over and give strength to the folds.

After drying, you can paint in the intended color.
We have it in pink, we lighten the folds with mother-of-pearl paint and shade with pink glitter gel.

Then we glue angels, pearls. pearls can also be tinted with glitter gel ...
If you want to paint wine glasses for yourself or as a gift, for a wedding or a themed party, you can be sure that you will get great pleasure from creativity - because it is done easily, quickly and inexpensively.
Before proceeding to step by step master class for painting glasses with your own hands, you need to decide on the future design of your wine glasses, so we suggest you get inspired and draw original ideas"glass" decor in the next chapter.
The painting of glasses and wine glasses can be different in terms of drawing technique, in terms of complexity, use of materials and, of course, in terms of subject matter.
Master class number 1: Glasses in the style of confetti
Glasses decorated with small peas look very festive and can be as elegant as in the photo below, or cheerful multi-colored. Circles are associated with champagne bubbles or bright confetti.
Difficulty level: very simple.
What you need: acrylic or contour paints on glass and ceramics, regular nail polish (but acrylic paints are much more stable) or a special marker for painting dishes will also work. To degrease wine glasses, prepare nail polish remover, degreaser or alcohol, for drawing - cotton buds, a pencil with an eraser on the end or a small hard synthetic brush, and for correcting the picture - cotton pads and sticks.
Painting technique:
- Thoroughly wash and degrease the glass with alcohol or other means using cotton pads or a napkin.
- Now you can start drawing circles. Squeeze some paint into a small container or just onto foil (paper, file).

Turn the glass over and start dotting from top to bottom, keeping the same interval between them. You can draw dots as in this master class, that is, starting from large to small, gradually increasing the distance between them. Otherwise, the dots can be the same size, different in color, and they can also form a pattern or pattern (point to point or pique technique), as well as slightly overlap each other.
Advice:
- It is convenient to put large dots with a pencil eraser, and small dots with a brush or a cotton swab with a pointed end as in the photo below (scroll).

- It is better to maintain a distance of about 2 cm from the edge of the glass to the picture, especially if the paint is toxic.
- If you draw with contours, then first you need to practice on paper to put small, medium and large dots at the same distance from each other and with the same degree of pressure on the tube.

- Now you need to let the paint dry. Drying methods largely depend on the paint, usually the manufacturer indicates the drying time and firing instructions.
- As a rule, painting with acrylic paints or outlines requires firing if you want to use the glasses often and wash them in the dishwasher. To do this, put the glasses in the oven at a temperature of 150-170 degrees for 30 minutes, and then turn off the oven, and without removing the glasses from it, let them cool naturally;
- Markers dry in 24 hours and do not need to be fired;

- Nail polish dries quickly, but the design will not last long, so for decorating gift or wedding glasses that you want to keep as a keepsake, this option is not suitable. But for holding theme parties You won't find better paint.
And here are other ideas for painting glasses with multi-colored polka dots that will decorate any party at a fun party (swipe the photo to the right).


Polka dots of gold, silver, white colors are more suitable for decorating wedding glasses.

By the way, circles can be not only drawn, but also glued. You can buy self-adhesive vinyl paper of the desired color and cut circles out of it using a hole punch or special scissors, and then carefully stick them onto the glass. The photo below shows glasses decorated in this way.

Master class number 2: Artistic painting of glasses
In this master class, we will turn glasses into flowers, because its stem looks so much like a stem, and the bowl looks like a bud.

Difficulty level: average.
What you need: any degreaser, cotton pads and cotton swabs for degreasing and pattern correction. And for painting, prepare artistic synthetic brushes of different sizes, a plastic plate or palette for mixing paints, as well as acrylic paints for glass and ceramics. If you wish, you can supplement the drawing with contour and stained glass paints, markers and glitter.

Drawing technique:
- Degrease the surface;
- We mix paints on a plate or palette, achieving the desired shades. In order to make the color pastel and delicate, colored paint is mixed with white;
- Now we need to draw the stamens: we put dots with a narrow small brush or a cotton swab with a pointed end. The color of the pollen can be black, yellow or orange. In our master class, yellow is used to draw the stamens of a lilac Italian aster and black is used for sunflowers.

Further, the drawing of the flower will be layered, so you need to wait until the drawn stamens dry. You can dry them naturally by leaving them for 2 hours, or bake them in the oven at 150-170 degrees for 15 minutes.
- Once the painted pollen dries, you need to draw the petals as shown in the photo below. If desired, draw the details - veins and color nuances. Then you need to let the paint dry (see point 3).

- The last step is to draw the pedicel and stem in green and bake our glass flower again, but now for 30 minutes - and then the paint from the glass will not “peel off” for a very long time.

Well, that's all, the decor of wedding, gift or holiday glasses is finished.

In the photo below, you can find other interesting ideas for painting with floral and plant motifs (scroll).

And here are examples of painting on glass with peacock feathers.

The theme of flora and fauna is also very popular.

Glasses for the festive serving of themed parties can be decorated brightly and funny.

Glasses as a gift or for a wedding can be additionally decorated with rhinestones, feathers, pearls, sparkles, ribbons and other decor.

Other methods and secrets of painting on glass: how to dry a glass with a stained stem and use a stencil or sketch
- If you want to completely paint over the base of the glass, that is, paint over its bottom from below, then you need to dry it in a suspended state or by carefully placing it on a home-made paper structure and four buttons as in the photo below.

- Painting on glass is easier to do using a sketch-substrate, drawn by yourself or printed in the right size on a printer. You can also use the pattern on the napkin. The paper with the image must be laid on the bottom of the wine glass, aligned and glued with adhesive tape as shown in the photo.

Stencils will also help in painting on glass with your own hands. For this you need:
- Draw them yourself or print a picture from the Internet, and then cut it out with a clerical knife;

- Buy ready-made stencils in a craft store, which are very easy to stick and peel off;

- You can draw stripes, geometric abstractions and simple stencil drawings using ordinary or masking tape;

- You can get the effect of an openwork pattern if you use lace as a stencil.
Tip: you can apply inscriptions or images through a stencil with a special matting paint on glass with the effect of hoarfrost or frost, which is sold in art or online stores. An example of such a decor is in the photo below.

Original and eye-catching cup crafts are always a great way to have fun decorating a room. If you turn on fantasy, then it is quite possible to create a bright craft, appearance which will be incomparable.
Photos of crafts from cups on the Internet will make it possible to understand that if you wish, you can create something interesting and unusual, exclusive.

Also, parents should learn a simple thing, many psychologists say that by creating such crafts, doing work with children, you can not only get close to them, showing your love, but it is also a great way to develop fine motor skills of hands, develop perseverance.

How to make crafts from cups?
In order to make interesting crafts from cups, first of all, you need to understand what exactly you want to get as a result, for what purpose you are doing this. For example, it is quite possible to decorate a festive table with such products, and if desired, it is quite possible to make one or another figurine that can only interest you.


Lanterns, a mini-lamp can serve as the main materials for such accessories, and various figures can be safely attributed here. The result is a romantic atmosphere.
Know that the most relevant and popular are considered to be certain products that will be cut with scissors. For example, it is possible to create artificial flowers, balls, certain objects.

Do not forget about the creation and application, but in this case, you just need to stick certain elements on the glass, even a kid at the age of five or six can make such a composition.

Simple do-it-yourself crafts made from cups for children will always bring only joy and vivid emotions.

Pencil cup
If you decide to make such a craft with your children, then you should know that you can teach kids to use plasticine, to see a new application even in simple, ordinary objects, which is important.

To work, you need to prepare plastic bottle, and it can be from milk, kefir, plasticine, scissors, but of course, flowers, everything is at your discretion. For example, if there are no specialized colors, artificial ones can also be used, even those made from paper.

You need to prepare the upper part of the bottle in advance, cutting it off so that the glass is at least 15 cm long, if you ignore this practical advice, then the glass will not turn out to be stable at all.


Next, it is important to take plasticine, starting to glue thick sausages out of it, differing in green. This is due to the fact that it blends perfectly with plant stems. As for the top strip, plasticine is attached to it, the bottom strip is designed for attaching large flowers.


As soon as the glass is ready, you can safely put both pencils and brushes into it. Such a step-by-step production of do-it-yourself crafts will make it easy to implement such an idea, making it a reality.

Snowman made of plastic cups
To implement this idea, you will need to carefully look at the master class on fakes from cups, and then you will be able to make a snowman without unnecessary difficulties and problems.

Instructions for making a snowman
At the very beginning, you need to build the first level; plastic cups are used for this purpose. You decide how many of them you need, since a lot will depend on your goal, that is, on the desired size of the craft. Glasses can be fastened together using a stapler.


Now start building the next system, keep in mind that this is done strictly in a checkerboard pattern, after the correct placement of the glasses, they are fastened with a stapler.

So you need to build levels, doing until a closed ball is formed, the second ball differs in size, which is known even to children. Don't forget, the biggest ball is the body, the smaller ball is the head, so you can easily count the number of cups, designed for the intermediate basic level.


Now you can move on to decorating, connecting your taste to this process.

Thus, after spending a little time, you can always make a beautiful, original and attractive snowman with your own hands using plastic glasses, everything is extremely easy and simple.

If there is a desire, then you should know that you can make a unique, bright and attractive Christmas tree, again using plastic cups for this purpose. As for the work in general, it follows the same principle as the actual creation of a snowman, there will be no problems.

All this leads to the fact that if you connect a little patience and imagination to this process, you can always create real masterpieces, they will impress everyone around you.

Know that bright and unique ideas and instructions on how to make crafts from cups will help you realize any ideas of interest.


Now it all depends on you, do not forget to involve your children in this process so that it becomes even more interesting, there is a great opportunity to get close to the children, and in general there is nothing more beautiful when you create something with your own hands.

Photo of crafts from cups


In a modern house, a candlestick plays not so much a functional role as it is a decorative element in the design of a room. Thanks to candlesticks, you can create the right mood and give an atmosphere of romance and a sense of celebration.
Candles in original candlesticks are appropriate not only during a holiday or a romantic evening, they will perfectly complement any dinner and bring a touch of enthusiasm. Unusual and at the same time very beautiful candlesticks from different glasses can be quite easily made with your own hands. Such candlesticks will only emphasize the shape of the candle, and create an exciting and mysterious atmosphere at any time.

We offer you a fairly easy master class with a photo of a candlestick from a glass, which you can do yourself. For its manufacture, the following materials are needed:
- Small branches of thuja.
- Sheet of paper or newspaper.
- Large tall glass.
- Scissors.
- Spray glue or plain glue.
Let's start the work by cutting off the desired size of the thuja branches and laying them out on paper. Then we will apply glue to them, if you do not have it in the form of a spray, then you will need to use a brush to apply it.

We glue the glass in a circle with thuja branches, you need to do this quickly so that the glue does not have time to dry.
After the glue is completely dry, you need to carefully cut off all the excess with scissors. At this stage, all the big work is finished, it remains only to choose a suitable candle and place it in a glass. As a result, we got a very original and beautiful candlestick, which will become a worthy decoration of the interior.
- read this article!


Varieties of candlesticks from glasses
There are many options for how glasses can be used as a candle holder.
Candlestick from an inverted glass
The simplest among them is to simply turn the glass upside down and place a suitable candle on the base of the stem. At the same time, the glass can be decorated by wrapping it with a tourniquet, at the base you can glue a border of white lace, and glue textile flowers of the same shades above it. The candle itself, which will be placed on the stem of the glass, can also be tied several times with a tourniquet, in general, a very beautiful composition will turn out.

A very simple, but at the same time very elegant candlestick will turn out if you create a decorative composition of cinnamon sticks and spruce twigs, fresh flowers and leaves, berries, Christmas tree balls in an inverted glass. To make such a candlestick more convenient, you can stick a CD to its base, so we will remove the hole in the glass.


Painted with acrylic paint
Very beautiful candlesticks can be created for the New Year holidays by painting them with acrylic paints. As a result, we can get excellent candlesticks from glasses in the form of snowmen, Santa Clauses, penguins - everything will depend on your imagination!


and Master classes for them - read in this article!
Candlestick with floating candles
A very romantic option would be a candlestick with floating candles. In the middle, you can place decorated balls, rose hips, flowers, twigs, Christmas tree needles, sea pebbles, fern leaves, then pour water, and put a small candle-tablet on the surface.


With beads and stones
Incredibly delicate and beautiful candlesticks will turn out if mother-of-pearl beads are placed in a glass and a candle is placed. The glass can be filled with absolutely any decor suitable for the theme of the evening, it can be sea pebbles and shells, dry maple leaves, twigs and acorns. It will also look very original if you make several small layers of different grains.


What else can candlesticks be made from:
Candlestick with lampshade
A very original candlestick from a glass, you can make it yourself in the form of a table lamp. To do this, you need to cut out a lampshade from thick colored paper, glue it and put it on a glass with candles. Thanks to the conical shape, the lampshade can not even be fixed. Such an unusual lamp can be additionally decorated with any decor, such as braid, rhinestones, flowers, applications.


Cup crafts are a great pastime. Their advantages are the simplicity and availability of the source material. It is also a good way to decorate a room for a festive event. In addition, according to pediatricians, such homemade products made by a child develop fine motor skills of the hands and develop perseverance.
The benefits of making crafts from cups
Making easy cup crafts for kids has a lot of benefits. Kids, doing this type of creativity, become more:
- attentive;
- independent;
- assiduous;
- neat;
- patient.

Collecting such trinkets, they acquire skills in working with glue and scissors, which will undoubtedly be useful to them for classes in kindergarten or school. The completed crafts will remain a pleasant reminder of childhood.

Do not forget that children who are engaged in man-made creativity, the brain develops much better than their peers who are not engaged in such work.

As a result, if your toddler has difficulty communicating with peers or is poorly developed logical thinking, then no doubt you need to do with him the creation of original crafts from cups.


Here are other benefits of such homemade products:
- low cost;
- ease of manufacture;
- beautiful appearance;
- no need for special knowledge and complex tools.

Variations of the use of crafts from cups in practice
As you can see in the photos of cup crafts, such gizmos are usually created with different purposes. They can, for example, decorate the dining table if any celebration is planned. And this applies to both dishes and dishes served. The scope for imagination here is huge.

By looking at different ideas and instructions for making crafts, which are full on the Internet, you can make various types of flowers, garlands and balls. Also, cups are the main material for the manufacture of many funny figures. In addition, the uniqueness of the cups lies in the possibility of creating lighting elements from them, whether it be flashlights, miniature lamps or luminous garlands.

Such accessories can be used to decorate the same table to add romance to the setting. They will look especially impressive in the evening.

What else can you do with plastic cups? Together with your child, you can make a variety of figures, ranging from animals and birds to fairy-tale characters, and then present them to your loved ones. Such a gift will definitely be remembered for a long time.

Another area for the use of homemade plastic cups is the design of the premises. For a baby, you can create a thematic composition, for example, an island where pirates live or a house for a fairy-tale man. You can arrange such beauty not only in the nursery, but also in other rooms where there is a little one.

Types of handmade plastic products
All crafts from cups are divided into the following groups depending on the method of execution:
- Products cut with scissors. This group includes balls, coasters for dishes, flowers, garlands, etc.
- Figurines. Most often, a wire frame or glue is used here. You can make heroes of fairy tales, representatives of flora and fauna, toy houses.
- Application. This method consists in gluing different parts onto the cup. Even five year olds can do it.
- Combined trinkets. For example, plastic glasses can be combined with bottles made of the same material. The result is a tree. Some of these crafts boast moving parts, which makes them even more attractive for children.


Materials and tools
After watching several master classes on crafts from cups, you can easily make sure that nothing particularly complicated is required for such creativity. You only need:
- cups (plastic or paper - to your taste);
- stationery scissors;
- stapler;
- glue.

You may also need plasticine, textiles, colored paper, paints, felt-tip pens, varnish, decorative details (beads, feathers, beads, rhinestones, etc.). All listed materials and tools are available to everyone.

As a conclusion
Crafts from glasses can be very different. From such an affordable material, you can make decor for a festive event, and spectacular souvenirs for friends. In general, experiment, bring your creativity to life, involve a child in such activities and get great pleasure from all this.

Photo of crafts from cups


Note! 


Note! 


-
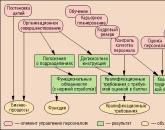 Basic elements of personnel management Basic elements of personnel management
-
 Quality management at the enterprise: standards, stages of implementation, tips
-
 How is the quarterly bonus calculated and how is it paid?
-
 Mysterious crossing on Abbey Road in England John Lennon originally named the group differently
Popular
- "Abbey Road" cover as the basis for a conspiracy legend
- How to write a letter of guarantee?
- Merchandising, its types and principles Fundamentals of merchandising in the textile industry
- Marketing activities in wholesale and retail trade
- Indicators and criteria for management effectiveness
- Why is "Bird's milk" called "bird"?
- Analysis of the labor resources of the enterprise
- Management functions, management levels One of the management functions
- Basic management functions How many basic management functions do you know
- Theoretical aspects of the organization of wages at the enterprise