How to set visual bookmarks in chrome. Install visual bookmarks in chrome
Visual bookmarks are convenient way for use on the Internet. These are images of thumbnails of pages of sites added to bookmarks. Using visual bookmarks Google Chrome You can easily and quickly go to the desired site: just click on the appropriate thumbnail, and you do not need to enter the address in the address bar of the browser. If simple bookmarks are placed on the bookmarks bar, then the express bar or visual bookmarks bar can be configured so that they appear on the browser page when a new tab is opened.
Without setting visual bookmarks, the Google Chrome browser has an express panel, which consists of thumbnail images of the sites that you visit most often. But on such a panel it is impossible to fix the necessary sites on a permanent basis.
To set visual bookmarks in Google Chrome, click on the "Settings" icon, which is located in the upper right corner.
Then on the left go to the tab "Extensions".

If you have previously installed any extensions, scroll down and select "More extensions" if there is nothing in the window, click "Would you like to view the gallery?".

The Chrome Store opens. Enter a query in the search bar "Visual bookmarks" and press "Enter".

In the list we find the section "Extensions", select the ones you like visual bookmarks and click "Install".


After installation is complete, click on the icon installed extension, which is located in the upper right corner.

This completes the installation of visual bookmarks. Now we open a new tab, which already has visual bookmarks selected by default. Adding a new bookmark is easy: either with the "+" or with the little icon in the top right.

After clicking on the "+" a window appears in which you need to enter the address and name of the site. Then click "Add" and a miniature of the desired site appears in the window.

If you find an interesting page on the Internet and want to add it to visual bookmarks, just click on the small icon in the upper right. A page with visual bookmarks will immediately open, select an empty box with a “+” and click on it, now the page has been added to visual bookmarks.
Bookmarks are easy to manage: you can add, delete, change, drag them. When you hover the mouse over a bookmark, icons appear on the right: settings and deletions.

In the settings tab "Basic data" you can change the site that will be in this box, change the description of the site. On the tab "Image Settings" you can upload another image for the visual bookmark thumbnail. tab "Delete bookmark" will remove the bookmark. To save the changes, return to the tab "Basic data" and click the "Save" button.

At the top is the search bar, using the "Change Search" button, you can change the search resource.

You can go to the settings by clicking on the gear icon to the left of the search bar.
On the tab "General settings" you can select the number of bookmarks horizontally and vertically, change the number of desktops. Below you can check the box to use custom search and open a bookmark in a new tab.

On the tab "Basic Design" by dragging the circle on the color palette you can change the background, the sliders allow you to change the brightness and the radius of the bookmarks.

On the tab "Individual background" you can choose an image as a background from the proposed ones, or download it from a computer or from a link. To return to visual bookmarks, press the button "Return".

That's how easy it is install and configure visual bookmarks for Google Chrome– simply by selecting and installing the extension you like.
Rate article:The functioning of visual bookmarks is similar in principle to the operation of the express panel in Opera, Internet Explorer or Firefox. The main difference between this feature of Chrome is that these bookmarks are a list of the most visited sites by the user, regardless of whether their address is in the Favorites panel (Bookmarks) of the program. This solution is not convenient for all users, and therefore the principle of the function can be changed by installing a special plug-in.
A third-party extension installed from the app store allows you to place your own links to the most the right resources and add more elements to the screen.
Initially, the number of visual bookmarks is limited to 8 items.
Installing an extension
Go to the extension store by opening a browser window and clicking on the icon of the main menu of the program "Customize and control google chrome". In the list that appears, select "Tools" - "Extensions" - "More extensions". Wait for the page with available plugins for the program to load. On the left side of the page, click on the line "Search by store" and enter "Visual bookmarks".
Among the results obtained, several popular solutions for use will be presented.
"Visual bookmarks" from the site yandex.ru allow you to get a full-featured panel that expands the number of elements used up to 25. You can also configure the display settings for the link bar, select a design theme and manually add the necessary items from regular bookmarks or by entering the address of the desired site in the appropriate line item creation menu.
Similar functionality is provided by "Visual bookmarks" from the Mail.ru service, which also have a weather display plugin on the main page of the resource and saving the number of unread mail messages. After choosing the most suitable option, click "Free" to install the plugin in Chrome, after which you will need to restart the utility in order for the entered data.
As soon as the program is restarted, visual bookmarks will be activated. You can add a new bookmark by clicking on the corresponding icon on this panel and entering the address of the desired resource.
To configure the panel display settings, click on the “Settings” button in the lower right part of the program window. This item will help you adjust the available number of elements, the color scheme used, and, if necessary, reset the applied settings.
Sources:
- Google Chrome Extensions
- how to change bookmark in visual bookmarks
Google Chrome includes a bookmark management tool that allows you to export or import them from another computer or browser. This allows users to change browsers or buy a new computer without fear of losing access to the sites they need.
You will need
- Any removable media (flash drive, for example), a computer with Chrome installed
Instruction
If you purchased a new computer or laptop and decided to transfer all your data to a new device, then you probably encountered the fact that the browser cannot simply be copied. To do this, you will need to import bookmarks using the browser settings menu. Before copying bookmarks in Chrome from computer to computer, prepare any removable media, such as a USB flash drive. Paste it into your old PC and then run it on your Google Chrome device.
Click on the key icon located in the upper right corner of the Google Chrome window, then go to Bookmarks -> Bookmark Manager from the menu. A new browser tab will open showing all your saved bookmarks.
Click the Organize button at the top of the browser tab, then Export Bookmarks. A new window titled "Save As" will appear.
Use the search box to select your removable device, and then click the "Save" button. Google Chrome automatically gives the file a name, such as "bookmarks_8_29_11.html".
When visiting websites hosted on the Internet, many of us use visual Google bookmarks Chrome. Useful and interesting sites are added to visual bookmarks.
You add a site to bookmarks so that you can easily and quickly visit the desired site by simply clicking on its name from the list of bookmarked sites. Bookmarks are usually placed on the bookmarks bar, but a more convenient solution would be to use the express panel for this, or the visual bookmarks panel.
The express panel, being the home page, opens a page with visual bookmarks when the browser is launched. Visual bookmarks are images of thumbnails of site pages added to bookmarks. When you click on such a bookmark thumbnail, you immediately get to the desired site, without entering its address in the address bar of your browser.
Google Chrome browser also has an express panel, which consists of thumbnails of the most frequently visited sites. Such a solution is not very convenient to use, and it is impossible to permanently pin the necessary sites to such a panel.
For the Google Chrome browser, many extensions have been created to create an express visual bookmarks panel, the so-called visual bookmarks for Google Chrome.
This article will discuss extensions that allow you to create an express panel for the Google Chrome browser: Visual Bookmarks from Yandex, Mail.ru "Visual Bookmarks" and Speed Dial 2 (ru).
Yandex Visual Bookmarks for Google Chrome
To install the "Visual Bookmarks" extension from Yandex in the Google Chrome browser, you will need to click on the "Settings and Google management Chrome (Wrench)" => "Tools" => "Extensions".
In the "Chrome Web Store" window, in the "Store Search" field, enter the expression: "Visual bookmarks", and then press the "Enter" key on the keyboard.
In the window with the search results, select the "Visual Bookmarks" extension from Yandex, and then click on the "Install" button. In the New Extension Confirmation window, click the Add button. After that, the Yandex Visual Bookmarks extension will be installed in the Google Chrome browser.
When you launch the Google Chrome browser, the Visual Bookmarks page will open. In the lower right corner of the page window there is a "Configure" button, which is designed to configure this extension. After clicking on the "Settings" button, the "Settings of visual bookmarks" window will open.
In this window, you can select the number of bookmarks to display by clicking on the bookmark at the bottom right (48 visual bookmarks are supported).
You can choose a "Background Image" from the options offered to you, or upload your own background image from your computer. In order to upload your background image, you will need to click on the "Add" button. In the Explorer window, select the image that you want to make the background and click on the "Open" button.
After that, the image you added will become the background image on the visual bookmarks page. You can add your other images and remove them if you click on the "Delete" button after you select an image to remove.
The default overlay method is fill. In this case, the background image fills the entire space of the browser window. You can select a different option to display the background image.
You can choose the “General Bookmark Refresh Interval” at your discretion.
The "Show bookmarks bar" item is responsible for displaying the bookmarks bar, you can uncheck this item to remove the extra bar from the "Visual bookmarks" page. After making the settings, click on the "Save" button and proceed to adding your pages to the thumbnail windows of Visual Bookmarks.

In the upper part of the window with a visual tab there are controls for this tab: "Hide", "Edit", "Update", "Delete".

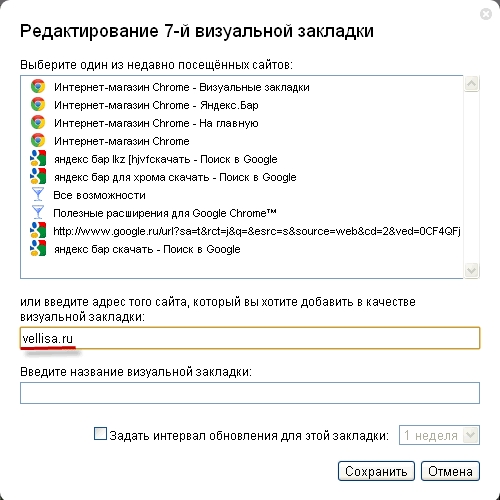
In order to add your own visual bookmark to the page with visual bookmarks, you will need to click on a free window. In the "Edit Visual Bookmark" window, you will need to enter the address of the site to be added, in the example I entered the name of my site. If you wish, you can enter a name for this visual bookmark. Next, click on the "Save" button.
The Visual Bookmarks page has a new bookmark thumbnail. Visual bookmarks you can move, swap, hide, add new and delete.

To disable the "Visual Bookmarks" extension from Yandex in the Google Chrome browser, you will need to click on the "Settings and Management (Wrench)" => "Tools" => "Extensions" button in the browser window. In the list of extensions you have installed, you will need to uncheck the box opposite the “Enabled” item in the “Visual Bookmarks” line from Yandex. After that, the extension will be disabled.
If you want to remove this extension, then you will need to click on the "Delete (Trash)" button. After confirming your consent to deletion, the Yandex Visual Bookmarks extension will be removed from the Google Chrome browser.
Yandex has updated its visual bookmarks and now they look a little different than the old visual bookmarks.
Visual bookmarks from Yandex for Google Chrome (video)
To install another visual bookmark extension - the Mail.ru "Visual Bookmarks" extension for the Google Chrome browser, you will need to click on the button "Configure and manage Google Chrome (Wrench)" => "Tools" => "Extensions". In this window, click on the link "More extensions".
In the "Chrome Web Store" window, in the "Store Search" field, you will need to enter the expression - "Visual Bookmarks", and then press the "Enter" key on the keyboard.
In the window with the search results, select the Mail.ru extension "Visual bookmarks", and then click on the "Install" button. In the New Extension Confirmation window, click the Add button.
Now, when you open the Google Chrome browser, the Mail.ru Visual Bookmarks extension window will open. To add your own visual bookmark, you will need to click in the empty bookmark window. After that, the "Site Address" window appears, for adding the address of the desired site.

A new visual bookmark has been added to the Visual Bookmarks page. By clicking on the links at the top of the bookmark thumbnail, you can edit or delete that bookmark.

This add-on has 9 windows for adding visual bookmarks.
To disable the Mail.ru "Visual Bookmarks" extension, you will need to click on the "Settings and Management (Wrench)" => "Tools" => "Extensions" button. In the "Extensions" window, in the Mail.ru "Visual bookmarks" field, you will need to uncheck the box opposite the "Enabled" item.
To remove this extension, you need to click on the "Delete (Trash)" button, and after confirmation, the extension will be removed from your browser.
Several extensions for visual bookmarks with similar names have been developed for the Google Chrome browser. Of these extensions, perhaps one of the best will be the extension Speed Dial 2 (ru).
To install this extension, click on the button "Settings and management (Wrench)" => "Tools" => "Extensions". In the "Chrome Web Store" window, in the "Search by store" field, enter the expression "Speed Dial", and then press the "Enter" button.
Choose among the list of extensions that were found, the extension Speed Dial 2 (ru), and then click on the "Install" button. In the New Extension Confirmation window, click the Add button.
After launching the browser, the settings window for this extension opens.

After that, click successively in the windows that open on the "Continue" button, reading information about the settings of this extension. If you do not want to read this information, then click on the link "Skip the study tour".
In the next "Import Most Visited Websites" window, you will be prompted to "Import Selected Sites" or "Skip". You can uncheck the boxes next to the sites that you do not want to add to the express panel.
In the next window, click on the "Start" button.
To add a site to the page of the Speed Dial 2 (ru) extension, you will need to click on the page, and then in the "Add" window you will need to fill in two fields: "Page Link" and "Title". After entering the link, you can copy it into the "Title" field. Next, click on the "Save" button.

A window with a site thumbnail appeared on the quick access page. In order for the image of the site to appear (Create Thumbnail), you will need to click on the thumbnail of the added site.

After adding the thumbnail, the added site became easily recognizable by its image. At the bottom of the image thumbnail, you can see the number of times you have visited this site.
By right-clicking on the site thumbnail window, you can make the necessary settings or remove the site from the visual bookmarks panel.

If you move the mouse to the right edge of the visual bookmarks page, the "Sidebar" will open, where you can see "Bookmarks" and "Recently Closed Tabs".
To configure the Speed Dial 2 (ru) extension, click on the button "Customize and manage Google Chrome (Wrench)" => "Tools" => "Extensions". In this window, in the Speed Dial 2 (ru) extension field, you will need to click on the "Settings" link.
In the "Settings" window, you can make the necessary settings as you wish. There are quite a few settings in this window to customize this extension as you wish.

To disable the Speed Dial 2 (ru) extension, you will need to click on the "Settings and Management (Wrench)" => "Tools" => "Extensions" button. In the Extensions window, in the "Speed Dial 2 (ru)" field, you will need to uncheck the box opposite the "Enabled" item.
To remove the Speed Dial 2 (ru) extension, you need to click on the "Delete (Trash)" button and after confirmation, the extension will be removed from the Google Chrome browser.
How to restore old visual bookmarks
After updating the extension from Yandex for the Google Chrome browser, the display of thumbnails of visual bookmarks has changed in the browser. Drawn thumbnails are now displayed, there are no images of site pages that are added to visual bookmarks.
To solve this problem, in new version extension Visual bookmarks for Google Chrome, in the settings you will need to enable the display of screenshots of site pages.
For those. For those who prefer to use the old version of the visual bookmarks extension for Google Chrome, I wrote about how it will be possible to use the old version of the extension again.
After a new installation of the old version of the extension in the Google Chrome browser, the old visual bookmarks for Google Chrome will be restored.
Article Conclusions
In the Google Chrome browser, you can install extensions with visual bookmarks that make it easier for the user to navigate to the desired sites.
Speed Dial 2 extension (ru) for Google Chrome (video)
For many, visual bookmarks for the Google Chrome browser are one of the most important things when surfing the Internet. Built-in browser capabilities are not always enough, and sometimes you want a more customized interface.
It is most convenient when the start page, the new tab and the transition from the Home button open the same panel with visual bookmarks of the Google Chrome browser.
For those who don't have all the features and want more, we publish our selection of visual bookmark extensions for Google Chrome:
Yandex visual bookmarks
Are you missing 8 standard bookmarks in Google Chrome™? Put "Visual bookmarks" from Yandex! With them, you can increase them up to 25.
In addition, you will always have your browser bookmarks bar at hand.
From the Visual Bookmarks page, you can easily launch Google Chrome™ Apps.
Atavi bookmark manager
Atavi (Atavi) is a free and most convenient service for saving and synchronizing bookmarks. Windows installed at home, but Mac OS at work? Do you alternate between laptop, PC and Android smartphone? Are different browsers installed everywhere? For Atavi, this is not a problem! You can access your bookmarks anytime and from any device on any OS. To do this, just go to Atavi.com from any device and enter the login (e-mail) and password specified during registration.
Synchronizing Chrome bookmarks with Firefox, Opera, IE and other browsers is now easier than ever!
speed dial
All the necessary sites are always in front of your eyes! And if there are a lot of sites, then you can distribute them into groups.
Convenient synchronization will allow you to have the same set of sites on different computers, as well as on mobile devices!
You can create your own preview of each site, also, you can always choose a preview image from our gallery. For the express panel itself, you can set your own background or use our themes.
Do you want someone else to see your list of favorite sites (for example, colleagues at work)? Then there is the Power Off feature for you, which will allow you to put a password on your express panel.
The Top Page Bookmarks extension changes the standard Google Chrome tab to the Top-Page.ru bookmark service and allows you to save any page to Top-Page.ru bookmarks without switching to the service. To do this, you need to call the context menu by pressing the right mouse button, and select "Send to Top-Page Bookmarks".

Popular
- How to Recover Old Photos Restore and Retouch Old Photos in Photoshop
- African savannah animals
- Congratulations, invitations, scripts, toasts, frames, postcards, contests for you at the Holiday Center!
- How to express centners in tons
- 1 2 tons to centners. Centner - how much? Other units of mass
- Congratulations on the day of the medical worker: poems, prose, pictures, sms, gifs
- How to make a bird costume Christmas costume magic bird
- The script for the anniversary of the girl (young woman) "A star named ...
- Comic nominations for art circles
- The script for the anniversary of the girl (young woman) "A star named ...