How to make an old photo clear? Program for restoring old photos Editing old black and white photos.
Photographs on paper have the unpleasant property of fading, fading, becoming covered with small cracks and scratches over time. Almost every person in the house has old black-and-white photographs from the family archive, damaged by time. However, they are dear to the heart and can be restored if you use a computer and the appropriate software.
There are many photo recovery methods using modern technologies. Consider one of the methods - restoring a photo using Adobe Photoshop. In any of them, the use of the following tools can be noted: Clone Stamp Tool, Healing Brush Tool and Patch Tool. What you need: A computer with the appropriate software and a scanner to scan images. Here is the simplest and most common way to restore an image:
1. Photo scanning
The photograph must be scanned. Before scanning, do not forget to wipe off fingerprints and old dust from the photo.
In the scanner settings, you need to set the highest resolution - at least 300 - 600 dpi. A lower resolution will not allow you to print the restored photo.
Black and white photographs should be scanned in "color" mode (RGB) rather than black and white, as color mode allows more detail to be preserved. Scanning in grayscale mode may result in poorer quality and more noise.
2. Image analysis and cropping
In the process of scanning and converting a photo from damaged paper into digital form, a lot of small cracks, scratches and dust particles appear, which are sometimes completely invisible in the original image. After scanning, it is important to analyze the image in terms of whether it is necessary to remove dust, which parts of the photo require restoration, and which can serve as donors for lost areas.
3. Remove scratches and dust
To remove dust, the Dust&Scratches filter is used, followed by applying a layer mask and restoring areas undamaged by dust. Dust is always more visible in the shadows and, accordingly, it will be much easier to remove it automatically there. When removing dust, work at 100 percent to get a clean, restored photo that won't leave any scratches or dust particles that go unnoticed when printed.
To eliminate cracks, you will need to switch to the Lab Color mode, where you can correct the image both in relief and in color. Cracks and scratches are removed from the photo using the Clone Stamp Tool. You can also use the Healing Brush Tool for this purpose. When working with these tools, be especially careful when removing scratches and cracks from faces in a photo.
Hair, clothes, and some other details are often the only areas in an old photograph that can be called clear and detailed. Therefore, when working with them, you should also be extremely careful. If necessary, you can additionally remove bags under the eyes, wrinkles and other imperfections in the photo with the same Clone Stamp Tool and Healing Brush Tool.
4. Restoration of missing sections

Some areas of an old photo may be so damaged that they will have to be restored using other, similar areas in the picture. To restore missing or damaged sections, you need to use the Clone Stamp Tool. Here you only need to select an area in the photo from which you can copy some of the pixels and, thus, restore the damaged area with their help. The cursor pointer is placed on this area, after which you need to click the left mouse button by pressing the Alt key. Next, you need to move the cursor pointer to the damaged area of the photo and click the left mouse button again. You may have to create a new layer to correct every major detail in the photo.
In order to close large damages, it is better to use the Patch Tool, which provides for the creation of a kind of patch with which you can cover the damaged fragment of the image. To restore the symmetrical details of the face, use the Flip Horizontal function from the Transform group to flip the copied fragment horizontally. Then use the Warp command to transform the fragment so that it complements the photo. True, here it must be borne in mind that a person's face is very rarely symmetrical, as a result of which a face restored in this way may look unrealistic. So, you will probably have to perform additional correction and feathering of the restored fragment.
5. Color correction

Finally, download Adobe Photoshop. And the first task is to make black and white color, and again to make the lost color play with the original colors. To do this, just use the keyboard shortcut Ctrl + L to call the dialog menu Levels (levels). First, you can use the button Auto (Auto) and look at the finished result of color correction. If the result is not satisfactory, you will have to adjust the tone manually.
Working with levels (Levels), the white and black point sliders will need to be moved to those points in the image where the histogram displays the beginning of areas with dark and light pixels. To increase the contrast and color saturation of the photo, you will also need to use the Match Color menu. Here you can increase the intensity of the color using the Color Intensity slider, while you will need to check the Neutralize box to neutralize the midtones that appear.
6. Minor corrections, sharpening and general photo correction

If the photo has shadowed areas, then they can be removed using the Shadow / Highlight option. To correct dark and light areas, it is necessary to choose the right settings so as not to lose detail in the image and not to “kill” the contrast. To achieve a really high-quality result, it is recommended to use curves (Curves), with the help of which it will be possible to further work out the dark and light areas of the photo image.
To improve the clarity of the photo, use the Unsharp Mask tool. Don't get too hung up on eliminating noise when restoring photos. Grain in old photographs looks quite impressive, adding a peculiar spirit of the time to the image.
Finally, you can try to make the photo more interesting and colorful by additionally adjusting the contrast and color saturation of the image using the Hue / Saturation option, which is called by the Ctrl + U keyboard shortcut.
Before correcting a photo, it is important to understand the causes of fuzziness. Each cause has its own way of elimination, and finding the right way means choosing the most correct, fastest and most economical way to a good result.
The easiest way is to send a photo to the restorer, who will know what to do with the photo, but it won't hurt to know the basic principles.
Photo restoration implies that we carry out all improvements with a digital copy of a paper original. Let's take a photo and look at it carefully, zooming in to 100% or more.
Case 1: Faded colors.
The contours are even, in the enlarged portrait you can see small details, such as the outlines of the lips, the shape of the eyes, eyebrows, and sometimes it is possible to make out individual hairs.
Causes.
The photograph faded, faded and faded over time. The most common reason: what always happens with paper photos.
A simple solution.
A faded photo is restored using color correction. However, this is not always enough: as soon as we make the image clearer, defects immediately become more noticeable. Paper photos not only fade, but are also easily damaged. This is clearly visible when magnified: spots, scratches, cracks, scuffs in places. All together spoils the impression, as if the image is hard to see through a layer of dust and dirt.

Professional restoration will restore colors, remove age-old dirt and make the photo look like new. To do this, just send the photo by mail, pay for the work and wait for the result.
Difficult decision.
Self-restoration of photographs is a complex and exciting business. If you have a lot of shots, time and patience, you like painstaking and accurate work, this path is for you. However, for this it is not enough to watch a few lessons. The same technique can fix one photo and ruin another, so without system knowledge and experience, a good result will not work, except in simple cases. If there is severe damage in the photograph, especially on the face, then without experience and some artistic skills, it is better not to take on independent work at all. Correcting mistakes and redoing work, a novice will spend two to three times more time than an experienced restorer. At the same time, it’s a shame when the result of hellish labor turns out to be much worse. Here are just a few typical mistakes: traces of processing are visible, “blurring”, old spots are not removed and new ones appear from somewhere, the face is distorted beyond recognition, etc. All this can be avoided if the work is ordered from a specialist. Is it worth it to restore the photo yourself? To answer this question, you need to make a choice: savings or results.
Case 2. Bad scan.
The contours are uneven, blurry. Breaks, graininess, stripes, notches or small squares are visible.
Causes.
1. Broken edges with jags and squares - a clear sign that the photo was scanned incorrectly, with low resolution or compression, so the borders lost clarity.

2. Graininess, stripes and other artifacts that are not on the paper original indicate that the scanner is not suitable for digitizing photographs. Sometimes the graininess comes from the texture of the paper, whether it is matte, rough, or corrugated.

Smart decision.
1. Rescan the photo, . Photos on embossed paper are digitized. Compare the result. If the photo clearly shows cracks and scratches, this is normal. If nothing has changed and the contours have not appeared, go to the next step.
2. Take the paper original to the photo center, where there is a professional scanner or other modern equipment. Compared to the main restoration, digitization is quite inexpensive and costs five to ten times cheaper. Of course, it will take more time, but isn't it worth it to make sure that the faces of your relatives become clearly visible in the photo? Some centers, along with the digitization service, will also offer restoration. But, alas, the presence of normal equipment in the photo center does not mean the presence of a good restorer, so always carefully look at examples of work. Fortunately, the Internet knows no boundaries: now you can find the best restorer in any city, and uploading a file takes only a few minutes. In addition, ordering photo restoration online is very convenient: you don't have to come for the finished photo a second time, you just get it by e-mail.
Why can't you skimp on good digitization? When scanner distortion is added to the damage to the paper, the photo loses its original appearance even more. You can restore a photo only from what is. If the contours have lost their sharpness during scanning, then they can be restored either by correct scanning or by artistic means. Whether the likeness remains, the photographic quality, or the faces become drawn and flat, one will have to rely solely on the ability of the restorer. Before ordering a drawing, look at its examples. Scanning is cheaper. For comparison, the average market price of a scan is 60 rubles. and the most primitive rendering - from 3000 rubles.
Wrong decision.
You sent a poorly scanned photograph to a contractor who agreed to restore it inexpensively and did not offer to improve it with digitization. What does it say? The performer is not a professional and does not know that a good result is impossible without proper digitization, or quick earnings are more important for him than the result.
Case 3. Blurred photo.
The contours are blurred, despite the fact that the photo was digitized in accordance with all requirements and high resolution. This happens when the photo is initially taken out of focus. So, in this case, it will not work to make clearer contours in simple ways. What was never in the photograph cannot be restored by digitization or in Photoshop. With the help of special filters, you can only create a visual effect of clarity, but it is impossible to show the details. The only way to correct fuzziness is artistic restoration, .
Examples of restoration without artistic restoration.
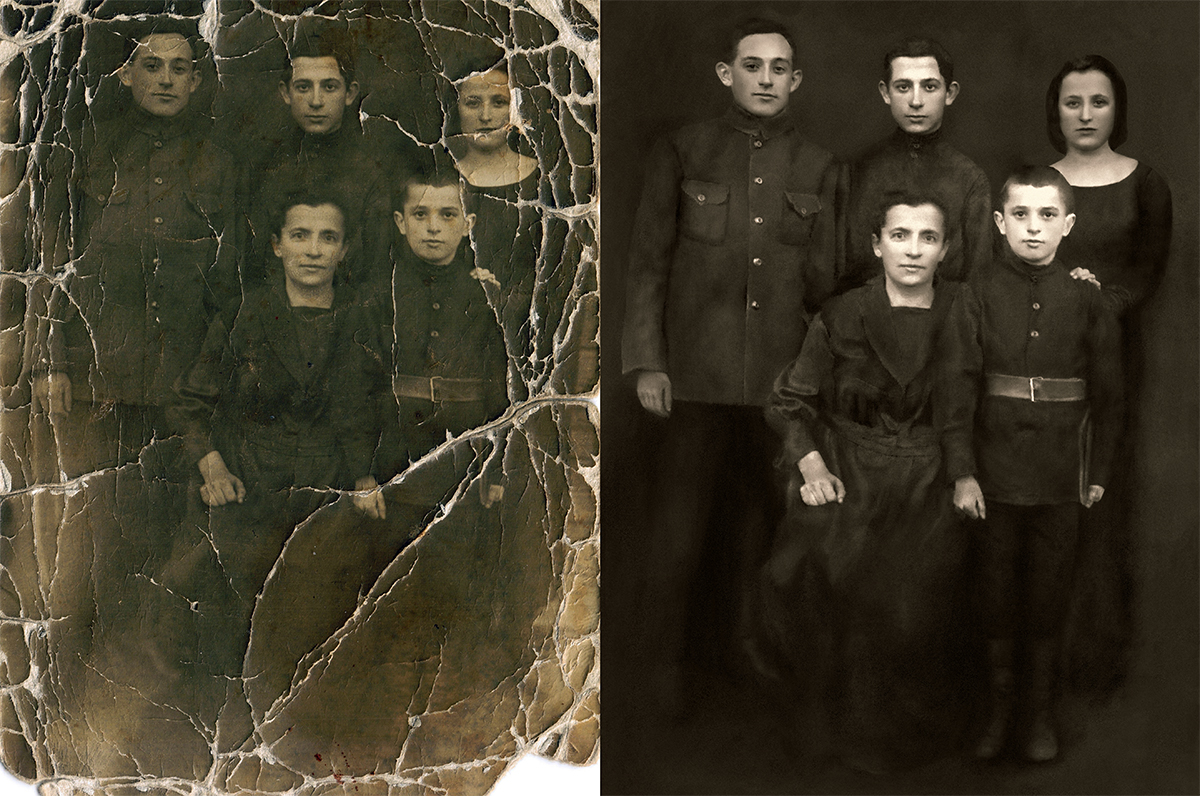


Last week my grandma asked if I could restore an old, ruined childhood photo of my father. I said I'd try, but I'm not promising anything. I knew it was possible that the level of damage in the photo would be beyond my knowledge, or the technology I have. After I received the photo in the mail, my worst expectations were met; this turned out to be no easy task.
As you can see, the photo is so badly damaged that a large portion of the face is missing. This usually happens when a wet photo dries and sticks to another photo. I've compiled a list of tips for separating sticky photos:
- Keep a close eye on those photographs whose negatives you do not have. Once a photo gets wet or moldy, it will be almost impossible to save it.
- Handle wet or stuck photos carefully, their surface may be very fragile. Avoid touching the surface of the image.
- If you see that the condition of old photos starts to deteriorate, it is better to redo them while you can. Take new photos from old ones after absorbing moisture (see below for moisture absorption).
- Remove photos from frosted, glass or plastic frames as carefully as possible without causing any harm. Also, if the pasted photo is in good condition, it can be scanned with a frame, and sent a digital copy for restoration.
- If you have stuck photos, they can be separated in warm water, if the water becomes dirty, it needs to be changed. It will take you about an hour to loosen them.
- Wet photographs can be rinsed in clean water, if necessary, and sealed in a plastic container or ziplock bag.
- A good way to preserve photographs is to place wax paper between the photographs.
- If you have a freezer, freeze the photos. Later they can be thawed, separated and dried.
- If you don't have access to a freezer or refrigerator, rinse damp photos in clean water and dry by laying them face up on a clean surface such as a table or towel.
- You can reduce the growth of mold in a photo if you store it in a dry and ventilated place. Open windows, turn on fans, air conditioners and moisture separators.
- Do not dry photos in direct sunlight.
- To prevent photos from curling, you can add a sinker at the corners of the photo.

If the photo is already damaged and you need to fix it, here are a few tips and methods that I used. Remember that even if you have an artistic eye and you know what the missing parts of the face will look like, always work from a copy, not the original.
What You Will Need
- Good scanner. If you do not have it, scan the photo in any other place.
- Any version of Photoshop
- It's not required, but I used a Photoshop plugin called Alien Skin Exposure
Step One: Scan
Make sure you are scanning your photo at the highest possible resolution. I recommend at least 300dpi. High resolution is required because you will be using other parts of the image as you work, and low resolution may produce unexpected results (be aware that film has a much higher resolution and you will experience pixel loss. In small images , loss in pixels is not noticeable).
Make sure you remove dust and fingerprints from your pictures. Dust must be removed prior to scanning using compressed air, a soft brush, or an optical grade cleaning cloth.
Step Two: Color Correction
There are many ways to color correct in Photoshop. I most often use Threshold, which can be created with an additional layer.

- To do this, create a duplicate layer with the photo, select the entire document (Ctrl+A), copy (Ctrl+C) and paste (Ctrl+V), then click on the little yin-yang icon at the bottom of the layers panel and select Threshold. The Threshold window will open and everything will turn black and white.
- Move the slider all the way to the left and slowly return to its place. The first black pixels to appear on the image are the darkest areas of the photo. Once you see them, click OK.
- Zoom in on these pixels, select the Color Sampler Tool (I), and place a marker in the center of these black pixels.
- Once you've set the marker, you can get rid of the layer's Threshold by moving it to the trash can icon in the layers panel, or by pressing Delete. The top layer will return to its previous appearance, and the marker will remain visible.
- Next, create a new Threshold layer and repeat the same steps, with the only difference being that you drag the slider to the right. This will indicate the lightest areas in the photo.
- Add another marker and delete the Threshold layer. It's time for color correction.
- Click Image -> Adjustments -> Curve to open the Curves panel.
- In the Curves panel, select the black tipped eyedropper and click on the first marker showing the darkest pixels. You may need to enlarge the images for a more accurate work.
- Do the same for the lightest parts of the photo, but with a white tip eyedropper. These actions will determine the black and light areas and help in color correction.

Step Three: Recovery
Select the Clone Stamp Tool (S) and change the mode from Normal to Darken. This will help to clone pixels from one area to another, overexposed area. I used this tool for hair and face. For softer transitions, I used a soft brush of different sizes.

In my case, I focused on the face, because he was absent.

In this case, it is very important to have an artistic eye, because. missing areas must be drawn as accurately as possible; for example, you need to redraw the right side of the mouth and lips. It's very lucky that the left part remained intact, and you can copy it, flip it horizontally, change the angle, and place it in the right place. Next, use the Clone Stamp Tool to touch up the edges of the lips. Correcting the background in this case was not difficult, in addition, I decided to return the image to its original shape of a rectangle without a paper frame glued to the photo.
When cloning the missing areas with a soft brush, you will notice that they are more blurry than the rest of the image, because. it has a lot of noise. To fix this, I used Filter -> Noise -> Add Noise and checked the Monochrome box. Next, I adjusted the intensity of the noise until I brought the image to a single result.
At this stage, I was very pleased with the work done, but, despite this, there were areas of skin color in which it did not look natural. I used the Alien Skin Exposure plugin. With this plugin, I simulated a black and white photo and added sepia. To add sepia, you need to use the Sepia - Mid Band Split setting. I couldn't believe that I was done with the restoration of this photo. This is the first time I've come across photographs damaged to such an extent.
Step Four: Print
We have reached the simplest stage in the work, it remains only to print the restored photo. I wish you all good luck!
Opening an old family album, we plunge into the past for a moment, sometimes so distant that it is already difficult to remember, and only old faded and rather shabby photographs remind us of events that once happened, of people with whom we once crossed paths, of a long gone into the non-existence of time. And sometimes we find ourselves not at all in our past, but in the past of grandparents, and we can imagine them young only judging by the photograph.
Retouching old photos is a way to bring photos back to their original look. This is especially valuable for photographs of the Great Patriotic War, which are of great historical value both for posterity and for history in the state in which they are. It is strongly not recommended to modify such photos, give them color or add any objects. But sometimes such photos are so damaged that it is difficult to make out what and who is depicted on them, here, of course, various programs come to the rescue - inventions of the modern world. One such program is "Photoshop" - a program that includes a huge set of tools. She is able to solve the most complex retouching tasks.
Restoration of an old photo - breathe a second life into a photo
When restoring old photos, the main thing is to preserve its uniqueness, while removing all the flaws that have appeared over time: various scuffs, creases, cracks, dust particles and damaged areas. Each master of "Photoshop" works, probably more intuitively, like an artist, manually redrawing the lost fragments, correcting defects, and is guided solely by his vision for each particular photo, what it should become after processing. Restoring old photos in Photoshop does not have any clear step-by-step instructions, since all photos are different, the damage on them is very diverse. But there are some of the most commonly used techniques and tools that are worth talking about.
Restoring an old photo

We will consider the restoration of an old photo using the example of this photo, we will try to restore its original appearance, the photo has a lot of pronounced cracks and creases, this is a scan, and we will work with it.
- Load it into Photoshop - File / Open.
- Our photo of the girl is loaded into the Photoshop workspace.
- First you need to remove the white edges of the photo, for this we will use the Crop tool. This tool is located on the toolbar on the left side of the workspace (by default). We click on the tool, an area for editing appears around our photo, hover over this area with the mouse, up and down arrows are displayed, pulling which we can hide the edges of the photo, areas with obvious defects. After we have completely adjusted our photo, we simply press the Enter key.

When an old photograph is being restored, the eye gets used to long-term processing of one photo, then you can simply spoil the image. In order to be able to see the original at any time and compare it with the working layer, you should duplicate the layer at each stage in order to compare the final image with the original one.
Removing photo defects - "Spot Healing Brush"
- Duplicate our photo - keyboard shortcut Ctrl+J.
- After cropping, we still have parts of the photo with defects in the corners, they can be corrected with the Spot Healing Brush tool, since in most cases it will not be difficult on damaged areas. We set the brush size depending on the size of the damage and just paint over the area, slightly, as if crawling to the edge of the background. In this case, after processing, if the background is homogeneous, the brush will replace the torn off corner of the photo with a similar tone and texture to the neighboring area. Step by step, it is worth painting over all the small defects in the photo with the Spot Healing Brush.
Correction of temporary losses - "Patch"
- Another tool is Patch, which does a great job with tasks such as restoring and restoring old photos. We select a tool and outline the problem area, trying to capture only the defect. To form a selection of the area for the patch, you need to close the circle. Then grab the selected area and drag it to the area next to it, try to avoid excessive contrast when choosing the area for the patch.
- After processing with these tools, this is what we got.

When working with areas of the central object in the photo, you should be extremely careful, as the Spot Healing Brush tool creates a “blurry” effect. In order not to lose the texture and detail of the image, you need to make the brush size slightly larger than the size of the defect and not overdo it.
Stamp tool when restoring old photos
Another great tool often used by Photoshop wizards is the Stamp Tool. Its principle is based on the transfer of color and texture to the damaged area from the area specified manually. Thus, with a properly configured tool (settings are individual for each photo) - brush size, opacity, pressure - a texture located next to the damage is transferred to the damaged area, which allows you to restore old photos with sufficient quality and return them to their original appearance. The Photoshop program for restoring old photos has a huge number of tools and settings, as well as extensions in the form of plug-ins for a wide variety of purposes.
Levels - Adding Depth to Photos
In addition to scuffs, cracks and tears, the photo fades over the years, so at least one correction is worth doing.
- Create an empty layer Ctrl N.
- Select "Image" / "Correction" / "Levels".
- On the histogram, move the sliders so as to exclude from the photo areas where there are no pixels - move the right slider to the left, the left slider to the right, the middle slider slightly to the left, but here you need to look at the lightening effect. When processing photos, you should be guided not so much by step-by-step instructions as by your vision of a particular photo and a sense of the golden mean.

In principle, the restoration of the old photo from cracks, temporary creases and ruptures is over; for slightly damaged photographs, these tools will be more than enough. We have fixed most of the shortcomings, and you can leave the photo in this state, or you can still correct the tone and saturation, remove noise, make the photo more vivid and interesting. It all depends on your imagination.
Restoring an old photo in Photoshop
Time can leave its mark on the pictures in your photo album, turning them into old and damaged photos with cracks and scratches.
In this tutorial, we will show you how to use the Adobe Photoshop editor, restore old photo and rid priceless family photos of extraneous shades, cracks, dust and scratches.
First, we'll look at how to restore the right hue from a faded photo by restoring the color tint to an old baby photo.
Restoring contrast and removing extraneous shades is quite simple. To do this, on the layers palette, select the layer of the open image and call the context menu by right-clicking on the image thumbnail. In the context menu that appears, select the Duplicate Layer command - create a duplicate layer.
Go to the tab Image - image, and execute the command Auto Contrast - auto-contrast. In most cases, the automatic color and contrast functions do a good job of correcting discolored or distorted tones. However, if the automatic algorithms cannot solve the problem properly, you should use the function of changing the levels of color shades. To do this, you need to create a new adjustment layer by clicking on the Create a New Fill from Adjustment Layer icon - creates a new adjustment layer or fill layer located at the bottom of the layers palette and selecting the Levels command - levels.
On the Adjustments panel that appears - correction, you need to move the black and white markers under the histogram to the center to increase the contrast.
Thus, after applying the Auto Contrast function, we increased the contrast using the Levels adjustment layer and restored the color tone of the photo in just a couple of steps.
Also, with the help of the Photoshop editor tools, you can remove unwanted tint from the photo.
Consider this with an old home photo that has a pronounced red tint. To begin with, on the layers palette, select the layer of the open image and call the context menu by right-clicking on the image thumbnail. In the context menu that appears, select the Duplicate Layer command - create a duplicate layer.
Now go to the Image tab and run the command Auto Tone - auto tone.
In most cases, we will get neutral shades. If the colors still don't look neutral, create a new adjustment layer by clicking on the Create a New Fill from Adjustment Layer icon at the bottom of the Layers Palette and choose the Levels command.
Go to the settings on the Adjustments panel, and in the Channel menu - channel, select the command Red - red. Next, you need to drag the middle marker to the left to increase the red hue or to the right to weaken it. After that, in the Channel list, select the Green command - green and move the gray marker again. Repeat the same action by selecting the Blue channel - blue.
If you set the Channel list to RGB, you can use a gray marker to lighten or darken the entire image without changing its color.
With the Photoshop editor, you can restore old photos removing small dust particles, cracks and scratches from them. Consider how to perform these operations on the example of an old military photo.
First create an empty transparent layer. To do this, go to the tab Layer - layers and in the drop-down list New - new, select the command Layer. You can also use the keyboard shortcut Shift + Ctrl + N. Now let's move on to removing cracks in the photo. Tears, scratches, creases and cracks that are present in many old photographs are most conveniently eliminated with the Spot Healing Brush Tool - a spot healing brush. And the Clone Stamp Tool is a stamp.
To get started in the toolbar, select the Spot Healing Brush Tool, you can also use the hotkey J. In the attribute bar, check the Sample All Layers checkbox. Sample all layers. And set the appropriate brush diameter.
Click on the defective part of the photo, gradually removing the crack. You may need to repeat this operation several times.
If the result does not suit you, then try using the Clone Stamp Tool located on the toolbar. First you need to set the starting point from which the area will be copied to replace the defect. To do this, while holding the Alt key, select the area on the image that is most suitable for replacing the defect and click the left mouse button. Then click on the defect. As you can see, the Clone Stamp Tool is much better suited to this image than the Spot Healing Brush Tool.
In the same way, continue to carefully paint over the cracks, while remembering to set new starting points.
With the help of the Clone Stamp Tool, you can also restore missing corners and fragments of the image by selecting the starting point in the same way.
It should be noted that we apply the Spot Healing Brush and Clone Stamp Tool to an empty layer, and not to copies of the original image. Because in this case, the tools will only borrow information from the background layer. This is very convenient so that after making changes, we can adjust the adjustment layers without fear of changing the color of the corrected areas.
Now let's see how to remove dust and scratches from this image. First, let's create a new layer, merging the previous two. To do this, hold down Ctrl and left-click on both layers, thereby selecting them. Next, click on any layer with the right mouse button and in the context menu that appears, execute the Merge Layers command. After the layer is created, call the context menu by clicking on the image thumbnail with the right mouse button. In the context menu that appears, select the Duplicate Layer command - create a duplicate layer. To remove dust and scratches, Adobe Photoshop often uses the Dust&Scratches filter located in the Noise group on the Filter tab. In the dialog box that appears, set the Radius value to 6 and the Threshold value to 16. And click OK.
This filter slightly blurs the image, so after applying it, you should add a new layer mask. To do this, click on the Add Layer Mask icon at the bottom of the Layers panel.
Zoom in for a better view and select the Brush Tool, setting the foreground color to black. Treat those areas where details need to be restored. For example, the outlines of a figure, eyes or lips. Thus, we have rid the images of many defects, significantly improving its appearance.
Also, to restore a photo, you can tint a black and white image to some shade. Using the following photo as an example, we'll look at how to tone an image to a sepia tone.
To do this, you need to create a color balance adjustment layer. Click on the button Create a New Fill from Adjustment Layer, located at the bottom of the layers palette, and select the command Color Balance - color balance.
On the Adjustments panel, in the Tone group, check the item Midtones - midtones.
To achieve a sepia tone, increase the red and yellow colors by dragging the sliders to the desired hue. The result will pleasantly surprise you.
It should be noted that there are such damage to the photo, which is very difficult to restore. If a part of the photo requires a very complex correction, as in this image, then you can try to cut off the damaged area using the Crop Tool - frame. On the toolbar, select the Crop Tool or use the hot key "C" and select the image starting from the corner of the photo.
As you can see, the selected area remains visible, while the outer one becomes darker. You can also hold down the left mouse button inside the selected area and move the frame to the desired position. Similarly, you can change the frame size. To do this, hold down the left mouse button on the corner markers of the created selection and move the cursor until the required size is obtained.
Then press the "Enter" key on the keyboard. Or double-click with the left mouse button to crop the image to the frame. Using this method, you can quickly crop an image by removing photo defects, as well as fine-tune the size of the future image.
Thus, thanks to the tools of the Adobe Photoshop editor, restore old photos won't be difficult. You can easily remove blemishes and damage, as well as restore color and contrast to faded photos, resulting in refreshed images.
(1)| 1. | Photomontage. Photo processing. | 14:19 | 9 | 28067 | |
| 2. | Create a label | 8:00 | 1 | 23925 | |
| 3. | Draw snow, rain, sun | 18:10 | 0 | 9958 | |
| 4. | Filter "Lens Correction" | 7:16 | 0 | 4208 | |
| 5. | Snapshot histogram | 9:33 | 1 | 6016 | |
| 6. | How to create a realistic shadow? | 16:33 | 0 | 8694 | |
| 7. | Vector masks | 15:54 | 0 | 7729 | |
| 8. | portrait retouching | 11:27 | 0 | 9564 | |
-
 Basic elements of personnel management Basic elements of personnel management
-
 Quality management at the enterprise: standards, stages of implementation, tips
-
 How is the quarterly bonus calculated and how is it paid?
-
 Mysterious crossing on Abbey Road in England John Lennon originally named the group differently
Popular
- "Abbey Road" cover as the basis for a conspiracy legend
- How to write a letter of guarantee?
- Merchandising, its types and principles Fundamentals of merchandising in the textile industry
- Marketing activities in wholesale and retail trade
- Indicators and criteria for management effectiveness
- Why is "Bird's milk" called "bird"?
- Analysis of the labor resources of the enterprise
- Management functions, management levels One of the management functions
- Basic management functions How many basic management functions do you know
- Theoretical aspects of the organization of wages at the enterprise