How to set up visual bookmarks in google chrome. Visual bookmarks in google chrome on android smartphones
Any browser has the ability to bookmark. This allows you to save your favorite pages and then open them at any time when you need. Yandex visual bookmarks for Google Chrome is one of the best solutions in this plan. They are very convenient and look great, allow you to make the browser interface more colorful.
Setting bookmarks
Yandex for Google Chrome is a browser extension from Google. It can be found and downloaded from the Google Chrome Add-ons Store by typing Visual Bookmarks in the search bar.
On the page with the results in the first place will be what we need. Open the add-on page and click "Install" in the upper right corner to start the installation.

This is how easy it is to install Yandex visual bookmarks for Google Chrome.
Instructions for using bookmarks
Opening the bookmarks bar in the browser is easy. You need to open a blank page or use the key combination Ctrl + T. Then the user will see those beautiful Visual Bookmarks on the screen. Initially, those pages that the user visits most often will be visible there.

To add your bookmark to this panel, you need to click on the inscription: “Add bookmark” in the lower right corner.

Then a window will appear on the display where you will need to enter the address of the page on which the bookmark will be created. Then you need to press the Enter key and, in fact, the bookmark is ready.

If for some reason the bookmark is no longer needed, it can be removed. To do this, move the mouse cursor over the upper right block of the desired bookmark and click the cross, after which it will disappear from the panel.

You don't have to delete the bookmark, just change the link. To do this, also place the cursor in the upper right corner of the tab and click the Settings (gear) button.

By the way, the blocks can be swapped and placed in the desired order. To do this, RMB should hold down the desired bookmark and drag it where the user needs. When the mouse button is released, the bookmark will be fixed in the new location.

In order for the bookmark to always remain in its place, you can pin it. To do this, move the mouse cursor to the right corner of the block and click on the lock icon.

Conclusion
Yandex bookmarks for Google Chrome is an excellent extension from Yandex that makes our favorite browser more convenient and colorful. The add-on is easy to install in the browser, and there is nothing complicated in managing bookmarks, any user will figure it out.
Organizing bookmarks in your browser is a procedure that will increase your productivity. Visual bookmarks are one of the most popular ways to arrange web pages in such a way that you can quickly jump to them at any time.
Today we will take a closer look at how the addition of new visual bookmarks for three popular solutions: standard visual bookmarks, visual bookmarks from Yandex and Speed Dial.
In standard visual bookmarks
By default, the Google Chrome browser has some kind of visual bookmarks with very limited functionality.

The standard visual bookmarks display frequently visited pages, but, unfortunately, you won't be able to create your own visual bookmarks here.
The only way to customize visual bookmarks in this case is to remove unnecessary ones. To do this, move the mouse cursor over the visual bookmark and click on the displayed icon with a cross. After that, the visual bookmark will be deleted, and another web resource you frequently visit will take its place.
In visual bookmarks from Yandex
Yandex Visual Bookmarks is a great easy way to put all the web pages you need in the most visible place.
To create a new bookmark in the Yandex solution, click the button in the lower right corner of the visual bookmark window "Add Bookmark" .

A window will appear on the screen in which you will need to enter the URL of the page (site address), after which you will need to press the Enter key to make changes. After that, the bookmark you created will be displayed in the general list.

Please note that if there is an extra site in the list of visual bookmarks, then it can be reassigned. To do this, move the mouse cursor over the tab tile, after which a small additional menu will be displayed on the screen. Select the gear icon.

The already familiar window for adding a visual bookmark will appear on the screen, in which you will need to change the current site address and set a new one.

In Speed Dial
Speed Dial is a great functional visual bookmark for Google Chrome. This extension has the widest set of settings, allowing you to fine-tune each element.
When you decide to add a new visual bookmark to the Speed Dial, click on the plus sign tile to assign a page to the empty bookmark.

In the window that opens, you will be prompted to specify the page address, and, if necessary, set the bookmark thumbnail.

Also, if necessary, an already existing visual bookmark can be reassigned. To do this, right-click on the bookmark and in the menu that appears, click on the button "Change" .

In the window that opens, in the column URL enter a new visual bookmark address.

If all the bookmarks are taken, and you need to set a new one, then you will need to increase the number of bookmark tiles displayed or create a new group of bookmarks. To do this, click on the gear icon in the upper right corner of the window to go to the Speed Dial settings.

In the window that opens, open the tab "Settings" . Here you can change the number of displayed tiles (deals) in one group (default is 20 pieces).

In addition, here you can create separate groups of bookmarks for more convenient and productive use, for example, "Work", "Study", "Entertainment", etc. To create a new group, click the button "Group Management" .

Next click on the button "Add Group" .

Enter the name of the group and then click the button "Add Group" .

Now, returning again to the Speed Dial window, in the upper left corner you will see the appearance of a new tab (group) with the previously specified name. By clicking on it, you will be taken to a completely blank page in which you can start filling in your bookmarks again.

So, today we looked at the main ways to create visual bookmarks. We hope this article was useful to you.
Constantly confused in bookmarks in search of the desired web resource? Put the most visited sites on the browser start page - this will greatly facilitate surfing. You can do this using the Visual Bookmarks add-on from Yandex.
These "tiles" look more than attractive.
Visual bookmarks - what is it
Visual Bookmarks is a list of your browser bookmarks, displayed as organized icons on the start page and in a new browser tab. Maximum amount links that can be placed - 25 pieces, for comfortable access to the most visited resources, it is enough.

Visual bookmarks from Yandex compare favorably with competitors, thanks to:
- Ease of installation and configuration;
- Do not load the browser with additional advertising;
- The design is thought out to the smallest detail;
- Ability to import / export your own bookmarks, directly to the panel.
Installation methods
Set Visual Bookmarks to Chrome browsers, Mozilla, Opera in two ways:
- Download a special extension from the store, for example, chrome.google.com/webstore or addons.mozilla.org/en/firefox.
- Install Yandex elements from the element.yandex.ru page.

In the Yandex browser, bookmarks, like , are part of it, they just need to be enabled in the settings.
Enable bookmarks in Yandex Browser
1. By default, bookmarks are already enabled and displayed in a new tab. If not, then go to settings.

2. Enable the items indicated in the screenshot and restart the browser.

3. Switch to the "Scoreboard" section and the desired "tiles" will appear in front of you.

User settings
You can add the desired site or arrange the list by clicking on the inscription - "Customize screen".

To make changes, use the buttons shown in the figure and at the end, confirm by clicking on "Finish".

Visual bookmarks for FireFox and Chrome
As mentioned above, there are two options for installing Visual Bookmarks in third-party browsers.
Installation and configuration will be carried out in Mozilla, believe me, the differences from Google Chrome are minimal and you can easily repeat all the steps.
Special extension
1. The first method is to install a special extension for Mozilla. Download and activate it from the link - addons.mozilla.org/ru/firefox/addon/yandex-visual-bookmarks/ , from the official add-ons store.

2. Open a new tab - bookmarks should already appear. Go to settings and adjust the number of displayed addresses and their appearance.

3. Sort the "tiles" to your liking by simply dragging them around the screen. To change or delete an address, move the mouse cursor over it and wait until the settings icons appear.

Element.yandex.ru
1. The element.yandex.ru site was created so that users do not bother themselves with a long search for the desired extension in stores - just press one button.


Setting up is no different from the above procedure.
How to remove visual bookmarks
As you might have already understood, deleting bookmarks from will not work - you can only hide them by doing all the steps in reverse order.
To remove from Chrome and FireFox, go to the add-ons section and delete the Visual Bookmarks extension.

How to restore bookmarks
When you change the browser or move to a new computer, there is a need to transfer and restore previously added bookmarks.
You can restore them only if you have a previously saved data file. The method of obtaining it depends on the browser used, which we will discuss below.
Yandex browser
1. To save all data in the Yandex browser, go to the bookmark manager.

2. By clicking on the inscription "Organize", select the item "Export all bookmarks to an HTML file".
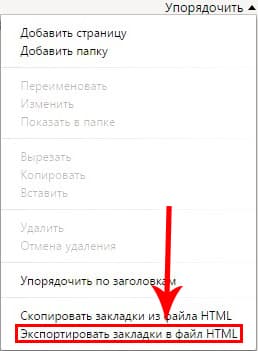
3. Save the file in a safe place, and if you need to restore it, follow the same steps, selecting "Copy bookmarks from HTML file" at the end.
Visual bookmarks
Saving bookmarks using the Visual Bookmarks add-on is not particularly different in other browsers.
1. Going to the add-on settings, select "Save to file".
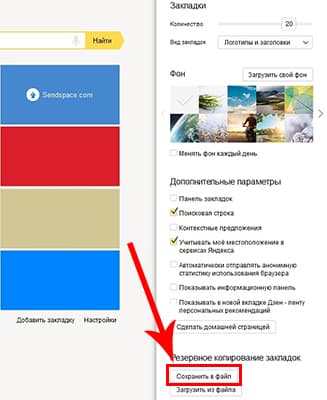
2. For recovery - "Load from file".
Summing up, today's review, it should be emphasized that the add-on in question greatly facilitates surfing the Internet. Installation and configuration does not cause any special problems for users, apparently the experience of Yandex employees affected.
And most importantly - visual bookmarks are absolutely free and do not pose a threat to the computer.
The Google Chrome browser is excellent in many ways: speed, ease of use, security, extensibility, and many others. But the developers did not think of visual bookmarks or did not really want to.
By default, chrome has regular bookmarks that can also be placed in a row under the address bar, and some kind of visual bookmarks that appear on a new tab. These bookmarks display the last visited pages and cannot be influenced in any way. Chrome is good because any of its shortcomings are eliminated with the help of additional extensions. The first time I saw visual bookmarks was in the Opera browser. When they were born, it was something new and quickly became fashionable.
How to install an extension in Google Chrome
To install visual bookmarks in Chrome, you just need to install the extension you like or use a cloud service. Installing different extensions does not differ from each other. The general algorithm of actions is as follows:

These are the most normal, in my opinion, bookmarks. To install them, follow the link and click the "Install" button.
If the link does not work, then you need to install Yandex Elements. To check the work of visual bookmarks, open a new tab in the browser:

By default, there will only be bookmarks with Yandex links and some of the latest ones. To add a new site, click the Add Bookmark button. You can select one of the recently visited sites or enter your link and name. Managing bookmarks is very simple: you can swap them by dragging with the mouse, change links and names, hide and delete them. When you hover over the bookmark icon, menu icons appear, with which you can do all these actions.
Click on the "Settings" button in the lower right corner and see what is there.

Advantages and disadvantages of cloud bookmarks
There are a lot of online services, opening the main page of which, you see visual bookmarks. Simply put, everything is stored on a remote server - in the "cloud". The advantage is obvious: no matter where you are, no matter what browser you use, on a computer or tablet, in Windows or MacOS - you can always go to your cloud and use the saved links.
For example, at work you have installed a corporate Internet Explorer browser or any other. During the not easy labor day a few interesting links have accumulated that you need to open at home in Google Chrome. In such a situation, it will no longer save. Now you can save bookmarks in the cloud, which is available from anywhere where there is an Internet connection.
Of the shortcomings, only the need for registration and the possible loss of all links if the service disappears. But if the bookmark data is stored on a computer, then the risk of losing it is even higher. There is also the inconvenience of adding new bookmarks, because. I had to manually copy the links and add them to the piggy bank. But there are services that offer an additional browser extension, such as the excellent and free bookmark manager Atavi.
In principle, the same Yandex bookmarks are an interweaving of the cloud and extensions for Chrome, but they can work completely offline, and purely cloud ones always require the Internet. Perhaps, Yandex loses only in that on different computers you will have to log in under your own name in Yandex, which is not safe, and it does not open in all countries anymore, and the functionality of visual bookmarks is a matter of taste.
Installing the Atavi Extension
To get started, go to the site by clicking the button, go through a small setup wizard and register by entering your username and password. Nothing else is required, you do not even need to confirm the registration from the letter.
Agree with the granting of rights to the extension with the "Add" button. The home page will be changed to atavi.com and will be notified. Video:
Basic bookmarking techniques
Everything is as simple as two-two. The main page displays the initial page of visual bookmarks. You can also create your own groups and switch between them using the tabs at the bottom of the window. In my example, there are three tabs: "Initial", "Recent" and "Currency" created by me

To add a new bookmark, click on an empty space with a large plus sign, enter the address, name and select a group:

Or just right-click on the page of any site that we want to save, and select the "Send to Bookmarks on Atavi" item in the context menu

The new element will appear on the start page. To delete a bookmark or change the data, you need to click the cross or the gear that will appear at the bottom right if you hover the mouse over the element

You can also move links between groups simply by dragging them to the desired group tab. You can also add a new bookmark using the Atavi icon in the browser address bar, in this case you can immediately change the name and group

To create or change a group, use the gear button at the bottom right of the Atavi window. By default, when you click on a group tab, you go to it, but in edit mode, you can change the name of the group. To finish editing, you need to click on the gear again and select "Finish".
Share bookmarks with friends


Export, backup, import
In any service that respects its users, of course, there is a function to export all links, just in case. Here this function is in general settings:

Everything is saved in a convenient HTML format, i.e. in the form of a simple page that opens in the browser, and all links are clickable:

In the settings, you can also change the look or switch to a reduced mobile version. And if you uncheck "Enable groups", then all bookmarks from all groups will fit on one page.
The developers have gone even further and offer to make their usual bookmarks visual, i.e. import from the browser to your Atavi account. To use this function, you need to export the usual Chrome bookmarks to HTML and import them using the "Import" function of the same name in the Atavi settings. Or install the extension, it will do everything by itself.

I think it’s already clear that if the browser extension is not installed, then just go to atavi.com and log in, you will see all your bookmarks. You can do this on phones and tablets, but there are apps for them too.
I completely switched to Atavi and I advise you. I liked the intuitive interface, fast speed, the ability to add bookmarks from the address bar. Of course, the main focus is on integration with Google Chrome, but it can also be used, whether Mozilla Firefox, Opera or Internet Explorer.
Visual Bookmark Veteran - Speed Dial 2
This tool allows you to fully customize the appearance and style of your bookmarks, import your most visited sites, view statistics, export your settings, and more.
Now let's open a new tab to see how the extension works. At the first start, you will be asked to go through an introductory tour, or skip this step. I advise you to quickly review it, so that later there are no questions. Next, the wizard will start to bookmark the sites you visit most. 
For the first time added bookmarks are shown without a thumbnail image, and I didn't like that. To add a picture, you need to go to the bookmark once or click "Create Thumbnail". Speed Dial settings are called up from the menu by right-clicking on empty space. There are a lot of settings, we will analyze the main ones here, and look at the rest in the video.

In the main settings we can:
- Select number of tabbed columns (default 5)
- Distance between bookmark thumbnails, in pixels
- Bookmark ordering method: manually by drag and drop or automatically by number of visits
- Center vertically so that the tab bar is in the middle of the screen
- Specify how often to update the preview
The Speed Dial 2 extension has a sidebar that appears when you hover your mouse over the right edge of the window. It has all the usual and recent closed bookmarks. You can also select or upload a background image. Another interesting feature is synchronization with Delicious social bookmarking service.
The easiest bookmarks from Mail.ru
Compared to bookmarks from Yandex, these are the simplest.
The principle of operation is exactly the same, only there are no settings, and only nine (3x3) tabs are available.

Everything is added and removed in the same way.
How to disable and remove old extensions
After searching and experimenting, you may accumulate several unnecessary extensions that will be . To disable an unnecessary extension, go to "Menu -> Additional Tools -> Extensions", find the add-on and uncheck "Enabled"
And to delete it completely (the settings are not saved!) You must click on the basket and agree to the deletion.
Web browsers have evolved over the years. Therefore, today it is extremely difficult to cope with a large stream of data without the proper means to organize your favorite web pages.
Visual bookmarks are bookmarks with thumbnails of the web page they point to. These extensions allow you to capture part of a web page as an image and then add labels/tags to create a visual bookmark. You can then view them in a gallery that can be organized by keywords.
One of the most popular extensions for visual storage and synchronization of your bookmarks. In addition to the search bar, all frequently visited sites on the main page are present:
- weather information;
- exchange rates;
- information about traffic jams in the vicinity;
- links to closed tabs, downloads, other bookmarks and browsing history.

Step 1. Find it in the Google Extensions Store. Click on the "+ Install" button. Confirm your intention to install the extension in the browser dialog that appears.

Step 2 The extension will be automatically installed, and now instead of the usual start window, you will see a new one - along with all the bookmarks. You can customize them as you wish. To delete a bookmark, hover over it until a cross appears in the upper right corner. Click on it and the bookmark will disappear. To add a new bookmark, click on "Add Bookmark" and follow the instructions that you will see on the screen.

To add a new bookmark, click on "Add Bookmark"
Step 3 Setting up the start page. To make changes, click on the "Settings" button.

Step 4 A settings panel will open on the left. You can change the background of the page by choosing one of the options provided, or by uploading your own. It is also possible to increase the number of visual bookmarks up to 25 and change their appearance.

Best Bookmark Managers
On a note! In addition to extensions for visualization, there are more advanced tools for organizing bookmarks. Organizers that go beyond browser extensions offer users effective method bookmark processing.
There are a lot of them, this article will consider 7 unique tools that allow you to organize them by visualizing them.
| Name | Image | Main characteristics | Supported Platforms |
|---|---|---|---|
 | Saving bookmarks via web browser extension, mobile applications, email, desktop app, web-based bookmark access and management, and more | Web interface, Google Chrome and Mozilla Firefox extension, Android/iOS/BlackBerry/Windows Phone mobile apps, Windows and Mac OS X desktop apps | |
 | Easy sync between Windows and Apple bookmarks, Mozilla Firefox/Google Chrome/Internet Explorer sync with Safari bookmarks | Mozilla Firefox, Google Chrome Extensions, Internet Explorer |
|
 | Sync across all major web browsers, import from Delicious, export/restore bookmarks, password sync and more | Internet Explorer, Mozilla Firefox, Google Chrome, Safari web browser extensions, web interface; Apps for iPhone/Android/BlackBerry/Windows Phone (Xmarks Premium only) |
|
 | Easily save links, share them on Facebook and Twitter, follow different users, discover new trending topics and more | Google Chrome, Mozilla Firefox and web interface |
|
| Diigo |  | Annotating bookmarks, screenshots, various mobile apps and browser extensions, sending links via e-mail, import/export bookmarks | Google Chrome, Mozilla Firefox, Safari, Internet Explorer browser extensions; Android, iOS and Mac |
 | All bookmarks are fully saved in the cloud | Google Chrome and Mozilla Firefox, web interface for accessing saved bookmarks |
|
 | Powerful search mechanism, beautiful organization, editing, viewing or deleting bookmarks | Google Chrome Web Bookmark Manager |

By far the most complete tool for managing your bookmarks, no matter what device you use. Pocket bookmarks are available for Google Chrome and Mozilla Firefox. When you click the "Tick" Pocket icon in your browser, the link will automatically be saved to your profile. You can also add tags to individual links to make them easier to find later.
Step 1. Find this extension in the Google Chrome store.

Step 2 Along with this, register on the official website of this extension. This is necessary to store and sync your bookmarks across all connected devices.

Step 3 As soon as the extension is installed, the corresponding icon will appear in the extension bar. In order to save a bookmark you will only need to click on this button and the page will be saved automatically.


Apple's iCloud Bookmarks is a tool that allows users to seamlessly switch between all Apple devices, including iPhone, iPad, and Mac. It also allows Apple users to seamlessly sync saved bookmarks across all registered devices. With the iCloud Bookmarkss extension, your saved bookmarks will be seamlessly integrated into all your registered Apple devices.
As in the previous case, you will need to install the extension in your browser. You can find it in the extension store.

Xmarks is a reliable tool for syncing bookmarks across different web browsers
Xmarks is a reliable tool for syncing your bookmarks across different web browsers. With support for Internet Explorer, Google Chrome, Mozilla Firefox and Safari; Xmarks offers full bookmark sync across all of these web browsers.
Step 1. Install the appropriate web browser extension.

Step 2 Register on the official website. Click the "Xmarks" icon on the taskbar to sync all your passwords and bookmarks with your Xmarks account and all other browsers you use.


Delicious is more than just a bookmark manager. You can also subscribe to different topics and groups to receive updates related to this area. Based on your interests, you can also view Top Trending topics in your chosen area of interest.
Step 1. Install the extension from the extension store.

Step 2 Once the extension is installed, you will see its icon in the extensions panel. By clicking on it for the first time, you will be able to register for storing bookmarks on the network. Once you log in, this button will bookmark the page you are on.

Dewey Bookmarks

Dewey Bookmarks is a Google Chrome extension that helps you better organize and manage your bookmarks
Dewey Bookmarks is a Google Chrome extension that helps you better organize and manage your bookmarks. The extension collects all your Google Chrome bookmarks and includes them in a strikingly beautiful web card layout. You can add "tags" to bookmarks to make them easier to access at a later point in time.
Step 1. Install the extension from the online store.


Now, every time you click on this button, all your bookmarks will appear on your screen, with large pictures.

Video - How to make visual tabs in Google Chrome


Popular
- Business plan: how to open a bus business
- Open a quail farm
- How to open a farmstead from scratch
- Mulard ducks: main indicators and features
- Trial tests in the OGE format in social studies (grade 9)
- Business plan for a maternity clothing store
- Ducks Indian Runner: main indicators and characteristics
- Breeding ducks at home
- I will solve ju social studies. OGE in social studies
- The meat breed of ducks is the best