Start breeding worms. Breeding worms at home for fishing
Breeding worms at home allows you to start a business with minimal investment, our investments amounted to only 1100 rubles. Not bad, right? We bought Prospector worms for 1000 rubles, but there were few worms in the box. This fact did not prevent us from engaging in worm breeding.
When the worms were brought to us, we had to transplant them into a box, we bought the box for 10 rubles in a fruit and vegetable store. Fruit boxes are good because they have holes around the entire perimeter, and worms need air. But in such a box you cannot put earth with worms. Therefore, for the remaining 90 rubles we bought agrofibre, in which one side passes air.
In the box for worms, we put the agrofibre with the breathable side out, so that air could penetrate to the worms, and we settled the worms in the box. They had a supply of food, so at the beginning we did not feed them. So we got a vermifarm.
Read on for a detailed guide on the technology of growing and keeping worms, as well as about vermicompost fertilizer obtained with the help of worms.
Types of worms
Technological earthworms differ from ordinary earthworms in that they can live in a higher concentration per 1 sq.m. In principle, you can dig up earthworms in your area, but these worms will not be as effective as technological worms.
Earthworms are a brilliant creation of nature and are used to:
- soil formation
- soil restoration
- for the production of biohumus and liquid biohumus
They will be especially appreciated by supporters of natural farming and connoisseurs of organic products grown without the use of chemicals.
They are also used for fishing and animal feed.
Three types of popular earthworms are described below:
Worm Prospector
This is the Vladimir hybrid, which Professor Igonin A.M. obtained this worm in laboratory conditions by crossing local earthworms with the Kyrgyz earthworm Eisenia foetida. That is, the Prospector worm is a technological rain compost (dung) worm Eisenia foetida.

California worm
It was bred in California in 1959 as a result of selection. The California worm is the technological earthworm Eisenia foetida.
Worm Dendroben Veneta
It was bred in Europe, especially for fishing. The Dendrobaena Veneta worm is the earthworm Dendrobaena veneta or Eisenia Veneta. Differs in fleshiness and survivability.
Technology for growing worms at home
Conditions for breeding worms
For productive breeding of worms, it is necessary to constantly maintain comfortable conditions for them. There is no single recommendation on how this can be done, the climate is different for everyone, in some regions it is easier to observe favorable conditions, in others it is much more difficult. The conditions are as follows:
- ambient temperature +8 +29 degrees
- it is necessary to constantly maintain moderate humidity in the boxes where the worms live
- it is necessary to constantly ensure that the worms always have food, can be calculated in such a way as to bookmark food for them for 1 week, instead of constantly putting food

They breed at a comfortable temperature for themselves from +8 to +29 degrees, if the worms are cold or they lack moisture or food, reproduction stops until favorable conditions are restored. Worms die at temperatures above 39 degrees. Cocoons mature in 2-3 weeks.
Cocoons of worms can dry out, freeze and remain in this state for months, but when favorable conditions are restored, the cocoons swell and newborn worms emerge from them.
Worms
The choice of a worm hive depends on where you plan to breed worms: in an apartment, in a country house, on the street or in a utility room. And also the choice will depend on your goals: do you plan to organize the production of vermicompost or want to fertilize and restore the soil only on your site.
If you are just starting to deal with worms and plan to organize a business in the future, start with 1-2 boxes of worms, do not buy a large batch of worms at once, study the process of breeding and obtaining vermicompost, gradually increasing production.

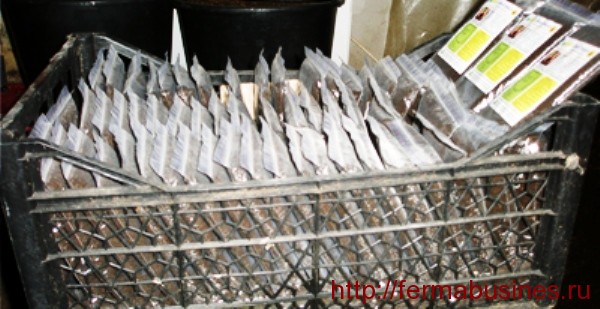
Breeding in an apartment. In the apartment, worms can be kept in plastic fruit boxes, such boxes can be found in any fruit store. We also tried to keep the worms in wooden fruit crates, but in them the board is too thin and cannot withstand the load, so we had to abandon this idea.
Also at home they keep worms in special ready-made vermifarms and vermicomposters from which it is convenient to get vermicay, such vermicomposters are usually equipped with a faucet.

Breeding on the street. Worms on the street are in danger in the form of moles, mice, birds and bears, so the container in which the worms will live must have a bottom. Many people keep worms outside in old enameled bathtubs, this method is good because liquid biohumus flows from the hole at the bottom of the bathtub.
trench breeding method. The trench should be 60 cm deep, 2.5 m long and 1.2 m wide. Such a trench can accommodate 50,000 individuals. To protect the worms from pests, the bottom and walls of the trench are laid out with boards.
It is desirable to put drainage at the bottom of the trench. The next layer is rotted horse manure. Then the soil and the third layer - peat. From above, it is desirable to close the trench with breathable agrofibre. Subsequently, biohumus is extracted by sieving.
![]()
In the utility room. Worms are kept in completely different ways: on racks in boxes, mounds of earth are made on the floor and worms live in these mounds, they are kept in large wooden piles, in general, it all depends on your imagination and capabilities.
DIY vermifarm
Before making a farm, decide what your main goal is: obtaining biohumus, obtaining liquid biohumus or breeding worms. This is necessary so that the vermifarm is designed in such a way that you can then extract the final product without any problems.
Vermiferma for an apartment.
You will need a fruit box (or another box that allows air to pass through, size is approximately 40cm x 25cm x 25cm), the earth is quite loose, agrofibre breathing on one side, pre-prepared food for worms.
How to make a vermifarm. The first thing to do is to cut the agrofibre in such a size that it fits into the box and there is still a supply that can be used to “wrap” the worms. Next, you need to put the agrofibre in the box, the breathing side should come out so that air enters the worms, and inside there should be a side that does not let moisture through. After that, you can begin to populate the worms in the box.
Usually, when buying worms, they come with a minimum amount of earth, so you will need to stock up on earth in advance, it must be loose enough earth for the worm to move in it. Clay in this case will not work. At the bottom of the box, pour a layer of earth, 10 centimeters. Put the worms on the ground. Top with a small layer of earth.
The next layer will be food: rotted food waste, or rotted manure, or rotted leaves. The main thing is that there is not a lot of liquid in the food and the worms are not in the swamp. For example, we mix kitchen waste with rotted leaves; for the home, this is a fairly convenient food option. After the layer with food, you need to pour the earth again so that midges do not start in your house.
Video: Breeding worms Prospector. What you need to start breeding
Vermifarm in the country. The principle of organizing the worms is exactly the same as described above, the only thing is that in the open air you can already feed the worms with manure or keep them on only one manure. And in this case, you will have a wider choice of containers in which the worms will live.
What to feed the worms
Worms are fed with rotten organic matter, it can be: manure, chicken manure, straw, sawdust, fallen leaves, weeds, kitchen waste. But among organic waste there are exceptions that cannot be fed to worms, these are: meat, bones, fish, milk, lemon, onion, garlic, hot peppers, as well as cat and dog feces.
In 24 hours, the worms pass through themselves an amount of soil mass equal to the mass of their body.
Growing worms
After you have settled the worms in a vermifarm or vermicomposter, provided them with food, you need to periodically monitor whether suitable conditions are met for them: humidity, temperature, food, lack of sunlight. It is enough to bookmark food in the worm box once a week, provided that there is enough food for a week.
Under favorable conditions, the worms will begin to multiply.
Video: Growing worms at home. We share the secrets of how we breed worms
Reproduction of worms
Worms breed in a favorable temperature for them from +8 to 28 degrees, in the presence of food and favorable soil moisture. In unfavorable conditions, reproduction stops.
One individual has both female and male reproductive organs. In order to lay cocoons, the worms mate. Earthworm eggs are laid in egg cocoons. The size of the cocoon is from 2 to 6 mm. Under favorable conditions, cocoon worms lay 1 time in 7 days.
A dung worm has 6-20 eggs in a cocoon, but not all of them develop. The eggs are fertilized after laying. The spermatozoa are in the cocoon and then penetrate the eggs. Worms in a cocoon develop 2-3 weeks. The hatched worms are 10-15 mm long and immediately begin to look for food.
Worm farm for business
Consists of boxes that are stored on racks. You will need 35cm x 40cm x 15cm boxes made from thin boards, at least 4mm thick. Subsequently, it should be possible to put one box on another. In order for air to circulate in the box, several holes of 2-3 cm are made at the bottom or on the sides.
Rotting horse manure (1 part) is placed at the bottom of the box, then a layer of earth (1 part) and peat (1 part) are placed. To prepare compost, you must have a separate, fairly large box. The compost should be dampened with water before being put into the worm box.
About 500 pieces of worms are populated in one such box.
The earth can feed 5-6 million worms per 1 ha. If worms are artificially bred, 345 million individuals can be kept in 1 ha.
From above, the box should be covered with agrofibre, which allows air to pass through. Boxes should be located in a room where the sun's rays do not penetrate. Soil temperature should not exceed 17 degrees. In the boxes it is necessary to maintain a constant moderate humidity.
To select worms and cocoons from such boxes, the following operation is carried out: a box is taken and the contents from it are shaken out to the surface, it is desirable that it be a large table. Further, layer by layer is viewed and cocoons and worms are selected. Large worms are put back in the box, they will continue to produce vermicompost and offspring. The cocoons are either sold or placed in a new box where there are no worms yet. Young worms can be put in a new box along with cocoons, or planted under plants. Separation of worms is carried out once a month.
55,000 cocoons are obtained from 4 boxes per year
Another, less time-consuming process of family separation is carried out as follows: adult worms are lured out of the box for sugar and they are moved to a new box, and crawling worms and cocoons remain in the old box. Subsequently, biohumus is extracted by sieving.
One Prospector worm per year produces offspring of 1500 individuals and 100 kg of biohumus. From 1 ton of compost, 600 kg of biohumus and 10-15 kg of worms are obtained.
business on worms
This type of business belongs to a noble cause, because you help restore soils, grow more useful products enriched with minerals and without the use of chemical fertilizers.
Worm business can be attributed to those types of business that require minimal investment with one BUT. Yes, to enter this business you need 1100 rubles, but the business will develop very slowly, you will need to wait until the worms multiply.
On the one hand, this is good, especially if you are new to this business, you can slowly study all its features while the worms breed. Earn clients. And have a bonus in the form of incoming cash.
But if you are already an expert in this business, investments in the business should already be more solid in order to seriously engage in the production of biohumus and the sale of worms. To do this, you need a building or land.
The advantage of this business is that vermicompost is a very popular product and not only in Russia. Look at the map of the world, how much land you see covered with sand, all these countries are in dire need of biohumus to create soil. Organic farming is also gaining popularity, people are more and more interested in organic products grown without the use of chemicals.
To start a worm business, you will need:
- worms, preferably a breeding stock that contains cocoons and young worms
- box where you put the worms
- decayed organic waste that is food
- soil in which worms will live
- breathable agrofibre to close the top of the drawer
Breeding worms as a business makes it possible to sell the following products: a family of worms, a breeding stock of worms, worm cocoons, crawling out of a worm, biohumus, liquid biohumus.
The current problem with worm breeding is that the process is not mechanized and requires a lot of manual labor. Therefore, there are only a few large companies producing biohumus.
Customers for products: agricultural enterprises, farmers and individuals
Utilization of manure in farms
Vermiculture is an ecological and cost-effective way to dispose of organic waste by processing it with earthworms.
Manure, passing through the body of the worm:
- seeds from manure lose their germination
- significantly reduced the content of Escherichia coli
- reduced number of pathogens
Processing manure with worms helps solve three problems:
- obtaining organic biohumus fertilizer
- animal waste disposal
- environmental protection
Worm-assisted vermicomposting is used for waste disposal in agriculture. Worms accelerate the process of manure processing, while the process of mineralization occurs, the concentration of pathogenic organisms decreases. Worms enrich the soil with nitrogen, phosphorus and potassium, removing these chemical elements from decayed plants.
The resulting biohumus contains nutrients and mineral compounds in a form available to plants. Such vermicompost passes all sanitary standards and is absolutely harmless to vegetables and fruits.
To carry out the vermicomposting process, it is necessary to prepare manure for this as follows:
moisture content of manure 70-75%
For the production of vermicompost on an industrial scale, the following methods of keeping worms are used: boxes, piles, heaps. The most popular way is to use boxes and collars.
Heaps or boxes are filled with substrate and worms are placed there. Periodically carry out moistening of the substrate using watering machines or hoses. From time to time the surface is loosened.
Biohumus
Biohumus - it is an organic, environmentally friendly fertilizer with a high content of carbon, potassium, phosphorus, calcium, enriched with macro and microelements, enzymes, active microflora. Biohumus does not contain pathogenic microflora and weed seeds.
Biohumus looks like a free-flowing finely granulated mass, odorless, brown or black.
The use of intensive technologies in agriculture has led to a deficit in the balance of humus in the soil. The solution to this problem is biohumus.
The use of biohumus
The concentration of nitrates in vegetables and fruits is reduced by 2 times, the content of vitamin C, sugars, carotene, starch, dry matter increases.
- to enrich the soil with humus
- to accelerate seed germination
- to increase yield by 30-80%
- to accelerate plant growth
- increases plant resistance to pests
- used to detoxify the soil
- to accelerate the breakdown of pesticides in soil and plants
- for soil improvement
- to increase the shelf life of vegetables
- to obtain environmentally friendly and safe products
It is applied to all types of agricultural crops: from garden greenery to trees.
Using biohumus will save you money that you could spend on chemical fertilizers.
1 ton of biohumus gives an increase in grain yield by 100-200 kg, potatoes 1600-1800 kg, vegetables - 200 kg. At the same time, the crop ripens 10-15 days earlier.
Video: Biohumus, vermicompost benefits and applications. The best organic fertilizer
Instructions for the use of biohumus
- Apply to the soil from early spring to late autumn.
- It is introduced into the soil before planting, both in open ground and in closed ground. The application rate of biohumus is 30 kg per 1 weave.
- Root top dressing is carried out during the period of maximum growth of green mass.
Worms for fishing is a classic and widespread bait for almost all fish, with the effectiveness of which it is difficult to argue with other types of baits, which most anglers are well aware of. And if in natural conditions it is not so difficult to get such a bait knowing about the places of its habitual habitat, then in urban conditions, buying a nozzle becomes the best option. For fishing enthusiasts who periodically go to fishing sessions, the problem of the amount of bait is not as relevant as for avid anglers who actively fish and use this animal bait in complementary foods.
The acquisition of a large number of portions of the nozzle will cost a lot, and sometimes it is quite difficult to find a material of high quality and suitable in size for the conditions of fishing. The way out of this situation is to breed worms for fishing on your own at home. With modern technologies and adherence to a certain culture of production, these processes are within the power of any fisherman, and the cost of raw material and equipment can more than recoup these investments in a short period of time. The article you read will help to convince the angler of the simplicity and accessibility of worm breeding technologies.
The main advantage of this classic nozzle is its versatility. After all, even having simply dug up worms in the garden, the angler has the right to count on the capture of almost all types of carp fish and even some obvious predators. Moreover, this type of nozzle is suitable for both float and. Availability of bait also plays an important role. Knowing the characteristics of the life of a certain type of worm, the angler can easily get a nozzle on his own. Of the tools, you only need a shovel, and roadside soils of roadsides, earthen areas near the accumulation of garbage and manure heaps are almost everywhere populated with this type of bait.

Low storage requirements, for which you need ordinary slightly moist soil or moss, allow you to stock up on bait for a long time without really bothering with its care. Well, the ease of use of bait does not cause difficulties even for a novice angler. After all, when using a worm for fishing, there are no special requirements even for the shape of the hook. The main thing is that it should have a hook that prevents spontaneous slipping of the bait and the size that is optimally suitable for the nozzle.
What worms are used by fishermen
Most species of ringworms living in our latitudes are suitable for fishing, in addition, California worms have been bred under artificial conditions for a couple of decades by specialized farms for fishing and agricultural activities related to soil-forming activities and poultry rearing. The aborigines who inhabit our soils everywhere include earthworms, earthworms or creeps and dung worms. The leaf worm is widespread in overripe deciduous masses, and the marsh worm lives in the marshy and coastal soils of reservoirs.
The varieties of the Californian worm species introduced and already in some regions wild and adapted to the weather conditions include the red worm and dendrobene. Standing apart from these original species is the larva of the beetle-hruschak or the flour worm, which is also included in the rank of popular and unpretentious to storage conditions. The interesting thing is that all of the above types of worms can be grown at home.
How to breed worms for fishing

Breeding worms for fishing will require some preparations from the angler and, in particular, the preparation of special containers, soils, the initial brood population of the selected type of bait and the substrate in which the worm will breed and feed. Under the worm, it is most practical to adapt plastic or wooden boxes no more than 40 cm high with drainage holes made in the bottom. Soils are used depending on the type of worms, but in most cases you can use earth from molehills or directly from the garden.
Important! When taking soil to fill the wormholes, you need to pay attention to the absence of ash in the earthen compositions, which will subsequently negatively affect the vital activity of the bred organism, increasing acidity.
Biological planting material or breeding stock can be purchased in special nurseries, or you can simply remove it directly from the natural environment by simply digging up a suitable amount of the worms you need by type. The substrate for organizing nutrition and drainage for each bred species of worm is prepared using special technologies, which the angler will learn about by reading the further material of the article regarding the process of reproduction of a particular species separately.
How to breed creep worms

In nature, creeps live in moist soils mixed with decaying plant organic matter, tree leaves and dying grass, which is precisely their main and natural food. For fishing and the process of breeding, creeps are collected after rains in the evening and at night, when they crawl en masse to the surface of the soil.
Important! The sizes of some specimens of creeping out can reach 30 centimeters; it is these specimens that are best selected for breeding stock.
For the worm, they take a wooden rack box 20 cm deep, which is covered with breathable material, burlap is especially practical in use. The substrate is prepared from ordinary soil mixed with finely chopped hay and leaves, which is subsequently moistened. Right on the surface of this mixture, 20-30 individuals of the breeding stock are placed and after two or three months they get the result in the form of a young shoot of creeping out. Growing worms in a summer cottage can be carried out directly in open ground by organizing worm houses in a dug trench filled with a substrate according to the technology presented above. Throughout the warm season of the year, the angler will be guaranteed the availability of bait.
How to grow dung and California worms for fishing

Californian red worms are bred at home in a slightly different way than the breeding method. This breed is thermophilic and subtly reacts to the acidity of the soil, which requires a more scrupulous approach to the preparation of the substrate, which, by the way, is also suitable for breeding dung worms. For queen cells, plastic boxes with drainage holes 30–40 cm high are taken and filled to the top with a substrate made according to the composition below, which includes:
- chopped straw;
- sawdust of deciduous trees;
- manure;
- chopped hay.
- ordinary land.
The components of the substrate are thoroughly mixed together and moistened. After pouring the mixtures into the boxes, they are thoroughly rammed, after which the mother material itself is placed directly in the top layer. It is advisable to constantly maintain the temperature at +20, +22 degrees in the box installation room. These are optimal conditions for feeding and reproduction of the Californian worm species. Dung beetles can be bred at temperatures four or five degrees lower. These species of worm give ready-made bait 40–60 days after the culture is settled in the substrate.
How to breed flour worms
In addition to Californian and earthworms, at home, you can successfully breed zoophobuses or flour worms, better known in the fishing environment. For their reproduction, you will need a deaf and low, 15–20 cm, plastic box with a mesh lid. The habitat and reproduction of the larva is prepared from flour, bran, small sawdust of deciduous trees and ground dried bread. Substrate elements are intensively mixed with each other and scattered along the bottom of the box with a thickness of 5–10 cm.
For breeding stock, a pet store buys a couple of dozen beetles, and in their absence the larva itself, although in this case the breeding process increases markedly in time for the output of finished products. The culture of the beetle is placed in the substrate, and the box is placed in a place where the temperature in the room does not fall below +25 degrees. After the expiration of two months, the beetles will begin to breed, one phase of the reproduction of which is a grown larva or a flour worm that the fisher needs for bait.
Containment Compliance

Worms for fishing at home during breeding need some kind of simple care, in particular, creating a microclimate and debugging a competent fattening process. To install a box with substrates, you will need to allocate a separate room, the temperature and humidity of which will be at constant values, without being subjected to sudden changes in values. The temperature range, based on the species being bred, will lie in the range of 18–25 degrees, and the humidity in the room should not fall below 50%.
In addition, special requirements are put forward for the acidity of the soil, which is in the pH6-pH7 parameters, which can be checked at home using litmus paper. Failure to comply with these parameters of the microclimate and the composition of substrates leads to a cessation of feeding, which causes a decrease or cessation of the process of reproduction and growth of individuals needed for bait. It is better to store the worms already selected for fishing separately from the mother liquor, in special boxes with ventilation holes and less voluminous boxes, adding moss as a bedding instead of a substrate. By placing such storage on the bottom shelf of the refrigerator, the nozzle can be stored without loss of condition and functions of its vital activity for up to one month.
How to feed worms for fishing at home

It is necessary to feed the worms at home with a certain regularity, but in such a way that the queen cells are constantly with feed of optimal volumes, so that it does not have time to turn sour. Strongly rotting food does not particularly affect the well-being of the growing bait, but it can seriously spoil the microclimate of the room, causing rather sharp unpleasant odors. Dung, as well as Californian worms and creeps, are fed with crushed plant organics, for which food waste is suitable, for example, leftover bread, vegetable and fruit trimmings, cereals and thick soups.
Waste is mixed with each other and placed in a layer of 1.5-2 cm in the upper part of the box, covering the nutrient mixture with a substrate previously removed to the same volume. To determine when to feed the worms next, you need to observe the amount of food left over every five days. The feed volume completely converted into humus indicates the beginning of a new feed bookmark. Unlike these types of worms, flour worms are fed every two days, giving them small portions of bran and oatmeal flakes mixed with grated carrots, beets or trimmings of other vegetables.
How often to water worms
Soil moisture has one of the leading roles in the success of breeding packing material. A decrease in this indicator causes individuals to sink deep into the ground, completely ceasing to feed. The substrate is moistened with an ordinary garden watering can, using water at room temperature for irrigation, which is previously allowed to settle in the same room for three days.
Important! Determining the optimal moisture content of the substrate can be done in a fairly simple way. To do this, the soil is squeezed in the hand, and the result of a positive moisture factor is the formation of a dense and non-friable earthen clod.
When the soil is waterlogged, drainage holes arranged in the bottom of the boxes will help correct the situation, and excessive evaporation of moisture will be prevented by covering a freshly watered substrate with propagating material with a piece of corrugated cardboard or a special cover with fine perforations over its entire area. The boxes are checked for moisture every week, adding water to the soil as needed.
Nowadays, many, looking for an affordable and profitable business for themselves, stop at the option of breeding earthworms at home. To help such aspiring entrepreneurs, this article has been written, which describes in detail how to breed earthworms.
Many people know that the soil is made fertile by the most common worms that come to the surface after the rain has passed. In particular, it is they who are engaged in the processing of organic residues into humus.
In the West, the worm business has been appreciated for a long time and even new breeds have been bred that breed and work much more productively than their own relatives. But at the same time, they are in some aspects a little more demanding on the conditions.
Which ones to choose
Still, start breeding worms, i.e. it is better to gain experience not on overseas thoroughbreds, on ordinary, our rain, for which it is much easier to create conditions. They are very well accustomed to moving to new conditions and begin to multiply rapidly.
To start a business on breeding earthworms, you can not buy them, but collect them yourself.
It's easy to do. It is not necessary to dig acres with a shovel to collect the required amount. It is enough just to dig a small hole and pour rotted leaves or manure into it. Pour it on top and cover with boards or a regular cardboard sheet. Do not worry, after a few days the first worms will begin to appear in it. It should be noted that it is necessary to relocate them to new conditions with the soil in which they were previously located.

It is estimated that to start breeding per square meter of nursery, you need about a kilogram of earthworm, which is about a thousand copies.
Where is the best place to breed?
There are no special conditions for choosing a room for organizing a farm, the main thing is that its area should be such that it is convenient and comfortable for you to work. It is desirable that the room is heated. You need to know that if the temperature drops to +4 degrees, then your wards will first decrease in activity, and then they will simply fall asleep. As a result, your business will completely stop. If you are going to breed earthworms all year round, then the area of \u200b\u200bthe premises should be larger, as the population will constantly grow.
Earthworm is bred in boxes. You can buy them, or you can bring them down yourself. This option, although more troublesome, has the advantage that you can make boxes in sizes that best suit your space.
Making our own boxes
from wood
A similar box is made of boards (optimum thickness) 2.5 centimeters. Practice has established that the optimal dimensions are as follows:
- width 1 meter;
- length 2 meters;
- height 0.5 meters.
We drill holes in the bottom, install the box on bricks or some bars. It must be installed under a slight slope. This is necessary so that the accumulated liquid (of great value) does not stagnate, but can drain. Corners need to be beaten with tin. From above, the boxes must be covered with a lid, a plywood, cardboard sheet is suitable, but you can also put it together from boards.
plastic box
You can move on to breeding in such boxes, at the next stage of breeding, when you gain experience. We do not recommend starting with them because they are not cheap, and if you, having tried yourself in this business, decide that this is not yours, you will be very sorry for the money spent. As in wooden boxes, plastic ones should have ventilation holes and should be installed at an angle.

plastic box
non-working refrigerator
Many, even experienced breeders, practice breeding worms in old refrigerators no longer needed by anyone. You need to put it upside down. We remove shelves and containers immediately, but do not throw them away, they may later come in handy. We drill ventilation holes in the walls and the door. We put on bricks or bars under a small slope.
cardboard box
Breeding and growing earthworms in cardboard boxes can be called the best option for those farmers who are just starting out. The minimum dimensions of such a dwelling for worms should be 40x30 centimeters. The main advantage of cardboard is that, as a rule, it is made from natural materials and passes air well. Worms often feed on it. The disadvantages include the fact that this material can not boast of durability. When you see that the box is becoming unusable, do something simple, namely, place it in a new one, and the old one will be eaten by worms.
Specialized vermicomposters
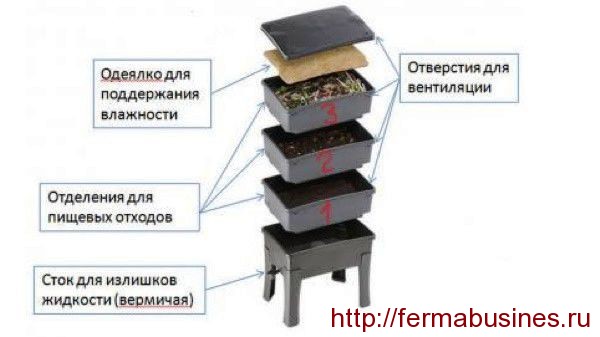
Of course, this is the best option and is most adapted for breeding and growing worms, both at home and in a large enterprise. The disadvantage is that such worm houses are quite expensive and therefore can only be recommended to farmers with experience.
This video explains how a factory made vermicomposter works.
How to fill a nursery
In the box in which you plan to breed the worm, you need to pour humus, which can be mixed with paper or cardboard for nutrition. Next, the resulting soil must be thoroughly moistened.
Attention! In no case do not immediately populate the worms in fresh soil. Wait a few days for the ammonia to evaporate from it.
You need to populate at the rate of one kilogram of worm per square meter of soil. Before settling, you need to dig a small hole in the ground and place the worms there along with the old soil. Next, this place must be leveled and moistened. We cover the box with a cardboard lid.
For several days, worms should not be disturbed at all. They must get used to the new conditions and get used to the new ground and confined space.
If the worms have spread all over the box, then consider that the acclimatization went well and you can feed them.
Water the soil regularly, but in moderation. Too wet ground is just as dangerous as too dry.
In the place of breeding worms, it should be quiet, any vibrations are also unacceptable.
What to feed
You can feed the worms with various waste that is in any kitchen. At first, you will have enough waste from your table. Later, you will have to think about increasing the food supply. Perhaps you can arrange for the leftovers to be given to you from some canteen or cafe. In no case should dog or cat droppings get into boxes with worms.
Prepared food is laid out in a ten-centimeter layer, about once a week. Farmers have come up with an easy way to tell when it's time to feed the worms. After the food is laid out, paper or cardboard pieces are placed on top. If you saw that the worms began to feed on them, then this means that the time has come to feed your wards.

Reproduction of worms
The worms become sexually mature by about three months and begin laying cocoons, which mature for several weeks and about two dozen small worms come out of it. Which, in turn, after a few months, they themselves are ready to give offspring.
This is interesting! Within six months, the number of worms can increase by more than fifty times!
Overpopulation should not be allowed, and if there are more than fifty worms in one liter of soil, then you should think about their resettlement or sale.
Overpopulation negatively affects not only the well-being of worms, but also completely stops their reproduction.
Worms are sorted every four to six months. To do this, the top layer of soil is taken from the nursery and moved either to a separate container, or simply shifted to the side. Then the middle layer is removed, in which the worms are located, and then the humus. Next, the worms need to be sorted. We select the large ones for sale, and send the small ones back. Also, some of the adult worms can be left or moved to new breeding boxes.
Implementation
A novice farmer may be a little confused, not knowing where to sell the worms. We will offer several options.
- Selling directly to anglers. This option is good because you can sell the product at the highest price working directly with the end user.
- zoological shops. Quite a good option, because. worms are fed not only to aquarium fish, but also to birds or even some animals.
- Fish farms. If you can establish contacts with such people, then you can not worry, large sales volumes are guaranteed to you.
- Implementation of humus. This is a very valuable product that significantly increases the yield of various crops. Gardeners or farmers can become buyers.
- Vermichay is an exceptionally valuable product, the use of which can increase the yield by more than 2 times! Buyers are not only summer residents or farmers, but also various greenhouses or those who keep their own greenhouses.
Profitability of the worm business
If you organized everything correctly, then even a very small farm is capable of producing about twenty thousand worms and about one ton of biohumus. And this is just from two square meters of the nursery. Plus, profits from the sale of vermicai and biohumus. As you can see, the benefits are more than obvious!
Breeding worms at home, do not forget about their natural habits. With the correct organization of the conditions for the existence of worms, soon the soil in the box will be divided into three layers. The first is the layer in which your wards feed, the second is the place where they are most of the time. And the third, the lowest, humus and vermicai will accumulate in it.
This video shows how to feed worms at home.
Below we will tell you in detail how to breed worms, how to care for them and earn a good income.
To be able to work with large wholesale buyers, your business must be formalized. The most common options are IP and LLC.
In our case, the simplest is IP, registration will take about a month and require a minimum cash investment (70-90 dollars).
Worm breeding technology
It is necessary to organize the cultivation of worms in several stages:
- Preparation of the premises in which your "wards" will live;
- Acquisition of livestock for rearing;
- Preparation of "housing" and settlement in it of the purchased "family";
- Caring for "pets";
- reproduction;
- Collection of biohumus, vermichaya, sale of adult worms.
Then another layer of nutrient bedding is added and the whole process starts all over again.
Is it worth buying worms
You can buy invertebrates at any worm farm, which is not difficult to find via the Internet. The average cost of a thousand heads is 22-40 dollars, depending on the chosen type and volume of purchase. For a business to be profitable, you need to start with at least 2-3 thousand worms.
If you are going to breed ordinary rain, you can not even spend money on a purchase and take them in the yard of your own house. First you need to dig a not very deep hole and fill it with manure or moistened rotting leaves. Then the "bait" is closed with a board or cardboard. In a week, the first invertebrates will start in this place. They must be transferred to the box along with the soil in which they lived.
The best types of worms
Each type is good in its own way. By providing proper climatic conditions and good nutrition for your wards, you can breed several species at once.
Earthworm
He has the best adaptation: both to climate change and to life on a closed farm. But his activity, in comparison with other "breeds", is somewhat lower. It gives less offspring and forms biohumus more slowly than its "brothers".
California red
One of the most popular species due to its mobility and rapid reproduction. California red gives excellent vermicompost and is not very picky about food. But it is sensitive to temperature. If it drops below +10 degrees, you may lose livestock.
worm prospector
An excellent choice for beginners. This species is active, quickly processes food and substrate. Prospector feels good at a temperature of +9…+28 degrees.
Room for breeding worms
For a vermifarm, you need a minimum of space, literally a few square meters. You can equip it in a garage, cellar, attic or in an outbuilding.
Even a dacha can become a springboard for growing invertebrates. In this case, it is necessary to comply with some requirements:
- So that in winter the business does not “freeze”, you need to take care of heating in advance;
- The room should not be too humid, but not dry;
- The farm should be located in a quiet place, away from the road, noise, vibrations.
housing for worms
For comfortable keeping of pets, it is best to build special boxes. They can be made on your own from wooden or plastic containers.. The wall thickness of the wooden box must be at least 25 mm. The standard parameters of the nursery are 1x2x0.5 meters. From the bottom of the box, you need to make holes to collect humus and tea, put a tray. From above, the nursery is covered with a lid with holes.
To save space, boxes are installed on racks that can be made from metal profiles.
There are several more ways to build a home for worms with your own hands:
- From an old refrigerator. It is necessary to remove the internal contents from it, make ventilation holes in the walls and the door, install the refrigerator with the door up and at a slight slope.
- From a cardboard box. The simplest and cheapest option, plus in the box, due to the natural thin material, there is very good air circulation and enough oxygen for invertebrates. As soon as the "creeping workers" began to eat pieces of damp cardboard, the box must be replaced.
- From a plastic container. Any plastic container can become a “house”: from a flower pot to a basin. The main thing is not to forget about ventilation and collection of humus and vermicai.
If desired, you can purchase a fully equipped vermicomposter, its cost is about $ 200.
Conditions for growing worms
Pets should be settled based on the norm of 1000-1500 individuals per cubic meter. This will ensure optimal nutrition and processing of the substrate. There are certain requirements for the maintenance and care of these creatures.
The soil
The substrate should consist of three layers. The top one is the most nutritious, that is, the soil must be enriched with organic matter. In the middle layer, invertebrates spend most of their time.
And in the lower one accumulate worm tea and biohumus. Worms will breed well only in high-quality soil. How to prepare it?
- Choose a container for maintenance and fill it with humus by half, add a little shredded newspapers. The mixture needs to be moistened a little, the total humidity level should be no more than 80%;
- A few days later, depressions are made in the soil, where individuals are settled along with part of the soil in which they lived before transplantation;
- The soil is leveled, moistened, the dwelling is covered with cardboard and left for a couple of days;
- When the "residents" adapt, you can add food to the soil.
There is a great way to check the quality of the substrate. Place 50-100 individuals in a small container with prepared soil and watch them during the day. If they are alive and remain mobile, then the acidity and moisture of the soil suits them. The required level of acidity is 6.5-7.5 pH. Tops, straw, sawdust increase the level of acidity. Lower - limestone, chalk, ground eggshell.
Temperature for keeping worms
Best of all, these creatures feel at a temperature +15…+25 degrees. Critical indicators: +4 degrees (individuals will hibernate or die), at + 36C and above, invertebrates also die.
At the right temperature, your wards will multiply well and produce vermicompost.
Feeding the worms
Feeding should be done once a week. Food is placed on the ground with a thickness of 10 centimeters. Lay a piece of newspaper or toilet paper on top of the food. Once your wards have started eating it, you can re-feed them and lay down a new layer of compost.
These creatures feed on decaying organic debris.. The diet of worms must be formed from the following products:
- Plant residues: skins, vegetables (boiled), potato peelings, etc.;
- Bakery;
- ground eggshell;
- Food waste;
- Water with the remains of kefir or sour cream;
- tea leaves;
- Straw, leaves, grass;
- Cow and horse manure, chicken droppings. It is important that the manure is of medium freshness, containing a lot of nutrients. Very fresh manure will increase the temperature of the soil, and the livestock will die.
Do not under any circumstances use meat waste, citrus fruit residues, peels from fruits and vegetables.
Reproduction of worms
Proper maintenance of worms implies the creation of favorable conditions for their reproduction. They begin to give offspring at the age of two to three months.
For 4 months, cocoons are formed, ripening in a few weeks. One cocoon is 15-20 new worms. If we roughly calculate the dynamics of reproduction, it turns out that in six months the number of invertebrates in one box will increase 50 times.
It is very important to regularly seat individuals in new containers.. With a high population density, they simply stop multiplying.
Worm breeding equipment
Equipment needed for growing:
- boxes or other containers;
- Shelving;
- Sieve;
- Wheelbarrow, shovel and pitchfork, bucket;
- Scales, thermometer, a device for measuring soil temperature and its acidity.
Sales of worms
Your farm on several points at once: from the sale of live individuals, the sale of biohumus and vermicai. "Young growth" and biohumus for sale are collected every month and a half. To whom to sell?
- Live individuals to pet stores for animal feed, fish farms, for breeding;
- Biohumus and vermichay for farms for soil fertilization and plant nutrition.
You can create your own website and do retail on your own.
Costs and profits
If you equip grow containers yourself, then the main costs will be inventory (no more than $ 100) and the purchase of three thousand individuals ($ 80-100) to start.
Materials for "houses", food, soil will require no more than $ 50. Cooking food does not require special expenses. In total, together with registration, the amount of investments will be about 350 dollars.
For 3 thousand individuals, two or three cubic meters of soil are needed. Every month and a half they will give about 30 thousand worms for sale (900 dollars) and approximately 1000-1500 kg of biohumus (700-800 dollars). You can earn about $600 more by selling vermicai. Monthly income will be 1500-2000 $.
Growing worms is quite simple and very! These creatures live a long time, are largely unpretentious, and the cost of arranging a worm farm is minimal.
Today, almost everyone is trying to start their own business. However, not everyone succeeds. Often, competitors do not allow to break into a large market, or the occupation is not to their liking. Have you considered breeding worms at home as a business? No? Then this material is for you.
Which worms are better to choose
First of all, remember that breeding such animals does not require selection by breed. For starters, you can use the local variety. For example, dung worms, which are easy to breed, adapt well to life in nurseries. Such individuals begin to multiply much faster. From this follows the first conclusion: it is better to collect worms on your own. The simplest of them - rain. Breeding worms as a business in this situation will not require large expenses.
Where to get worms
If you decide to start breeding worms as a business, then you should collect them. To do this, dig a shallow hole and place some rotting leaves or manure in it. Be sure to moisturize the filler. The main thing - do not overdo it. After that, just cover the hole with a board or a layer of cardboard. A week later, the first tenants will appear in your "house". Transfer the individuals to the box along with the soil in which they lived. In order for worm breeding as a business to generate income, at least a kilogram of invertebrates is required per square meter. This is about 1000 individuals.

Choose a room
When you have collected the worms, you need to consider the place where they will live. Their breeding does not require a specially equipped room. It is important that its area matches your desires. Of course, it is best to breed California worms (or any other) in a heated building. For these purposes, a garage or cellar is perfect. If you are going to grow your pets in an ordinary barn, then get ready for the fact that a decrease in air temperature to 4 ° C will affect the activity of the worms. They will just go into hibernation. In this case, you will have to forget about breeding worms in the winter. If you want to do this throughout the year, then you should take care of heating and, of course, a large farm. After all, the number of individuals will grow. For example, on large farms where breeding is considered as a business, their number can reach 100,000 or more.
Special nursery boxes
Breeding the California worm as a business does not bring much trouble. The main thing is to create optimal conditions for its reproduction. It is best to keep worms in special nursery boxes. You can make them yourself. At the same time, remember that everyone needs a box of a certain size. In such nurseries, the most comfortable conditions for invertebrates are created. Boxes can be made from plastic or wood.

Wood nursery
To make it, you will need boards. Their thickness should be 25 millimeters. If you are breeding an earthworm, then it is better for you to make a nursery box that meets the following parameters: 100X20X50 centimeters. When the box is ready, turn it over and drill holes in the bottom. After that, place the box on the bars so that it stands at a slight slope. This is necessary so that the valuable liquid ("worm tea" - the product of the vital activity of these animals) drains neatly. Cover all seams and corners with tin tape. This will prevent the penetration of rodents into the nursery. Don't forget the roof. You can simply make it from boards. If not, then you can use a sheet of plywood. Be sure to make holes in the roof. They are necessary for normal air circulation.
plastic container
If you have achieved positive results, and breeding California worms as a business brings you income, then you can purchase special containers made of plastic. You should not buy such products if you are just starting out. Since such acquisitions are quite expensive. Agree, if you don’t like breeding dendroben worms or ordinary rain worms, then such a purchase will simply be in vain for you, and you will throw your money away.
If you still purchased such nursery boxes, then first make holes in them. After all, these containers are completely airtight. Make holes in the roof and on the sides. In addition, there should be a hole for draining valuable liquid.

old refrigerator
An old refrigerator can be used as a hotbed. To do this, install it with the door up and remove all contents. You won't need it. Make holes in the walls of the refrigerator and on the door. Set it on the bars so that it is at an angle. Don't forget to make a hole in the bottom for the liquid to drain.
Cardboard boxes
If you have just started this business, and earthworm breeding is something new for you, then you can use cardboard boxes as nurseries. Their dimensions should be approximately 40 by 30 centimeters or more. Cardboard is an environmentally friendly material that passes air well and is often used by worms as food. The only disadvantage of such a hotbed is a short service life. If the box is damp and starting to fall apart, then you can put it in another.

Let's discover the secrets of the worm business
Recently, many have been attracted to the breeding of worms. As a business, this business is quite profitable if you approach it correctly. In order not to burn out, you should know some simple secrets. First of all, it is necessary to take into account the peculiarities of the natural habitat of worms, in what soil they live, what they eat. Their "house" can be conditionally divided into three floors. At the top, worms feed on the organic remains of animals and plants. In the lower tier of habitat, the product of their vital activity accumulates, in other words - humus, as well as a liquid, which many call "worm tea". Between these "floors" your pets will feel most comfortable and will mostly stay there. It is important to properly fill the nursery. Then the worms will multiply well and increase your profit.
How to properly fill a nursery
If we consider breeding worms as a business, then first of all you should carefully study all the nuances of such an activity. Many beginner breeders make many mistakes, the first of which is filling the seedbeds incorrectly. How to do it competently?

Half fill the prepared container with humus. If desired, you can mix it with shredded cardboard or pieces of newspaper. Be sure to moisten the finished mixture. However, do so with caution. If, when the lump is compressed, free moisture does not flow out of it, then you did everything right. Do not immediately populate the worms. The compost filler will release a substance such as ammonia for the first few days. When it completely evaporates, you can start settling the nursery.
Make a hole in the prepared filler and put part of the soil with worms into it. Gently level this place, moisten and cover with a piece of cardboard. For several days, do not disturb the residents. They must adapt to a new habitat.
If the worms have spread throughout the nursery, this is the first sign that the acclimatization was successful. Then you can feed. Remember, the place where worms breed should be calm and quiet. Therefore, install the nursery where there are no strong vibrations and noise.
Soil moistening
You need to moisten the soil of the nursery regularly. However, you should not overdo it. Remember, breathe with your skin. This explains the fact that they crawl out to the surface of the soil during rain. They just need it to saturate their body with oxygen. If the soil is too wet, your pets will simply die.
What and how to feed?
Business does not require special expenses. This also applies to their food. You need to create a compost heap. For these purposes, manure, grass, leaves, tea leaves, coffee grounds, egg shells, vegetable and fruit peelings are perfect. Do not throw into the compost heap the waste products of cats and dogs, manure if the animals were treated for worms, peeling onions, garlic, citrus peels, fats, oils, dairy products, meat and fish waste.
When the food is ready, lay it in a small layer - 10 centimeters thick. You need to feed the worms once every 7 days. To determine the satiety level of pets, you can use a piece of newspaper or regular toilet paper. Lay it on top of the food and moisten it a little. If the worms have started to eat this paper, then it's time to feed them and lay a new layer of compost.

How worms reproduce
Earthworms can start producing offspring at the age of 2-3 months. For 4 months they lay cocoons. They ripen within a few weeks. No more than 20 individuals emerge from one such cocoon, which, after 2 months, already begin to actively breed. An exception is the prospector worm, whose breeding is a more complicated process. If you count, then in about six months the number of pets in one box will increase 50 times. Remember, if there are 50 adults per liter of soil, then urgently you need to either sell them or plant them in new nurseries. Otherwise, their reproduction will stop naturally.
How to make a profit
Sorting worms every 5 months. To do this, carefully remove the top layer of soil and remove the soil where your pets live from the nursery. After that, you can remove the layer of humus. Send small worms back to the nursery, and adults - either to further expand your enterprise, or for sale.
You can sell the goods in the form of bait for fishing, in a pet store as feed. Such a product is in demand by fish farms. You can sell not only invertebrates, but also worm tea and humus. The latest products are in demand among summer residents.
To collect worm tea, you made a special hole in the bottom of the nursery and a drain. This product is very valuable as an environmentally friendly and natural fertilizer. As you can see, there are a lot of opportunities to make money on breeding worms. The main thing is to know the right approach.


Popular
- Jewelry casting Centrifugal jewelry casting
- Bicycle sales business: how to open and manage Actual ideas for making money
- Shawarma equipment: skewer and grill, a must in the kitchen, how to cook and sell Benefits of opening a shawarma selling point
- Green onion growing business using hydroponics: profit all year round!
- Hugo Boss - Brand History How Hugo Boss is translated
- FBK published an investigation into the elite real estate of Prime Minister Dmitry Medvedev
- Mini home business equipment
- how to make a million dollars in a month how to make a million
- Business on a cnc machine for wood What can be sold made by a cnc machine
- How to promote a beauty salon from scratch: step by step instructions Do not forget about "word of mouth"